| Table of Contents | ||||||||||
|---|---|---|---|---|---|---|---|---|---|---|
|
...
When your Club makes the decision to use PayCloud and Autopay, Clubessential will assist in basic setup, including converting the payment token for use. Many settings, however, are easy to use, and enable you to define/manage the process.
Video Overview
| Widget Connector | ||||||
|---|---|---|---|---|---|---|
|
...
Once the token has been converted, to get started with Auto Pay, you must first enable or Turn On Auto Pay, for your club. To do so, click on System, and Club Settings. From here, select the Auto Pay tab across the top. Turn on either or both Auto Pay options (Auto Pay - ACH or Auto Pay - Credit Cards) depending on your Club’s requirements.
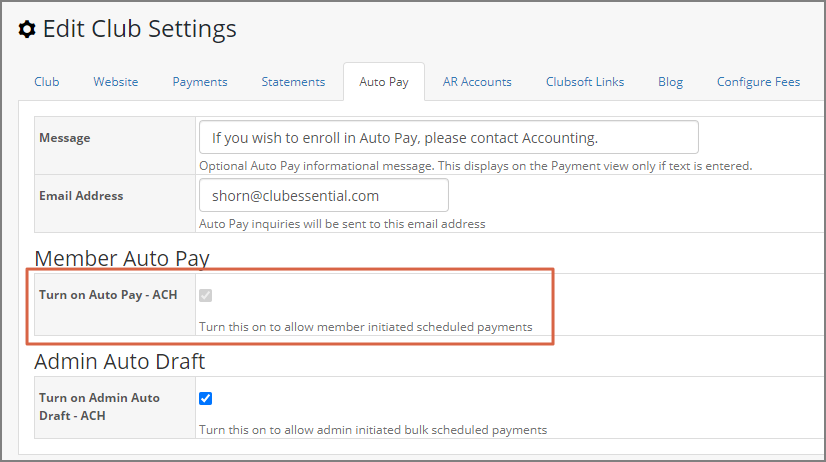
Please Note: These features are only available to clubs with CE Payments, Elavon (ETS) or PaySimple. The ability to turn on Auto Payments for other processors is not a possibility at this time.
Allow Partial Payments
Next, determine whether your Club will allow partial payments or whether your Club will require the full statement balance to be paid. To allow partial payments, check the Allow Partial Payments box.
...
The Website tab contains the Landing page that can be set for Members when they connect to PayCloud. Initially this is typically set to display Statements. Oftentimes, however, Clubs accepting online payments may choose to change this to Make a Payment.

Payment Notifications
...
Please Note: Password must be longer than six digits, needs one uppercase character, and one numeric character.
Reports
Payment History
This report contains the payments made by Members using the PayCloud system. The report can easily be filtered (using the predefined filters) and/or customized (using the date range feature) to quickly display the data desired. Easily view payments from Today, the Past Week, Past Month. Also, for Clubs with Autopay enabled, easily view the payments based on status Successful or Unsuccessful.
...
- Navigate back to the Clubessential Cloud Endpoint Editor and click on the Sync Tab.
- Use the Magnifying glass to open the Member Lookup Window.
- Use the Search field to find the member.
- Double Click the member in the Grid.
- From the drop down, select which item to sync (Statements, Credit Books, Gift Cards, and Vouchers).
- Click Sync.
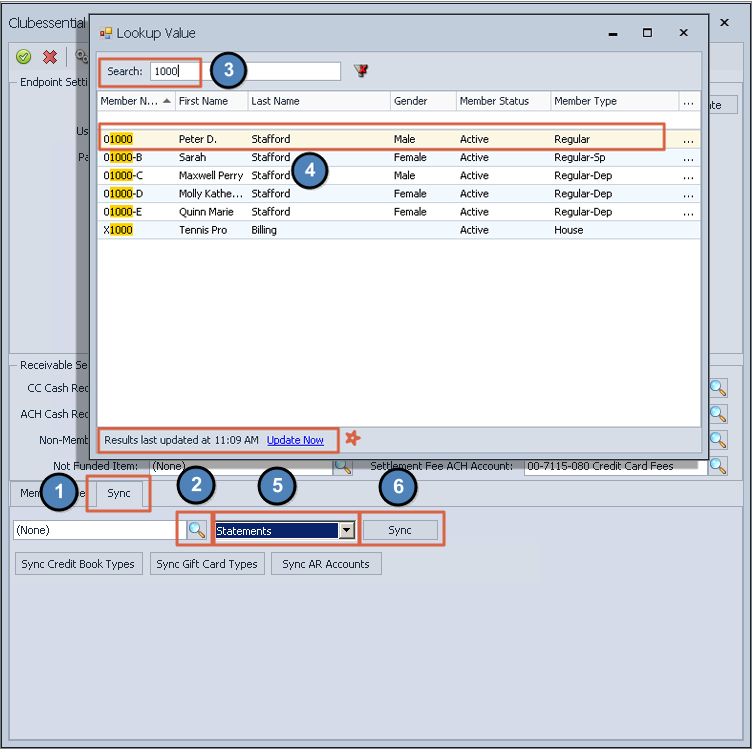
- A confirmation window will appear, "The sync has completed successfully. Check the Log for details." Click OK to close and return to the editor.

...
A: Use the blackout feature to prevent Members from making/scheduling payments on a certain day. Click here for more info.
Q: How do I change the landing page my Members see when they first log-in to Paycloud?
A: Go to System, Club Settings, Website Tab. Click here for more info.
Q: How do I batch my PayCloud payments and post them?
A: PayCloud automatically batches and sends payment batches to the Clubessential Office system. To post, go to Membership, Approve Payment Batches, select batch to post, and click post. For more info, click here.