...
| Table of Contents | ||||||||
|---|---|---|---|---|---|---|---|---|
|
Overview
NACHA (National Automated Clearing House Association) payments offer a very low-cost, effective solution to receiving Member payments electronically. Office now has the capabilities of accepting ACH payments directly from your Club’s Members, without the need for an intermediary processor, such as ETS, or Open Edge. Use Case In addition to (or in lieu of) accepting Member Credit Card Payments, which oftentimes have high processing fees that impact the bottom line, Management wanted to provide Members with another option to pay their monthly statement electronically, via ACH. With significantly lower fees than credit card processors charge, Clubs are now able to utilize their primary bank for processing ACH’s directly, and provide Members with this additional payment convenience In previous versions of the Office software, it was difficult to troubleshoot the necessary rights needed to see specific records of a particular module. For instance, if an employee was unable to see a certain GL account, in previous versions, the user would first have to find an employee with rights to the GL account, determine what department(s) the GL account was linked to, and then proceed to find an Administrator who could add the necessary departmental rights.
In versions 5.9 and above, an enhancement has been added to help simplify this process. Specifically, employees can now select the Active button on a specific module’s Grid to pull up All Records. Any instance of the module an employee does not have rights too, will have a grayed-out italicized font. Use Case An employee just changed rolls, and is now unable to view a G/L account that he needs to view. |
Content
|
|---|
NACHA Setup
To ensure ACH is set up and working properly, there are three main areas that need to be addressed within Office, and one that needs to be addressed directly with the Bank your Club chooses for processing.
Member - Bank Account(s)
General Ledger - Bank Account(s)
Member Payments - ACH File Generation
Upload ACH File to Primary Bank (contact your Banking institution for instructions)
Member - Bank Account(s)
To effectively receive an ACH payment from a Member, the Member’s profile must first contain the appropriate banking information. Within the Membership Module, Manage Members section, select a Member, and then navigate to the Bank Accounts tab within the Financial Information section of the Member’s profile. Click New to add an account, complete the tab for the Member’s account they wish to use for ACH payment purposes, and click Save and Close.
The Member must have banking information set up to make an ACH payment.
General Ledger - Bank Account(s)
In addition to having a Member’s banking information, the Club’s Cash Account that will be receiving the payments from the Members must also be set up properly. Within the General Ledger top menu, select Accounts, and then double-click on the appropriate cash account that will be receiving the ACH payment.
Navigate to the Banking tab, and populate the Bank Name and Routing Number fields.
These fields must be populated to issue the proper ACH file.
Member Payments - NACHA File Generation
Once the proper Member(s) and Club account have been set up properly in the system, proceed to the Payment Wizard to generate the appropriate NACHA file for the bank. Navigate to Membership, Member Payments, and click Quick Add to initiate a ACH payment batch.
Complete the Payment Wizard as normal, with the following highlighted exceptions. Ensure Bank ACH is chosen, and Export NACHA File has been selected. Once Export NACHA File has been selected, the NACHA Settings box will open. Contact your bank to receive the proper information to populate the NACHA settings fields. These will be unique to your bank.
If NACHA Settings are not populated, error message will appear, and you will not be allowed to proceed.
Once populated, proceed to next screen. When populating information in this screen, ensure to select the Member’s account that is to be utilized for ACH payments (previously set up in Member’s profile) in the Payment field. Once complete, click Save NACHA File.
Name the NACHA file (end name with .txt) and save file to location of your choice.
The NACHA file is now available for uploading to the Bank.
Complete wizard and posting as normal.
When reviewing General Ledger History, note that ACH file shows successful file generation.
Best Practices
Ensure set up of Member Bank Account and Club G/L Cash Account are proper to reduce/eliminate processing delays.
FAQs
Q. What are the major benefits of taking ACH payments?
A. It is a very low-cost solution that allows Members the ease of making electronic payments, and Clubs the ease of accepting electronic payments. It also gives Clubs the power to work with the Bank of their choice directly without the need for an intermediary processor.
Downloadable Guide
...
Troubleshooting Examples
In this section we will demonstrate a few examples of the new feature. In each situation, once the correct rights are determined, the user will need to contact a Club Administrator to provide the correct access. For your Club's benefit, Clubessential Support is not permitted to provide any security rights.
Troubleshooting G/L Account Access (Department Related Permissions)
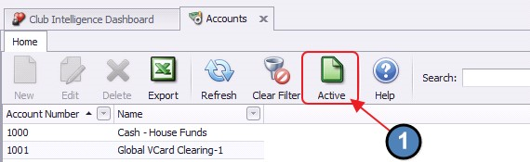
Within General Ledger, Accounts, click the Active button to view all records.
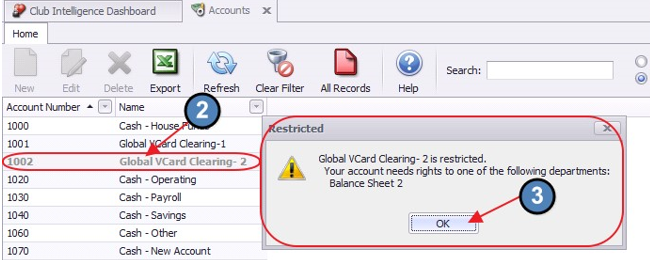
Double-click on grayed-out record and a prompt will display explaining permission levels needed to access. Click OK to proceed.
Troubleshooting Item Access (Area Related Permissions)
Within Items, Manage Items, click the Active button to view all records.

Double-click on grayed-out record and a prompt will display explaining permission levels needed to access. Click OK to proceed.

Downloadable Guide
Troubleshooting Area and Departmental Rights - Guide