...
| Table of Contents | ||||||||||
|---|---|---|---|---|---|---|---|---|---|---|
|
Overview
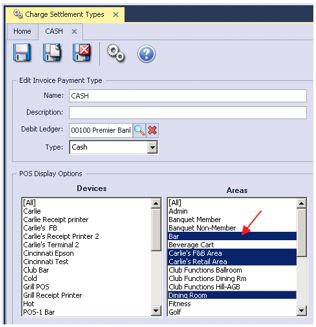
System generated Gift Cards can be issued and redeemed using the Office System. In addition, the Office system can populate various Gift Card Types depending on the Club’s operations. In this manual, we will discuss how to set up, issue, redeem, and handle expiration of Gift Cards. The Office System can be utilized for manually entered paper/ plastic Gift Cards, or plastic Gift Cards with a mag stripe. Use Case Charge Settlement Types are the settlement buttons in the Close Ticket section of the POS.
They are used to tell the system what settlement buttons should display on what terminals, and where the buttons should appear on the settlement screen. They are also responsible for storing the debit account when posting payments to the General Ledger. Use Case
A Club has decided to start accepting checks, and therefore, will need to set up a new Charge Settlement Type, and configure its corresponding Check Settlement Type button in the POS. |
Content
|
|---|
...
1) Navigate to System across the top toolbar and select System Settings.

2) Select Point of Sale on the left pane and navigate to the Gift Card Settings section.
...
- Enter an Auto Number Seed - This is the first Gift Card Number to assign.


Set Up Gift Cards
...
1) Navigate to Membership across the top toolbar and select Gift Card Types.


2) The Gift Card Types Grid will launch.


3) Perform either of the following to launch the Gift Card Type setup screen:
- Click the New icon on the toolbar.


- Right-click anywhere on the Gift Card Types Grid and select New.


4) The Gift Card Type Setup screen will launch.


5) Please enter all appropriate information listed below:
- Enter the Name of the Gift Card Type.
- Select the POS Item created in the previous section.
- Enter an Expiration Value.
- Select the Areas the Gift Cards will be redeemable.


Note: To remove an Area, highlight the Area in question from the Selected Areas list and select Remove Selected.

6) Select Save & Close.


Once the Gift Card Type has been added, you can issue the Gift Cards.
...
1) In the Member Charge Wizard enter the Member (Member purchasing the Gift Card), Area, the Gift Card Item (POS Item selected in the Gift Card Type), QTY (Number of Gift Cards to be issued), and the Price (Amount to be issued to the Gift Card). Enter the next line as applicable. Select Finish when each line item has been entered.


2) Once Finish is selected, an additional option at the bottom of the screen labeled Gift Card Entry will populate.


3) Depending on your setup, the system will auto-assign the Track and Gift Card Number or you can enter the first number and the system will assign the next sequential numbers. If using plastic Gift Cards with a mag stripe, toggle the mouse in the Track field and swipe the card. The code that is on the mag stripe will then populate into the Track field associating that card with the Gift Card in the Clubessential database. Repeat the same process to populate the code on the mag stripe into the Card Number field.


- If Issued To is checked, it will let you manually enter a guest or event description.
...
4) Continue entering all Gift Cards. When the final Gift Card is entered, select Finish.


5) Post the Batch.


Auto-Finish
If you are entering multiple Gift Cards and they will be issued to the same event (i.e. - Golf Tournament Prize) or Member, the Auto-Finish feature may be utilized. Please note that if using plastic Gift Cards with a mag stripe, the Auto-Finish feature cannot be utilized.
1) Once all information has been entered on the first Gift Card select Auto-Finish. This will automatically assign a number to the remaining Gift Cards with the identical information entered.


2) Select Yes on the confirmation prompt.
3) Post the Batch as normal.
...
1) In the POS Order Screen select the Gift Card Item. Because the Gift Card Item is flagged as Ask for Price, the system will prompt the user to enter a price for the Gift Card (this will be the amount issued to the Gift Card).
2) If more than one Gift Card will be issued at the same amount, select the Change QTY button and apply the appropriate quantity. Continue with all the Gift Card denominations; in this example 6 Gift Cards at 3 different amounts (25, 50, and 100) were issued.
Settle the ticket using Close Ticket or one of the Quick settlement options; once the ticket is settled, this will bring up the New Gift Card box.
Note: If the New Gift Card Box option does not appear make sure you have the proper Item selected in the Gift Card Type.
3) Depending on your setup, the system will auto assign the Track and Gift Card Number or you can enter the first number and the system will assign the next sequential numbers. If using plastic Gift Cards with a mag stripe, toggle the mouse in the Track field and swipe the card. The code that is on the mag stripe will then populate into the Track field associating that card with the Gift Card in the Clubessential database. Repeat the same process to populate the code on the mag stripe into the Card Number field.
...
Lastly, select OK to move to the next Gift Card.
Auto-Finish
...
1) Once all information has been entered on the first Gift Card select Auto-Finish. This will automatically assign a number to the remaining Gift Cards with the identical information entered.
Reassign Gift Cards
1) From the main POS screen, click or touch the button Gift Card Balance.
2) Use the Assigned To, Card Number, or Description field to narrow down your search. Highlight the Gift Card to edit and click Details.
3) A box with the Gift Card details will display; if you want to reassign the Gift Card to a Member, click or touch Change Member and search for the member. If this is not a member, click or touch Non Member and manually enter the name. Click or touch OK when finished.
Note: The ability to reassign is controlled by the Employee Security Role, Edit Gift Card Name after Issuance.
...
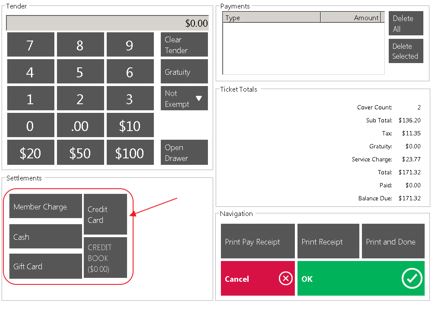
2) Select the item(s) and choose Close Ticket when ready to complete the transaction.
3) Select the Gift Card Settlement Type (If one does not exist please see our Creating a POS Settlement Button manual for more information).
4) The Gift Card Entry screen will load.
...
- If using manually entered paper/plastic Gift Cards, use the Assigned To, Card Number, or Description field to narrow down your search. Highlight the Gift Card and select OK.
5) Enter the amount of the Gift Card to apply toward the ticket. The system will automatically enter the maximum amount of the Gift Card that can be redeemed on the ticket. In this example, the ticket has a total of $36.42 and we selected a $100 Gift Card. By default, the system will enter $36.42 as the amount to apply toward the ticket because the Gift Card has a balance larger than the ticket total. Click OK when finished.
6) The Gift Card settlement will now show in the Payment field. Select OK/ Print and Done to close the ticket.
Multi-Settlement
...
1) Select the Gift Card Settlement Type, highlight or swipe the $25.00 Gift Card, and click OK.
2) The system will then by default, apply the maximum amount redeemable by the Gift Card to the Gift Card Amount prompt. Click OK.
3) The Gift Card payment will then be visible in the Payments section.
4) Select the Cash Settlement Type.
5) The remaining balance on the ticket will be settled to Cash.
6) Select OK/ Print and Done to close the ticket.
Gift Card Expiration Wizard
...
1) Navigate to the Membership module on the left user menu and select Gift Card Expiration.
2) The Gift Card Expiration Wizard will launch.
As Of Date and Type
...
3) Type: select the appropriate Gift Card Type by clicking the lookup icon. You can only select one type at a time.
Change the Expiration Date
...
3) Next: to move to the next screen.
4) Enter the New Expiration Date in the New Expiration Date column. Select Finish.
Note: if you checked “Automatically adjust all expired” the date you entered will be the same for all Gift Cards. At this point you can still change the date to something different.
Reduce Remaining Balance
...
5) Next: to move to the next screen.
6) Enter the Expire Amount: this is the amount you want to reduce from the remaining balance of the Gift Card. Example: if the remaining is $50 and you want the new remaining to be $30 then you would enter $20 in the Expire Amount column. Select Finish when complete.
Note: if you checked “Automatically reduce all expired” all Gift Cards will be reduced to zero by their remaining amount.
7) Post the batch.
View Gift Cards in Manage Members
...
1) Navigate to the Membership module and select Manage Members.
2) Select the Gift Cards tab from left pane.
The Gift Card’s Description, Transaction Date, Issued Amount, Unapplied Amount (Remaining Balance), and Expiration Date are available.
Gift Card Reports
...
Navigate to Interactive Reports and expand Membership.
Gift Card Transactions Report
This report details the Gift Card Transactions for a certain time period and allows the user to filter by Detail Level, Gift Card Type, Gift Card Number, and Member.
Outstanding Gift Cards
This report details the Outstanding Gift Cards and can be filtered on Gift Card Type.
Best Practices
...