| Table of Contents | ||||||||
|---|---|---|---|---|---|---|---|---|
|
...
To access Statement Messages, click on Membership in the top menus. Then, select Statement Messages from the drop-down menu.

From here, Edit a previous statement message by clicking on it, and then selecting Edit, or create a new message by clicking the New button.

When creating a New message, give the message a Name. Include a Start Date and End Date for the message as applicable. Mark the message as the Default message if it is to be utilized as the current message, by checking the Default box. Then, enter message. Keeping the formatting simple and the message relatively short will ensure the message fits into the statement message box.

Also note there is a Member Types tab. This tab should be utilized to designate which Member Types should receive the message. To designate a Member Type, check the Restrict the statement message to the following member types: box. Then, click the Member Selection box, and designate the Member Types to include. Then, click Select. If the message applies to all Members, disregard this tab.

When finished, click Save and Close.

...
, select Statement Messages from the drop-down menu.
From here, Edit a previous statement message by clicking on it, and then selecting Edit, or create a new message by clicking the New button.
When creating a New message, give the message a Name. Include a Start Date and End Date for the message as applicable. Mark the message as the Default message if it is to be utilized as the current message, by checking the Default box. Then, enter message. Keeping the formatting simple and the message relatively short will ensure the message fits into the statement message box.
Also note there is a Member Types tab. This tab should be utilized to designate which Member Types should receive the message. To designate a Member Type, check the Restrict the statement message to the following member types: box. Then, click the Member Selection box, and designate the Member Types to include. Then, click Select. If the message applies to all Members, disregard this tab.
When finished, click Save and Close.
Past Due Messages
The Office System has the ability to place canned Past Due Messages on any Member’s Statement who is over 30, 60, or 90 days past due. Please follow instructions below to create/ update a Past Due Message.
Accessing the Tool
To create/ update a Past Due Message,
Select System across the top toolbar and choose System Settings.

2. Navigate to the Membership tab on the left pane of System Settings.

3. Use the Over 30, 60, or 90 day Past Due Statement Message section to enter your canned message.

4. Now, the corresponding message will appear on a Member’s Statement if they are Past Due.

Month End Processing
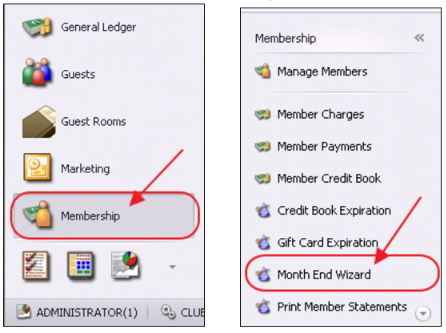
Once preliminary steps are complete, launch the Membership, Month End Wizard.
To access the Month End Wizard to generate the statements:
- Click on Membership
- Then, click on the Month End Wizard option.
...