Overview
The Employee module allows a Club to manage an Employee’s contact information, job codes, security, areas, and other fields pertinent to the Employee. Within the module, new employees can be added by replicating an existing role at the club, or by adding a new position at the Club. Additionally, employee access and status can be controlled within this module. Use Case A new Manager of Food and Beverage started at the Club today. Management will add the new employee to the database, and will model the employee after the former F&B Manager. Care will be taken to ensure the former F&B Manager (who resigned), can no longer access the database. |
Content
Accessing the Tools
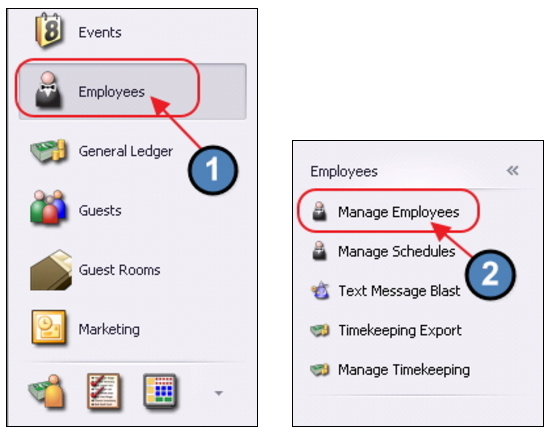
Employee Management tools are located within the Manage Employees section in the Employee Module. To access:
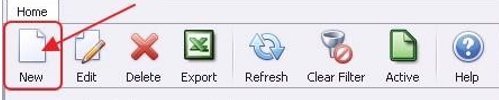
1) Click on Employees (By default, the Manage Employees grid will launch)
2) If entering from another area from within Employees, click on Manage Employees
The Manage Employee data grid will launch. The primary functions associated with managing employee setup are embedded in the tabs of the Employee profile, which can be accessed by double-clicking on an existing employee, or clicking the New button.
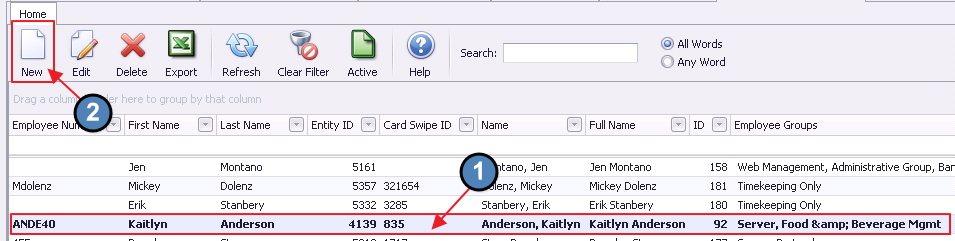
Once clicked, the Employee Profile screen will launch.
Employee Profile - Tab Overview
Gaining an understanding of the Employee Profile tabs and their contents, is crucial to being able to carry out Actions associated with Employee Management (described later in this document). Within the Employee Profile, the following tabs are available for viewing/populating. (Note: Screen will originally open to Security - System tab, however, we will cover the tabs in the order presented.)
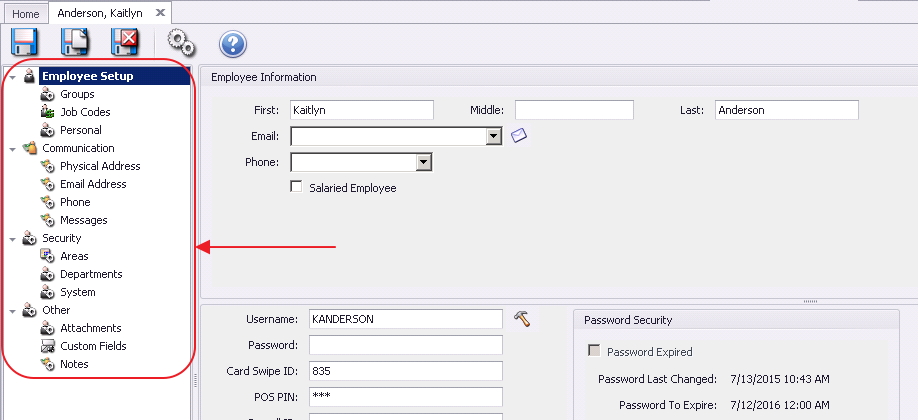
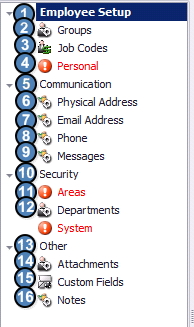
Employee Setup
The Employee Setup tab contains the most basic Employee information:
- First, Middle (Optional), and Last Name
- Email and Phone: Once added (on the Communications tab), data will be visible on this tab, and if more than one option is added, the “default” values may be specified.
- Salaried Employee designation - If checked, the employee will have no clock in/ out options at the POS.
- Photo - If desired, a photo of the Employee may be added. Click Select Photo and browse to the correct file to add.

- The bottom section of the tab contains System log-in information and will be covered in the System section of this document.
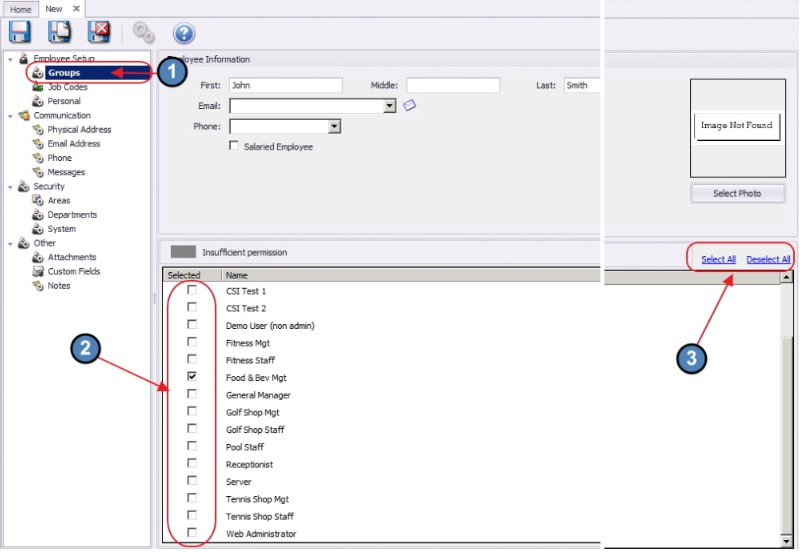
Groups
- Select the applicable Employee Groups on this tab. Employee Groups are designed as a shortcut (and best practice) to assign Security, Area, and Departmental rights all at once, rather than on an individual basis. Please see our Employee Groups Manual for more information on their setup. Note the Select All and Deselect All buttons on the right to assist with assignment and unassignment.
Job Codes
Job Codes are used to track hours worked within the timekeeping system. Select the Employee’s applicable Job Codes on this tab. Please see the Job Codes manual for more information on their setup.
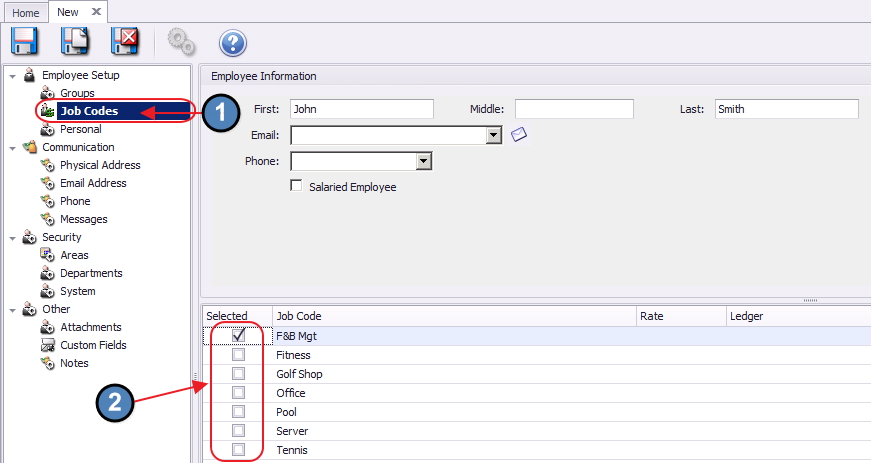
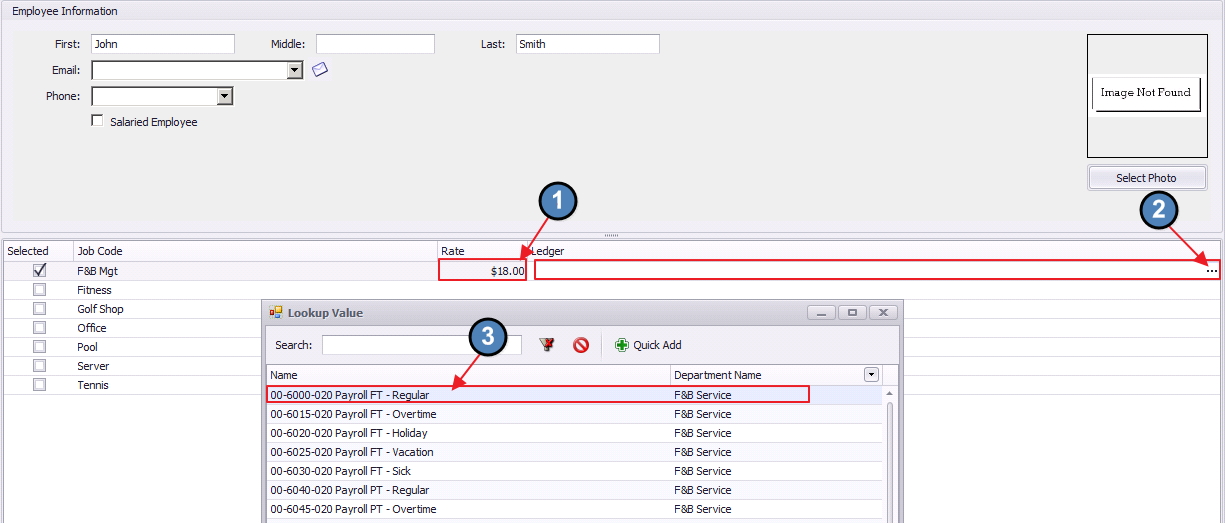
Although it is best practice to add the Rate and Expense Payroll Ledger at the Job Code level, they can be added on an individual basis here.
To add a Rate, click to select the Rate field and type the appropriate dollar amount. This rate will be on an hourly basis.
To add an Expense Payroll Ledger, click the ledger lookup button (three dots) and select the appropriate ledger. The Expense Payroll Ledger is simply for reporting purposes, it will not produce any type of Journal Entry.
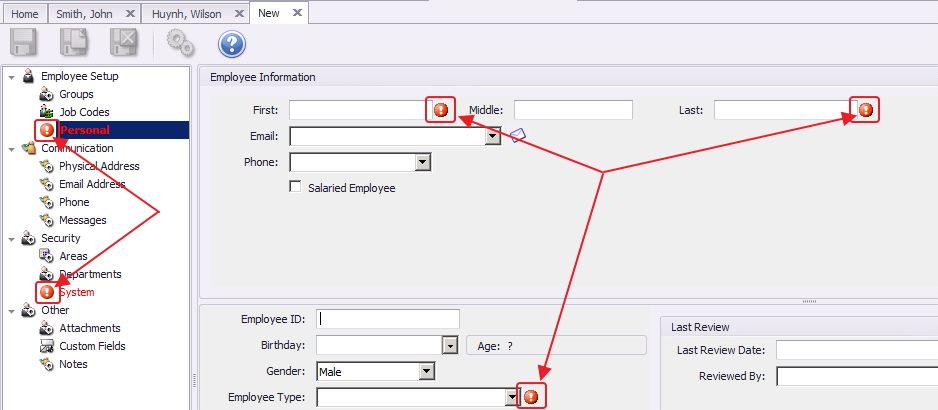
Personal
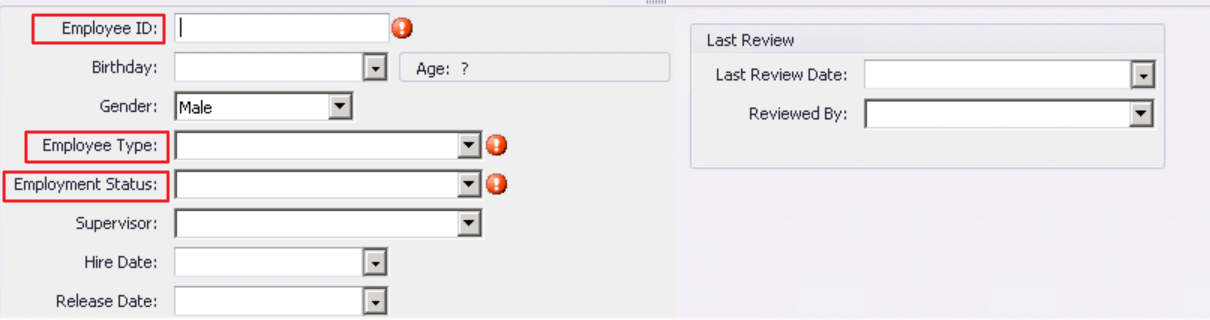
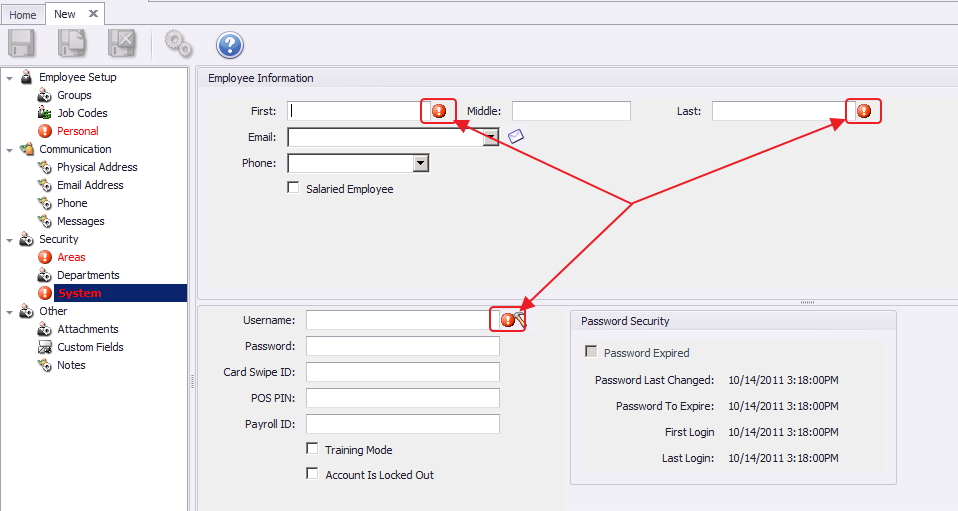
This tab contains additional personal information about the Employee. The three required fields on the tab are below:
Employee ID- The information entered here is how the employee will be referenced on Posting Summaries. DO NOT LEAVE BLANK. Typically this is first name & last initial (can be preceded with a number)
Employee Type – must select one (typically full or part time)
- Employment Status - must select one
The system also offers optional fields for Birthday, Gender, Status, Supervisor, Hire Date, Release Date, Last Review Date and Reviewed By.
Communication
The Communication tabs contain the primary ways to reach the employee. Information populated on the sub-tabs within this section is viewable in summary on the Communication tab.
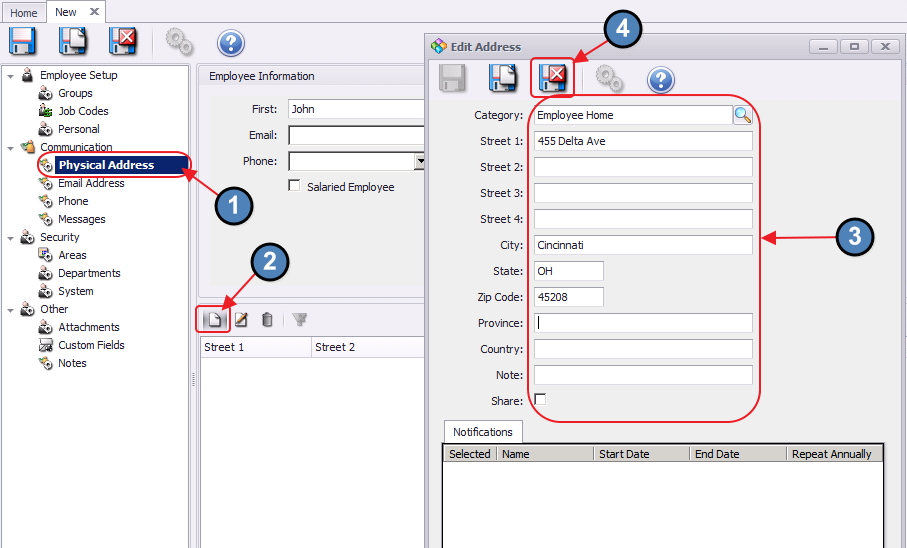
Physical Address
This tab contains the physical address(es) of the Employee. To enter a new Physical Address, navigate to the Physical Address tab, click the New icon, enter the address, and click Save and Close. Addresses may be populated at any time, and are not required. Note: The Share flag is not applicable to employees.
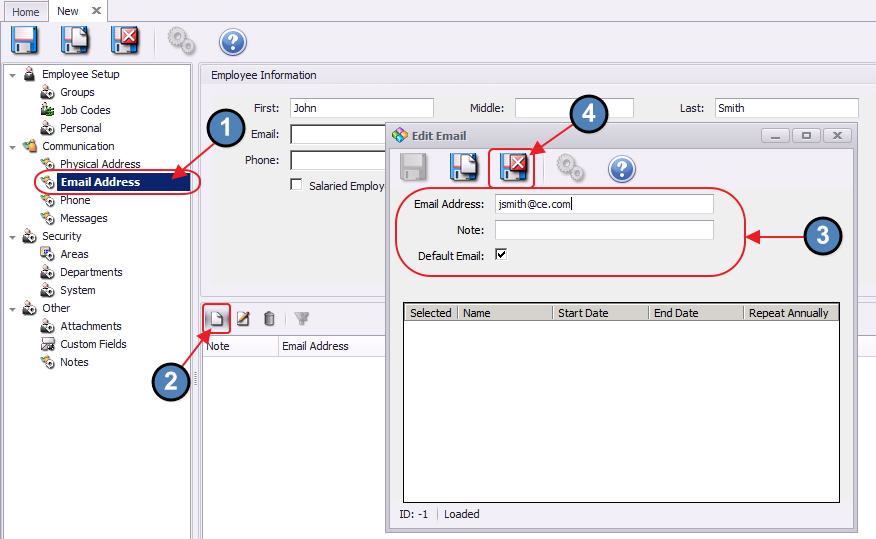
Email Address
This tab contains the email address(es) of the Employee. To enter an Email Address (optional), navigate to the Email Address tab, click the New icon, enter the email address and add a Note if desired. Default Email will be checked for the first email address entered, however, can be changed. One email address must be marked as Default, as it will predominantly be used when sending emails through Office. When finished, click Save and Close. Email addresses may be entered at any time.
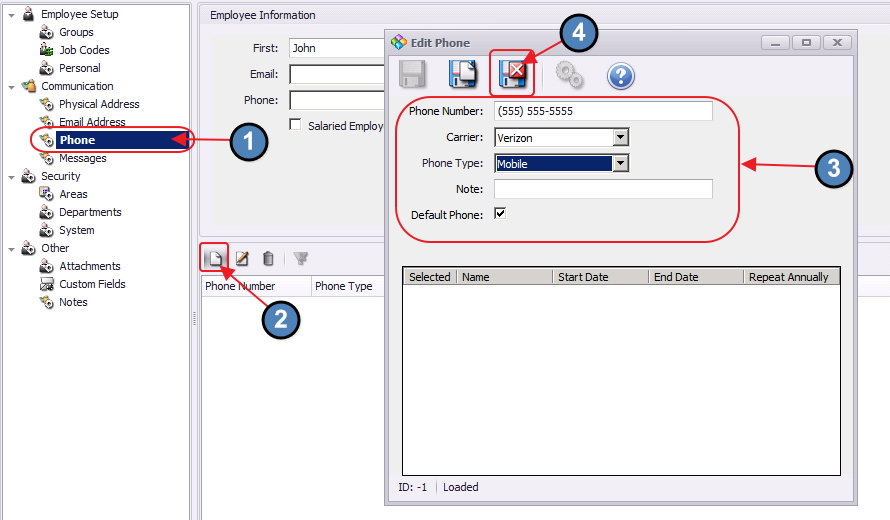
Phone
This tab contains the Phone Number(s) of the Employee. To enter a Phone Number (optional), navigate to the Phone tab, click the New icon, enter the Phone Number, Carrier, Phone Type, and add a Note if desired. (Note: If Mobile is selected, specify Carrier to assist with sending Text messages to Employees through Office. For more info, refer to the Marketing manual). Default Phone will be checked for the first phone number entered, however, can be changed. One phone number must be marked as Default, as it will predominantly be used for communication purposes. When finished, click Save and Close. Phone Numbers may be entered at any time.
Messages
The Messages tab provides a way to send email or text messages to the Employee. The tab also contains a summary view of the messages sent to the employee.
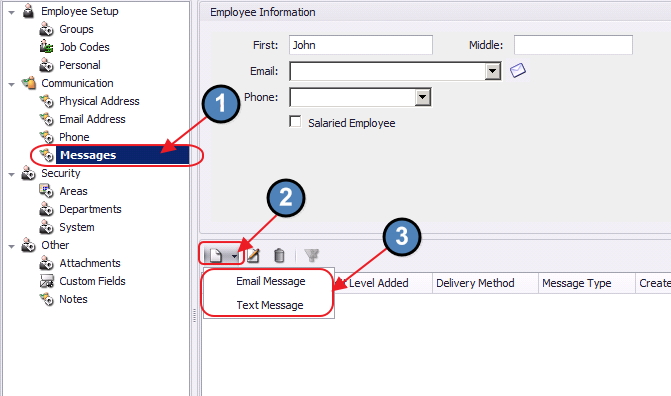
Email or Text Employee
Although it is recommended to send emails and text messages through the Marketing Wizard (Please see our Marketing Manual for more information), emails and texts can be sent on an individual basis within the employee’s profile.
To do so, once on the Messages tab, select the New Icon and choose whether the message will be an Email or Text Message.
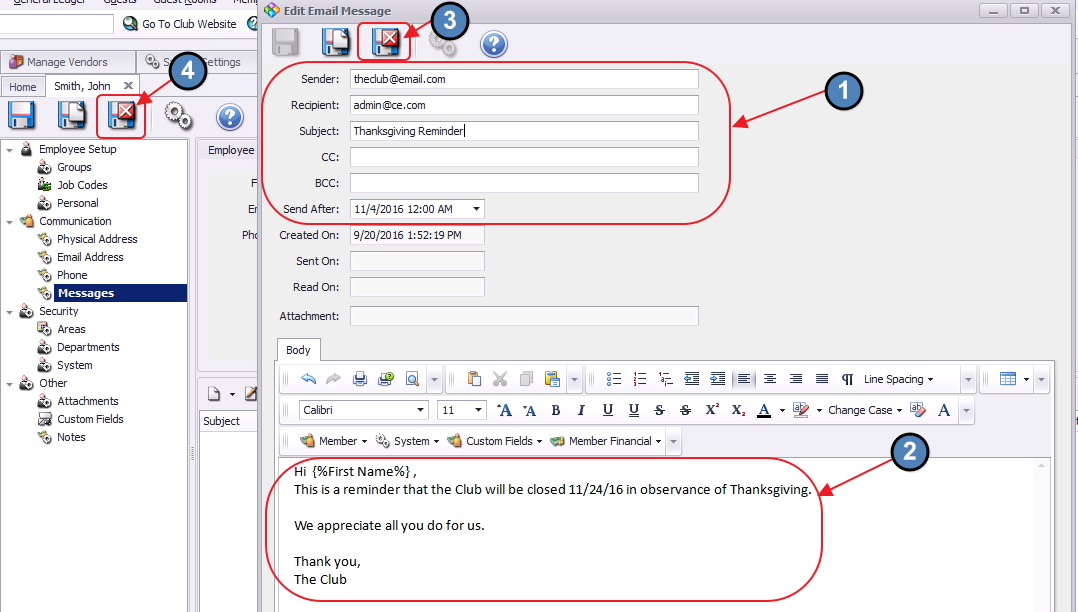
Email Employee
If Email Message is selected, the user will be prompted to enter a Sender address (must be a valid email address), Subject (Optional), additional email addresses to include (either as carbon copy CC: or blind carbon copy BCC:), Send After (delay send feature) and the Body of the email message. When finished, click Save & Close.
Important: Be sure to Save & Close the Employee Profile after you have Saved & Closed the email message. Saving the Employee Profile is what prompts the system to send the Email Message.
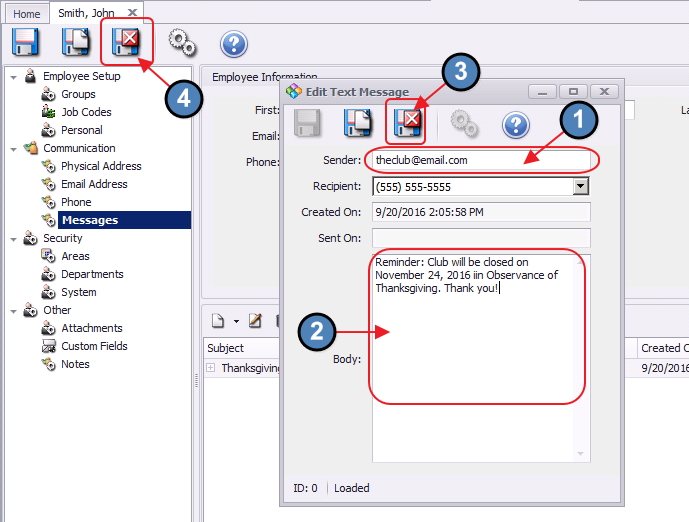
Text Message Employee
If Text Message is selected, the user will be prompted to enter a Sender address (must be a valid email address), select the Recipient (should be the mobile number on file), and enter the Body of the text message. When finished, click Save & Close.
Important: Be sure to Save & Close the Employee Profile after you have Saved & Closed the text message. Saving the Employee profile is what prompts the system to send the Text Message.
Security
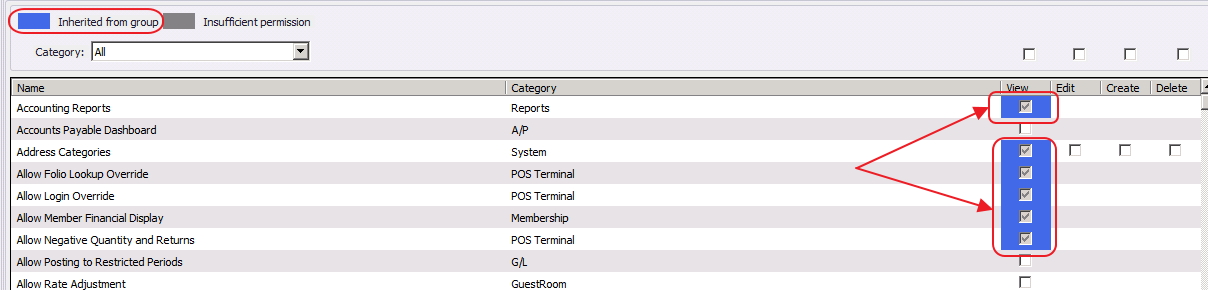
The Security section contains the security matrix as assignable to the Employee. The security summary can be viewed on the Security tab. Note that the matrix is color coded to help identify security privileges inherited from the group (blue), or show where insufficient privileges exist (gray). To view security matrix by Category, select the drop-down to select specific Category to view.
Note: Please see the Security Rights Manual (Coming Soon!) for complete explanation of Category and Security Rights.
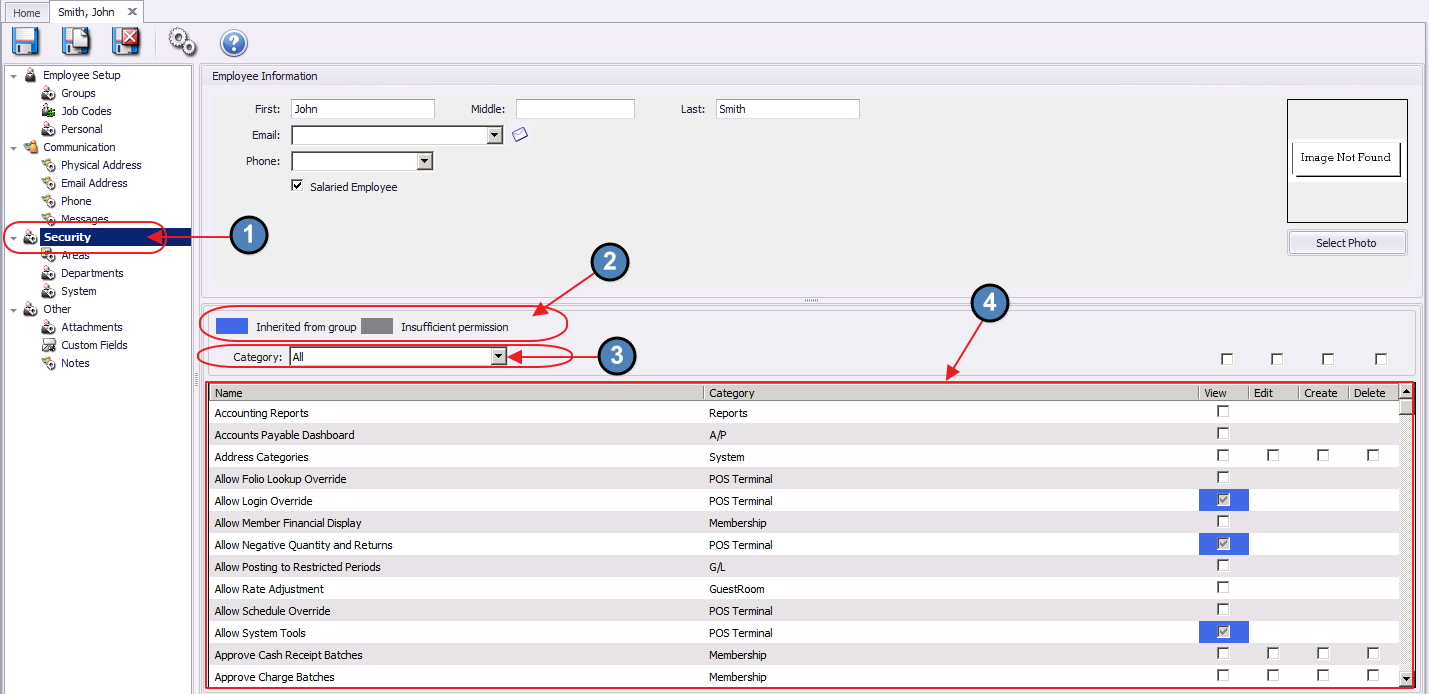
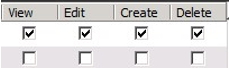
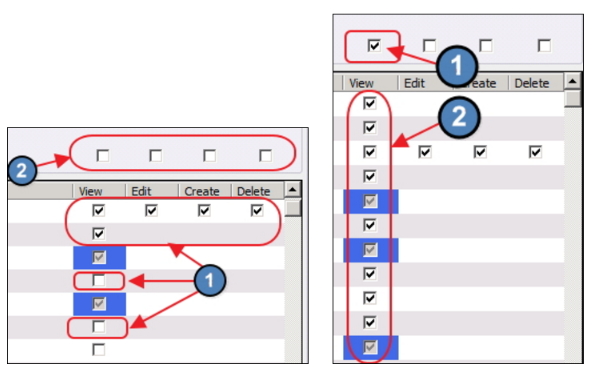
Most security rights, will have four permission levels with a corresponding check box. Check all permission levels that apply for each security feature. The permission levels include:
View- User will have a view only mode of the security feature.
Edit- User will be able to edit existing instances of the security feature.
Create- User will be able to create new instances of the security feature.
Delete- User will be able to delete existing instances of the security feature.
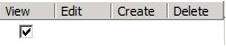
If there is not a check-box for the Edit, Create, or Delete permission levels, simply check the View permission level, and the employee will have full access to the security feature.
It is recommended that Security rights be applied at the Employee Group level. This will allow the user to apply various security rights all at once (consistently), rather than on an individual basis (Please see our Employee Groups Manual for more information on their setup). As previously mentioned, if a security right is Inherited from an Employee Group, the check box will be highlighted in blue, and the check mark in the box will be gray (indicating the permission cannot be edited, as it is inherited).
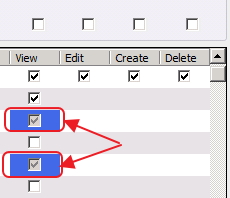
There may be situations in which an employee will need additional security rights, not inherited from their Employee Group. If this is the case, an Administrator can navigate to the specific security right and check the corresponding permissions on an individual basis. Also note the row of (4) check boxes above the matrix. This allows for easy assignment of View, Edit, Create, and/or Delete functions for all visible functions. For example, clicking the first box, will assign View permissions for all listed functions.
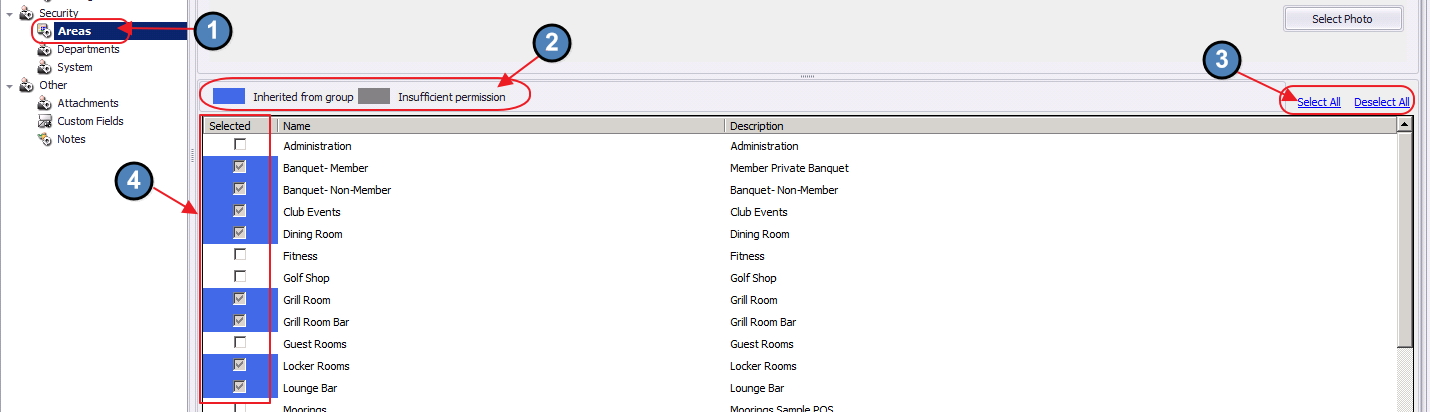
Areas
The Areas Tab contains which areas the Employee can access in the POS, as well as the reporting module.
Furthermore, for employees to see specific items within the Items module, they will need rights to the Areas linked to the corresponding Item Categories. This is most often used to prevent F&B employees from seeing Retail items and vice versa.
Again, it is recommended to apply areas at the Employee Group level to help quicken the employee setup process (Please see our Employee Groups Manual for more information on their setup).
Areas inherited from an Employee Group, will be highlighted in blue.
While not recommended, individual permissions may be applied if necessary by selecting the required areas. The Select All, and Deselect All buttons are available to assist with quick assignment and unassignment.
Departments
Employees must have rights to at least one department. The Departments Tab is used for security purposes. More specifically, the Departments tab can be used to hide certain aspects of the system from employees.
Please see examples below:
• Supervisors- In the Employees module, supervisors will only be able to see employees in departments to which they have been granted access.
• GL Accounts- To see certain GL accounts, employees must have rights to the department(s) flagged within the GL account.
• Vendors- To see certain vendors, employees must have rights to the department(s) flagged within the vendor profile.
• Companies- With the new multi-company capabilities, to see anything associated with a specific company, the employee will need rights to a department that is linked to that company.
• Members/ Member Types- With the new multi-company capabilities, Member Types are linked to a specific company. To see any Members or Member Types associated with a specific company, the employee must have rights to a department linked to that company.
Departments Inherited from an Employee Group, will be highlighted in blue.
While not recommended, individual permissions may be applied if necessary by selecting the required Departments. Note that the Select All, and Deselect All buttons are also available to use for quick assignment and unassignment.
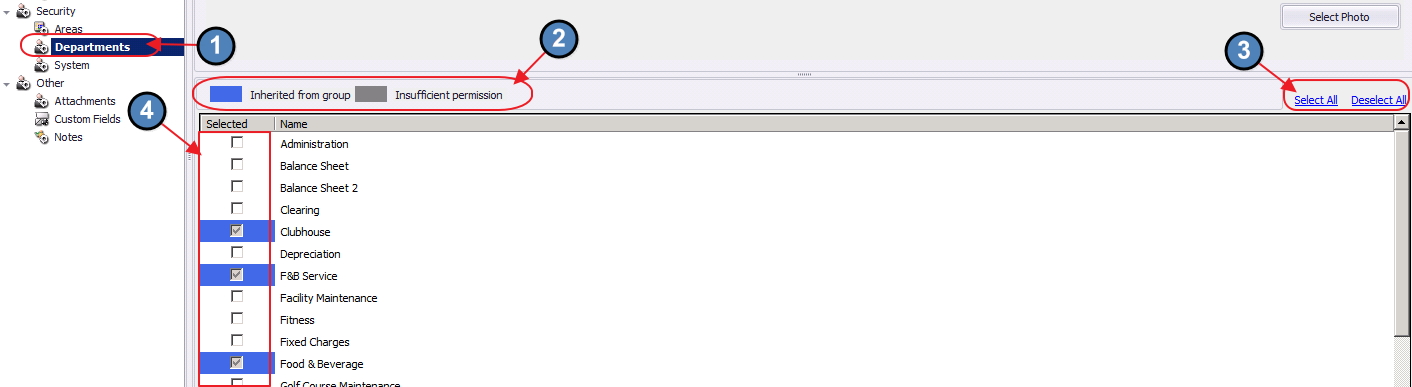
Note: For timekeeping purposes, an employee must have rights to the departments linked within the areas they will be working. For instance, if a server will be working in the Dining Room area, and the Dining Room area is linked to the Food & Beverage department, the server will need to have rights to the Food & Beverage department for timekeeping to report properly. If the employee does not have the correct departmental rights, they will not show on the Employee Hours report.
System
The System tab controls login information for CMA and POS. This is the default landing screen when clicking on the Employee’s Profile.
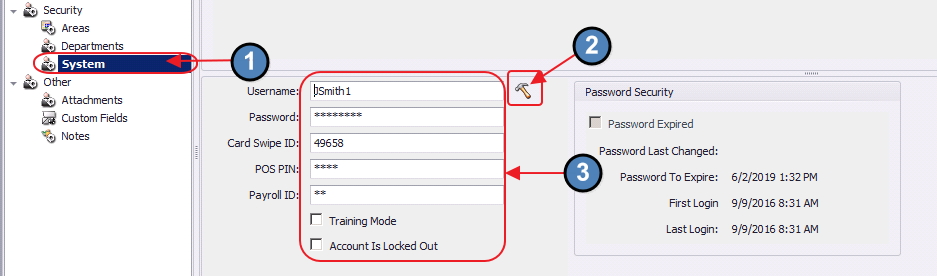
Username- Select the hammer icon to generate a unique login. If selected, the hammer icon will produce default credentials of first initial & last name. This field is NOT case sensitive.
Password- This is the password used for CMA. A password must be assigned to every employee. If password is forgotten, a new password can be entered here by an employee with the correct security rights. This field is case sensitive.
Card Swipe ID- This is the username for POS and must be numeric unless using an encoded card (because POS only prompts with numeric keypad to login). This field does NOT need to be assigned to employees who will not be using Timekeeping or POS.
POS PIN- This is the password for POS, and not a required field unless exporting Timekeeping info to another system. This field can be the same as the Card Swipe ID – in which case the user will NOT be prompted for a password.
Payroll ID- Only applicable if client exports Timekeeping to another system. Typically First Initial & Last Name.
Training Mode- If checked, any completed POS charges will be put into a test charge batch. The system will not allow this batch to be posted to prevent skewed financials.
Account is Locked Out- If checked, the employee will not be able to login to the POS or CMA. Ensure this setting is checked for Terminated employees.
Other Information Section
The Other information section contains information that does not apply to any other area, but is relevant to the employee.
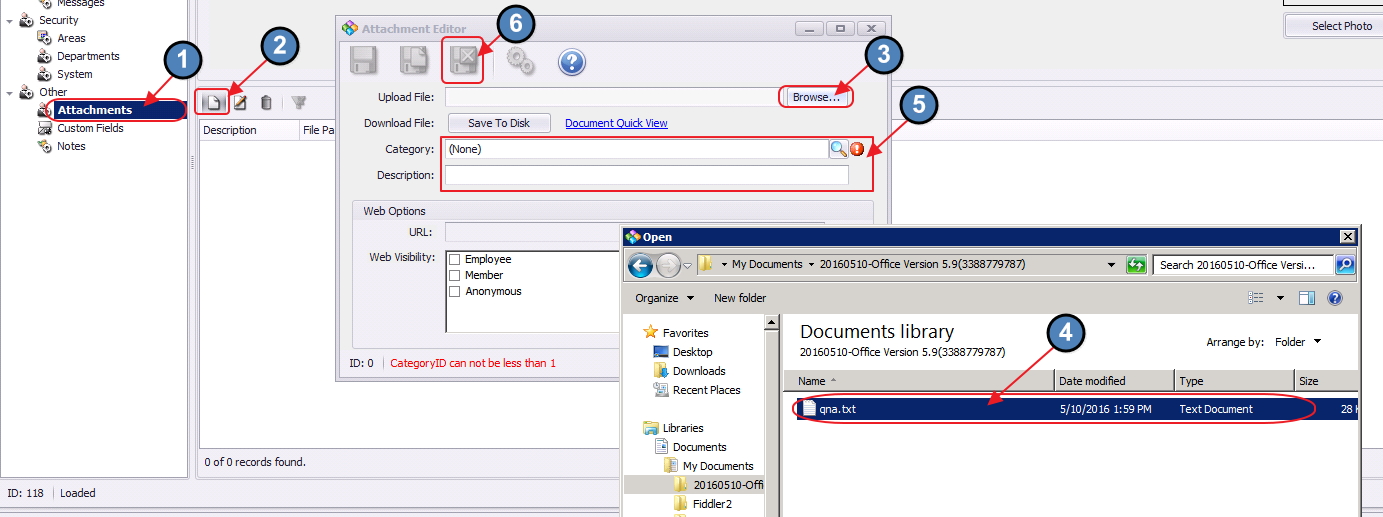
Attachments
The attachments tab allows for document attachment to an employee’s file.
To attach a new document (such as the Employee’s application), click the Attachments tab, click the New icon, browse for the document, complete the remainder of the Attachment Editor screen, and click Save and Close when complete.
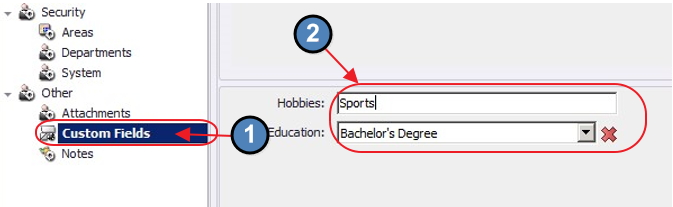
Custom Fields
Click on the Custom Fields tab to populate additional data regarding the Employee.
These Club defined fields allow a Club to capture additional items such as the Employee’s Education Level, Hobbies, etc.
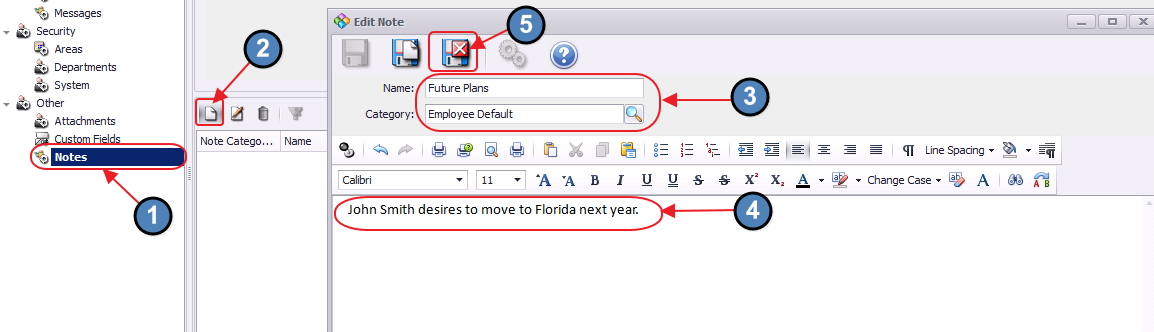
Notes
The Notes tab allows for additional free-form notes to be put on an Employee’s Account.
To attach a note, click on the Notes tab, click the New icon, enter a Name and Category for the note, type/format the note, and click Save and Close when complete.
Save and Close Reminder!
When finished editing any of the tabs, it is imperative to do a final Save and Close on the Member’s Profile to ensure all changes saved on the tabs, are saved to the overall Profile.
Most Commonly Used Actions - Employee Mgmt
Create Employee for an Existing Position
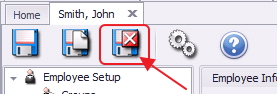
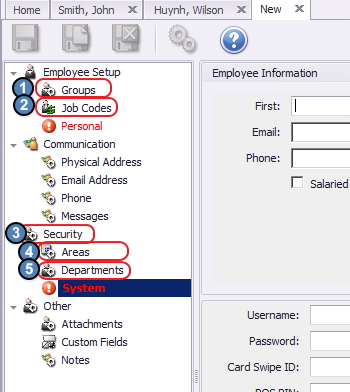
If a New Employee will perform the same/similar functions as an already existing employee, best practice (and quickest/easiest way to set up employee) is to copy the existing employee’s setup.
To copy an existing employee,
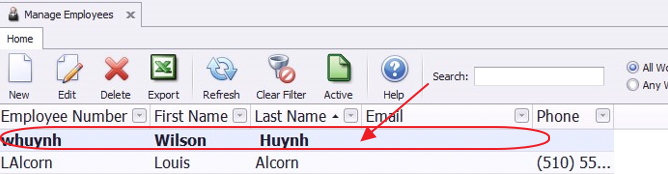
1) Click on Employees to load the Manage Employees Grid. (Or, if accessing from another Employee area, click Manage Employees from the Employee options).
2) Double-click on the Employee to copy from, to load their Employee Profile.
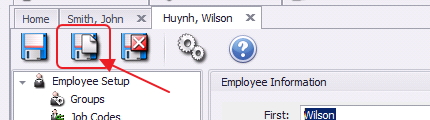
3) Once loaded, select the Save and New icon.
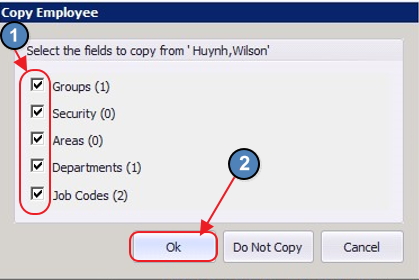
4) Select the relevant fields to copy, and then click OK.
Applicable Fields include:
Groups
Security
Areas
Departments
- Job Codes
The Employee Setup screen will launch.
5) Next, verify that all copied information was transferred successfully on the (5) tabs highlighted below. Return to the System tab when completed.
6) Complete set up, by entering relevant information on the additional tabs highlighted below, as outlined in the Employee Profile - Tab Overview section of this document.
Reminder: Required fields are highlighted with a white exclamation mark inside a red/orange circle.
7) When finished, click Save and Close on the Employee Profile to establish new employee in the system.
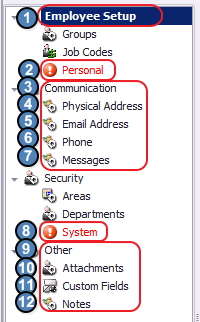
Create Employee for a New Position
If an employee is hired for a completely new position, best practice is to first create a new Employee Group for the position. (Please see the Employee Groups Manual for more information on setup.)
Once the new Employee Group is created, please follow the below instructions to create a new employee.
1) Click on Employees to load the Manage Employees Grid. (Or, if accessing from another Employee area, click Manage Employees from the Employee options).
2) Then, perform either of the following to launch the Employee setup screen.
a) Click the New icon on the toolbar.
b) Or, right-click anywhere on the Manage Employees Grid and select New.
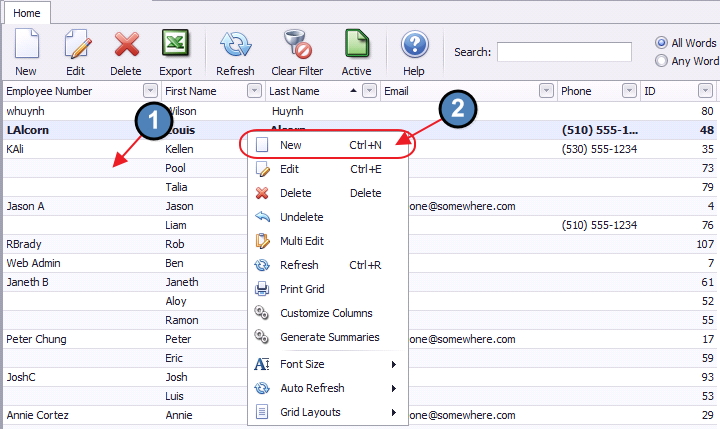
The Employee Profile (setup screen) will launch, and will open on the System tab.
3) Complete all necessary information on the System tab. (For more information on how to complete this tab, refer to the System section of this document.)
Reminder: Required fields are highlighted with a white exclamation mark inside a red/orange circle.
4) Next, complete set up, by entering relevant information on the additional tabs highlighted below, as outlined in the Employee Profile - Tab Overview section of this document.
It is recommended that these tabs be entered in sequential order.
Note 1: On the Groups tab, remember to select the newly created Employee Group. This will populate all Security, Area, and Departmental rights.
Note 2: On the Security - > Area, and Departments tabs, verify that all rights were successfully transferred from the Employee Group. Rights inherited from an Employee Group, will be highlighted in blue.
5) When finished, click Save and Close on the Employee Profile to establish new employee in the system.
Troubleshooting Area and Departmental Rights
In previous versions of the Office software, it was difficult to troubleshoot the necessary rights needed to see specific records of a particular module. For instance, if an employee was unable to see a certain GL account, in previous versions, the user would first have to find an employee with rights to the GL account, determine what department(s) the GL account was linked to, and then proceed to find an Administrator who could add the necessary departmental rights.
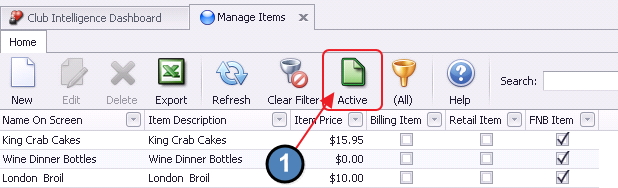
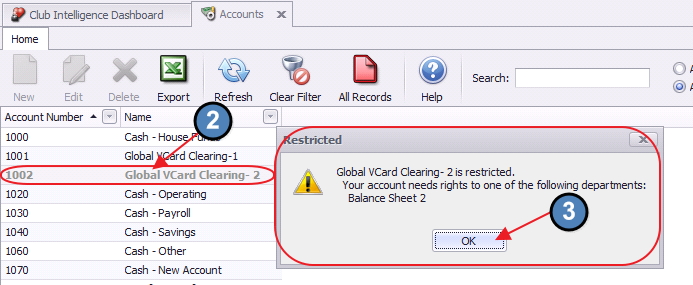
In versions 5.9 and above, an enhancement has been added to help simplify this process. Specifically, employees can now select the Active button on a specific module’s Grid to pull up All Records. Any instance of the module an employee does not have rights too, will have a grayed-out italicized font.
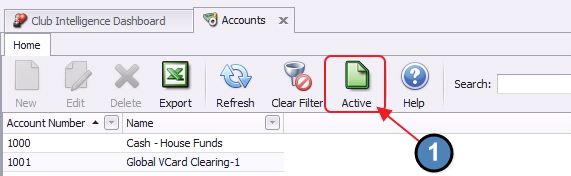
Troubleshooting G/L Account Access (Department Related Permissions)
Within General Ledger, Accounts, click the Active button to view all records.
Double-click on grayed-out record to determine permission levels needed to access. Click OK to proceed.
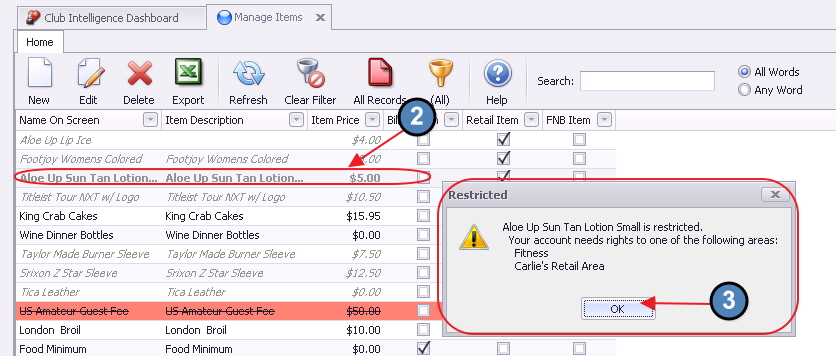
Troubleshooting Item Access (Area Related Permissions)
Within Items, Manage Items, click the Active button to view all records.
Double-click on grayed-out record to determine permission levels needed to access. Click OK to proceed.
As noted above, the Employee can double-click any record, to receive a prompt telling them what rights they will need to see that specific record.
Terminating an Employee
When an Employee is no longer employed by the Club, ensure the Employee’s status is updated, and ensure the Employee can no longer access the system.
Please Note: It is not advisable to delete an employee as this will cause issues with chit history.
1) Launch the Employee’s Profile by clicking on Employees, and double-clicking on the Employee.

2) Navigate to the Personal tab, then:
- Set Employee Status to Terminated.
- Set the Release Date to the date of termination.

3) Navigate to the System tab, then:
- Remove Card Swipe ID to prevent the terminated employee from logging into the POS any longer.
- Change Password to prevent employee from accessing CMA any longer (This can be updated to any bogus password).

When finished, click Save and Close to save the settings to the Employee Profile.

Determining Which Employees Have Been Terminated
Remember, it is advisable to NOT delete an employee from the system as this could cause problems with chit history. However, to quickly determine which employees have been terminated:
Filter the Employee Status column to only display ‘Terminated’ Employees.

If the Employee Status column is not already on the Grid:
Right-click anywhere on the Grid and choose Customize Columns.

Double-click or drag and drop the Employee Status column to add it to the Grid.

Rehiring a Former Employee
In cases where a terminated employee returns to the club, to reactivate their account:
1) Double-click on the rehired employee to launch the Employee’s Profile.

2) Navigate to the Personal tab, then:
Change the Employee Status to New Hire or any other status that applies.
Highlight the Release Date and select delete on your keyboard. This will delete out the old Release date.

3) Navigate to the System tab, then:
Provide the re-hire with a Card Swipe ID. This will provide them with access to the POS.
Update their Password to reinstate their access to CMA.

4) When finished, click Save and Close to save the settings to the Employee Profile.
Best Practices
Assign security by Employee Groups rather than at the individual Employee level.
Enter Rate and Expense Payroll Ledger at the Job Code level rather than the Individual level.
When setting up a new employee for an existing Club position, copy an existing employee (with the same role) to expedite setup.
If a new position is created at the Club, first create a new Employee Group, and then use the group to assign security to the new employee.
Adjust Terminated Employee status, and delete them from the Manage Employees grid. Also, ensure Account is Locked Out is checked for all terminated employees to ensure they can no longer access the system.
FAQs
Q. What is the best way to create a new employee who will be replacing an existing employee?
A. If the new employee is performing the same, or similar job functions to an existing employee, the easiest way to create the employee is to open the existing employee, save as new.
Q. How do I see deleted Employees in the Employee Grid?
A. Click the Active button above the grid to view all records. Deleted records will have red highlight around them.