Overview
The Unified Platform allows Clubs to manage their Tee Times seamlessly across the Reservations System into the Office Point of Sale Retail System; ensuring Administration, Members, and the Golf Pros have the tools they need to reserve and manage the Club’s Tee Times.
Use Case(s) A Club may wish to allow their Members to register for Golf Tee Times utilizing the on-line Reservations system. Additionally, the Club may also utilize the Clubessential Office Product, and have the POS fully implemented in their Golf Pro Shop. In addition to allowing the Members to make reservations online, the Club is also interested in assisting Members who call-in or walk-up with making a Tee Time. Daily, the Club would like the Golf Shop to have integrated visibility and editing capabilities to the Tee Time Reservations, and easily convert the reservations into POS tickets they can then charge to their Members. The Unified Suite provides the Club with the ability to meet their goals. |
Video
This video contains highlights from a training Webinar given on the Tee Times Unification process.
Note: Sections of the video have been referenced below with corresponding times in the video for ease of access
| Total Video (Length) | 18:57 | |||
|---|---|---|---|---|
| POS Tee Times Tab Overview | 0:25 | Change Member to Apply Guest Charges | 9:40 | |
| Convert Tee Time to Member Charge (One Member, One Guest) | 1:46 | Assist Member with Booking Tee Time (Admin Dashboard) | 10:45 | |
| Grid Color Discussion | 3:28 | Merge Multiple Tee Times into One Ticket (Multi-Select) | 12:46 | |
| Edit Closed Ticket (Delete Ticket Option) | 5:28 | Complete Prior Day Open Tee Times | 13:58 | |
| Convert Tee Time to Member Charge (Multiple Members, Multiple Guests) | 7:13 | Member Charge All Feature | 15:37 | |
| Edit Closed Ticket (Re-Open Ticket Option) | 8:13 | Other Features (Full Screen, Auto Refresh, Grid Options) | 17:33 |
Content
Reservations/Tee Times
Once a Member makes a Reservation on-line using the Clubessential Tee Times Product, the Reservations fully integrate into the Retail Golf POS application.
Make a Reservation (as a Member)
Once a Member books a tee time on-line using the Clubessential Tee Times product, the tee time fully integrates into the Retail Golf POS application. For example a member could book a tee time on the website as follows:
Navigate to Book a Tee Time
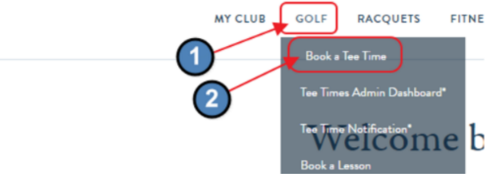
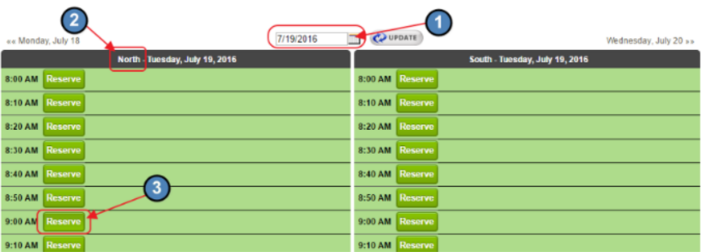
Select Tee Time Date/Course/Time
Select the Date, note the Course (if more than one exists), and select specific time slot by clicking on the “Reserve” button.
Complete Registration Booking Form
Once a time is selected, the Reservation form will appear. Complete the form, and click “Make Tee Time.”
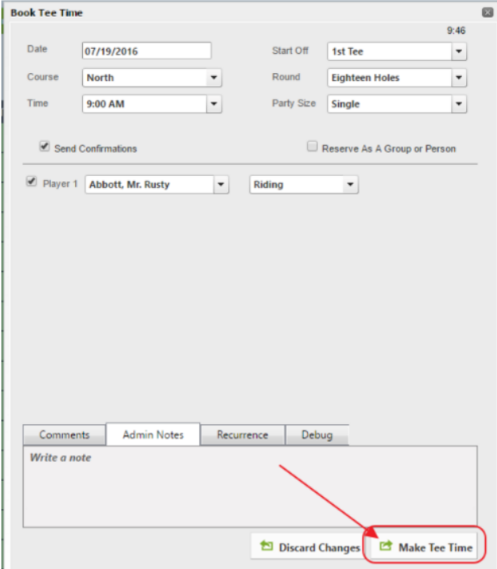
Once a Member makes a Tee Time online using the Clubessential Tee Times Product, the Reservation fully integrates into the Retail Golf POS application.
Point of Sale
To view the existing Tee Times Reservations, log in to the Retail POS Terminal associated with the Golf area.
Tee Times Tab Overview
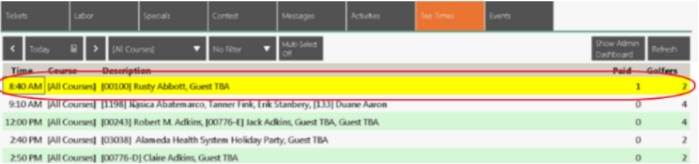
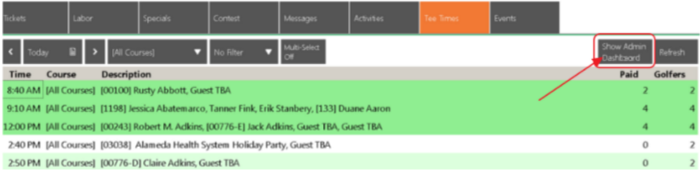
Once logged in, navigate to the “Tee Times,” tab. All Tee Times reservations will appear on this tab.
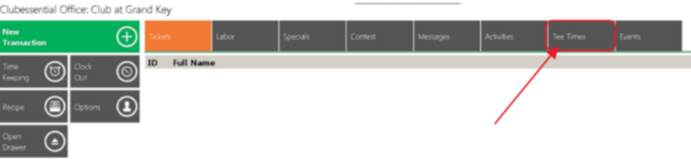
Main Grid
Tee Times will default to today’s date in the highlighted main grid.
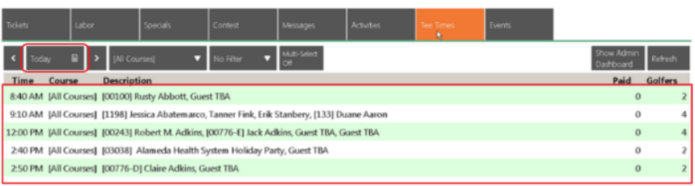
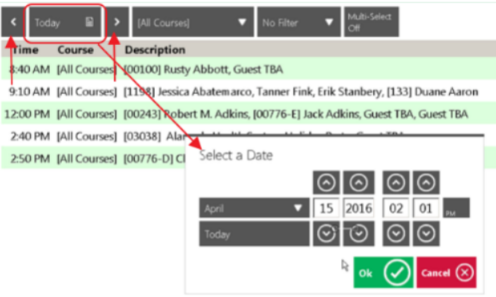
Other Tee Time dates; however, may be viewed by clicking on “Today” to launch the “Select a Date” window, or utilizing the arrows to the right and to the left of “Today” to move forward or backward one day at a time.
Note: Members are easily identified because their Member Number precedes their names.

Guests (TBAs and specific names) will not contain Member numbers.

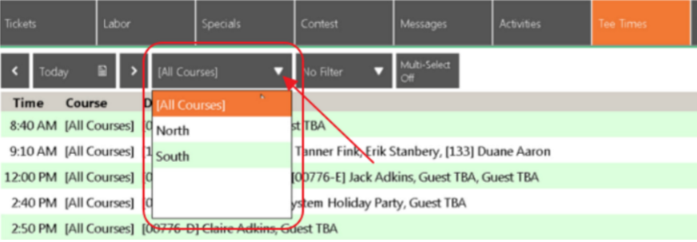
For Club’s with multiple Courses, click on the Course Drop-Down option to view a specific course, or choose “All Courses” to view a consolidated view of the Club’s Tee Times.
Display Colors
Note: To learn more about the Color meanings, click on the “Colors” button in the bottom right hand side of the screen. A Tee Time Color Picker window will launch.
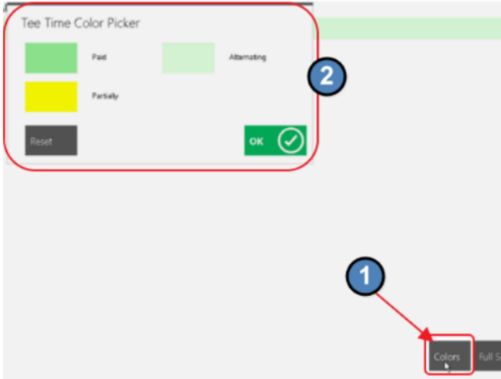
Default colors are as follows:
Dark Green: Paid Tee Times
Yellow: Partially Paid Times
Light Green: Alternating (Used in every other row of the grid for tickets with no status to make grid display easier to read.)
Colors may be changed by clicking on the color, selecting a new color, and clicking, “OK.”
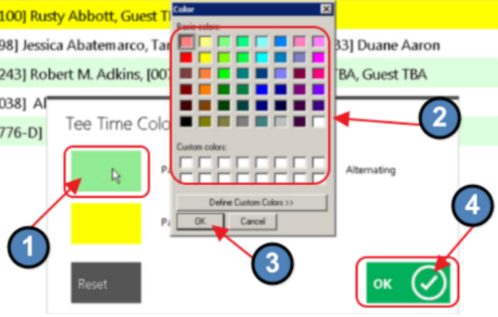
For example, Colors changed as follows:
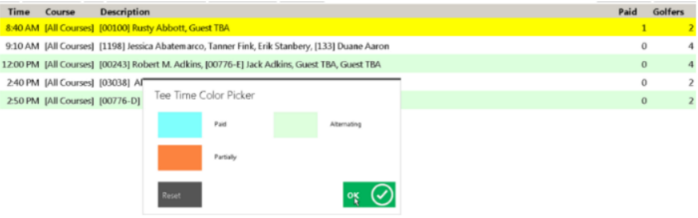
Would change the Grid display to the below after hitting, “OK.”
Convert Tee Time Reservations to Member Charges
To convert the Tee Times into Open Tickets, click on the desired Tee Time reservation, and ticket will be generated to reflect the associated charges.
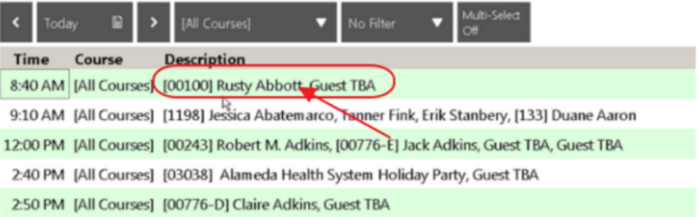
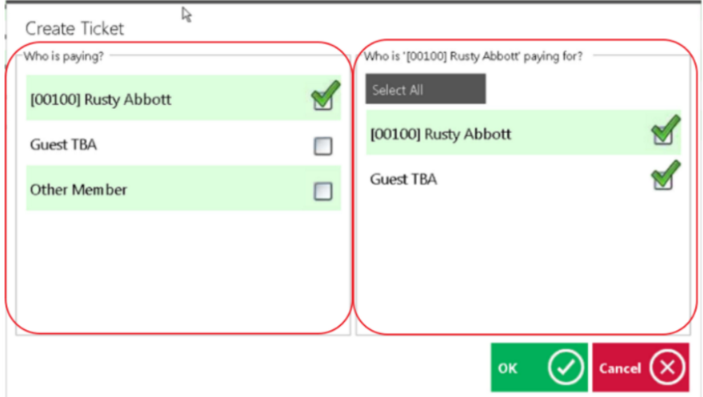
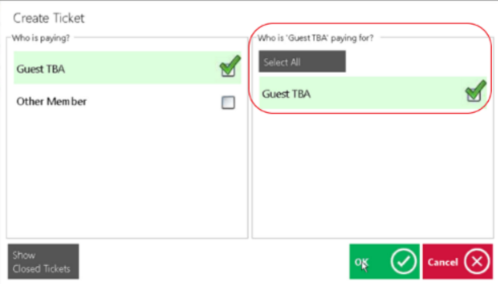
The Create Ticket screen will open. The left side of the screen is used to designate who will be paying for the charges. The right side of the screen is used to designate whom the selected individual on the left side of the screen will be paying for. In the example below, Member, Rusty Abbott, will be paying for himself, and his Guest.
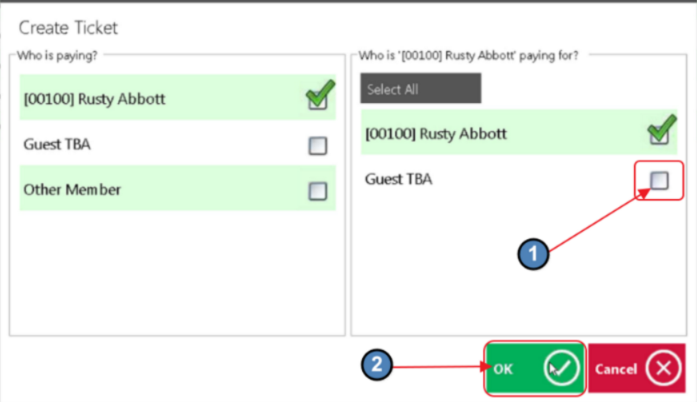
Partial Pay a Tee Time - One Member, One Guest
The boxes may be selected to edit the payment arrangements. For instance, if Rusty was only paying for himself, simply uncheck the “Guest TBA” box, and then click, “OK.”
The POS will then generate the Ticket for Rusty, pulling in the associated charges based on Rusty’s Member Type. In this example, Rusty is only required to pay for the Cart Fee. Ticket can then be closed based on Member payment preference.
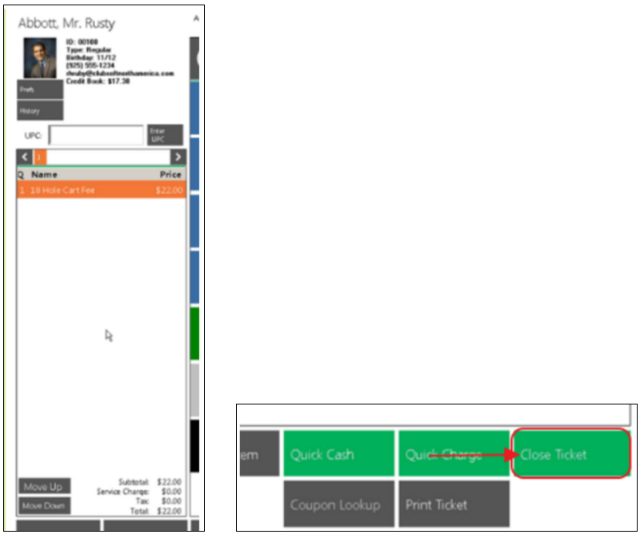
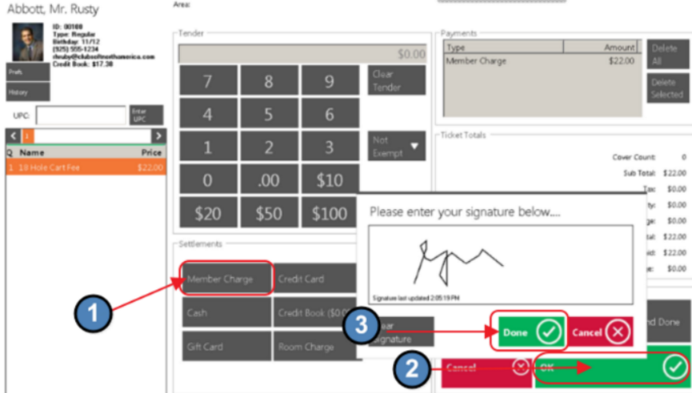
For example, Settlement Type of Member Charge could be used.
After the payment is settled for Rusty, the Tee Time will now reflect this “Partially” Paid status, by highlighting the Tee Time in Yellow. As Rusty only paid for himself, the Guest charge is still open.
Complete Payment for a Partial Paid Tee Time - One Member, One Guest
Click on Partial Paid Tee Time, to create additional ticket.

System will automatically show only the unpaid portion of the Tee Time. In this example, only Rusty’s guest is currently unpaid (as shown on the right side of the screen.) Click, “OK” to close.
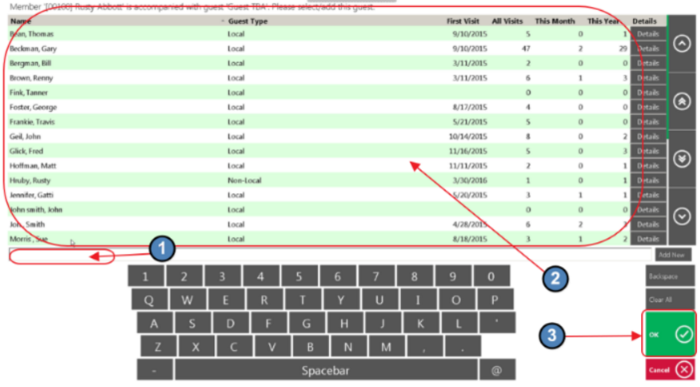
For Guests, system will prompt to select Guest. Search for guest name, select Guest from listing, and click, “OK.”
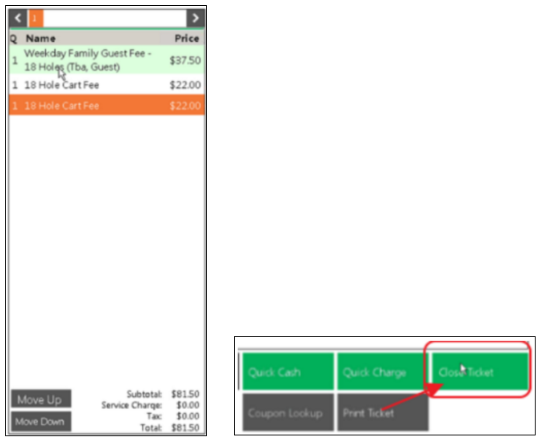
Ticket will then be created reflecting the appropriate Guest fees based on system setup. In this case, Guest was charged for Weekday Family Guest Fee, and a Cart Fee. Close ticket based on Guest’s payment preference.
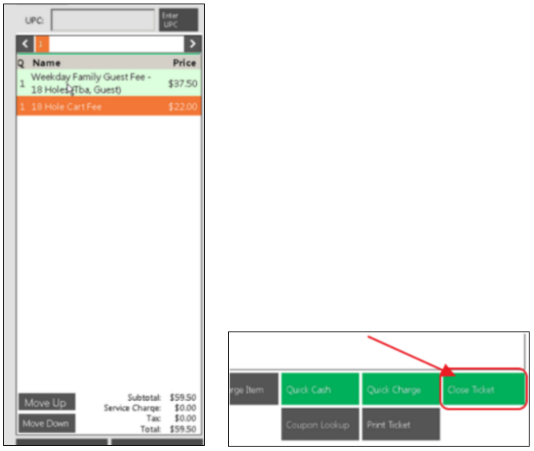
After ticket is closed, note that Tee Time turns Paid color (in this case, Dark Green), as all Golfers (2) on the Tee Time have Paid.

Edit Paid Tee Time (Delete Ticket Option)
If an edit needs to be made to a Paid Tee Time, or a ticket that has been closed, double click on the Paid Tee Time to launch the Closed Tickets screen.

In this screen, tickets may be viewed again for reference. Select the ticket, click, “View Ticket,” and then click, “OK,” when finished reviewing.
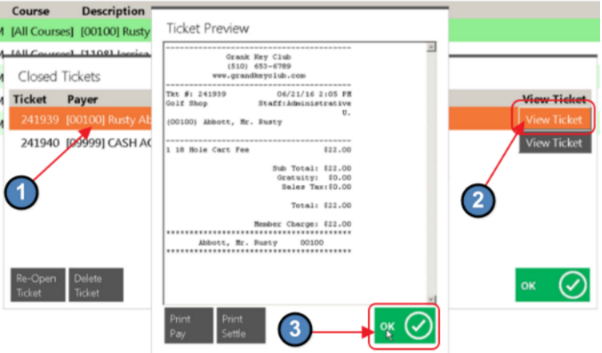
Depending on the circumstances, tickets may be Re-opened and edited, or deleted.
Using the previous example, let’s say that Rusty did want to pay for his guest. To accommodate this change, delete existing tickets, and create a new ticket to reflect this.
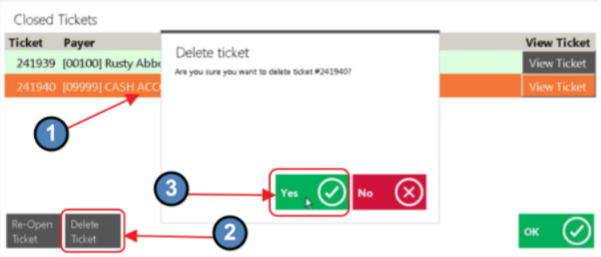
To delete a ticket, select the ticket, click, “Delete Ticket,” and click, “Yes,” to confirm deletion.
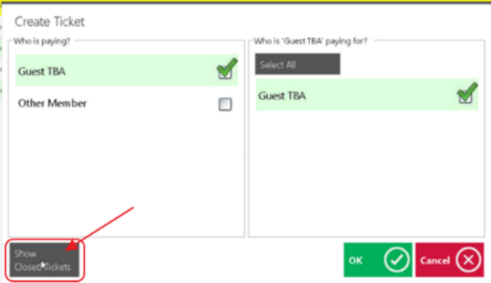
When returned to the grid, select the Partial Paid Tee Time.

Then, select the “Show Closed Tickets,” button to view remaining closed ticket.
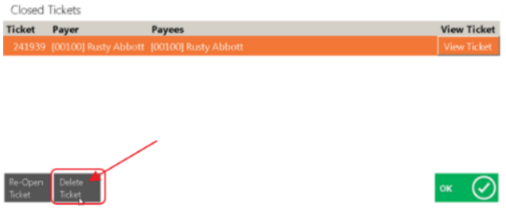
Delete ticket as previously shown.
When returned to the grid, select the Open Tee Time.

Ensure payment arrangement is proper, and click, “OK.”

After selecting the guest, ticket created will reflect the combined charges and can be closed out according to Member’s payment preference.
After closing the ticket, Tee Time again will show status as paid.

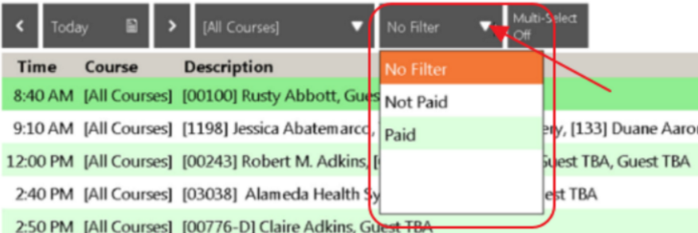
To assist with viewing Tee Times according to their payment status, utilize the payment filter.
Partial Pay a Tee Time - Multiple Members, Multiple Guests
Select Tee Time. (Reminder: Members have numbers before their names, and Guests do not.)

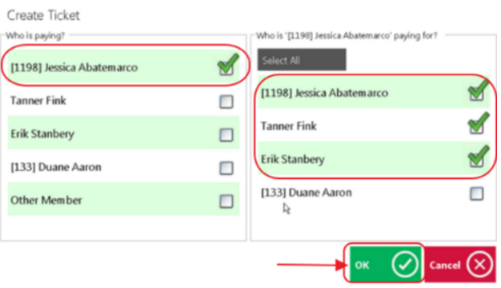
When creating a ticket with Multiple Members, the system will default Guest Charges to the Primary Member making the Tee Time Reservation.
In the example below, Member Jessica will be paying for both guests, Tanner and Erik. Click, “OK” to continue.
Note: In the event the Member making the reservation was NOT paying for the guests, uncheck the guests from the Member, and re-assign payment appropriately.
When more than one Guest exists, both guests will need to be confirmed using the Guest lookup feature previously shown. Select Guest 1, and click, “OK.”
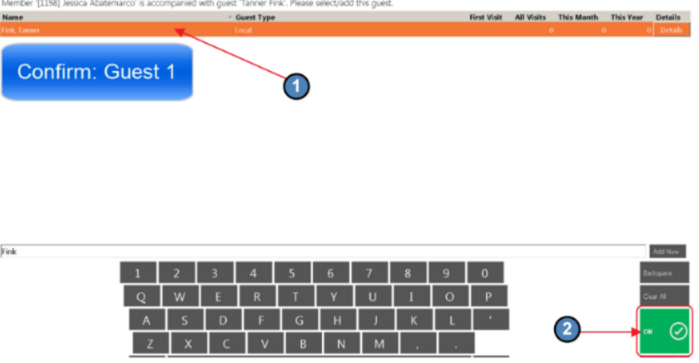
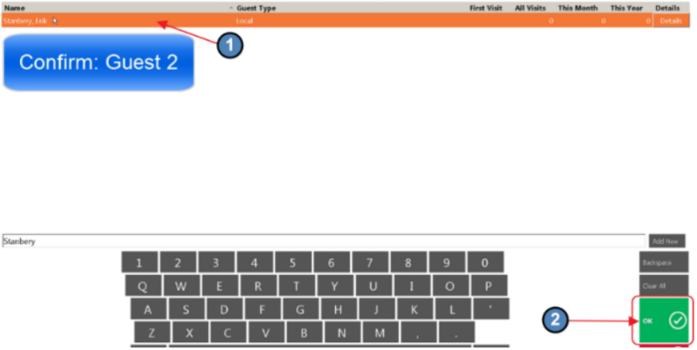
Then, select Guest 2, and click, “OK.”
System will then generate Ticket with appropriate charges for the (3) individuals. Close ticket based on Member payment preference.
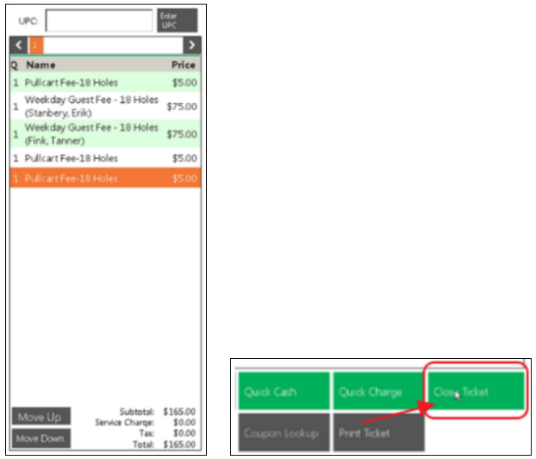
Grid will reflect Partial payment status, as (3) of the (4) golfers have paid.

Complete Payment for a Partial Paid Tee Time - Multiple Members, Multiple Guests
Click on Partial Paid Tee Time, to create additional ticket.

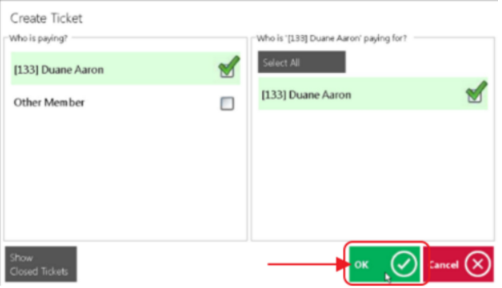
System will automatically show only the unpaid portion of the Tee Time. In this example, only Member, Duane Aaron is currently unpaid (as shown on the right side of the screen.) Click, “OK” to close.
Member charges will auto-populate based on system setup. Close ticket based on Member payment preference as previously demonstrated.
Edit Paid Tee Time (Re-Open Ticket Option)
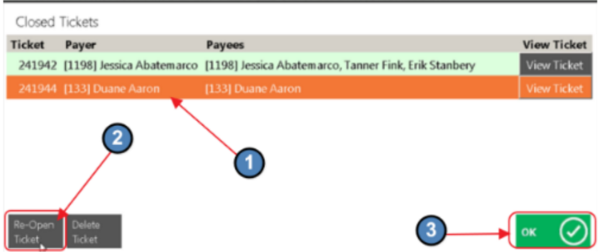
As previously shown, if an edit needs to be made to a Paid Tee Time, or a ticket that has been closed, double click on the Paid Tee Time to launch the Closed Tickets screen.

For this example, the Retail shop forgot to add a putter to Duane Aaron’s ticket. To correct this, and add the putter, select the Ticket, click “Re-Open Ticket,” and then click, “OK.”
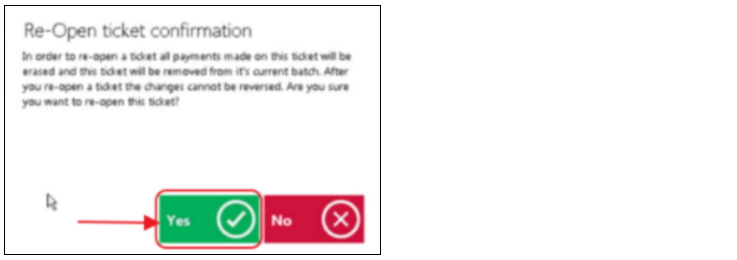
Confirm Re-Open, by clicking, “Yes.” Note, only if the Ticket resides in an unposted batch, will the system allow re-opening. If Ticket is in batch that was already posted, go into back Office, un-post batch, and then re-open ticket. Post batch again after editing is complete.
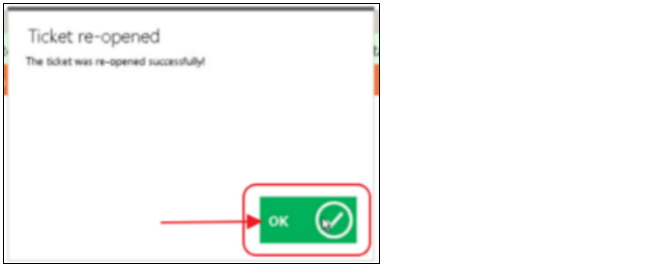
Acknowledge success message by clicking, “OK.”
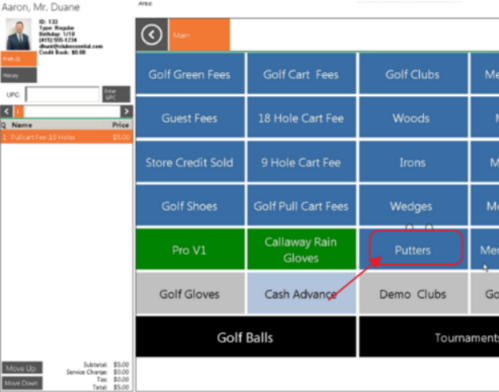
Ticket will re-open. Putter (or additional items), can then be added to the ticket.
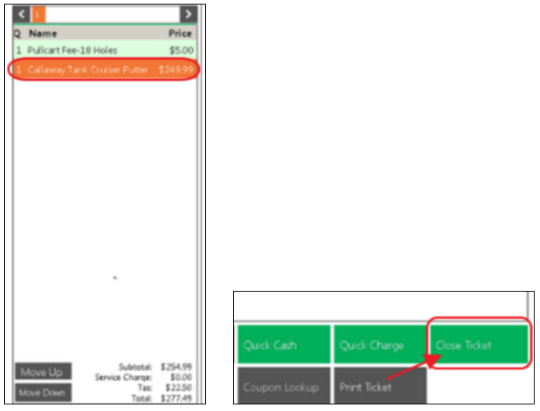
When additional item(s) have been added, close ticket according to Member payment preference.
Tee time will again show Paid status.

Create Tee Times from POS
When a Member walks up and requests a tee time, or calls in to make a tee time, click on “Show Admin Dashboard,” to create a tee time from the Point of Sale terminal.
The Tee Sheet will open, and will function similarly to the web based version.
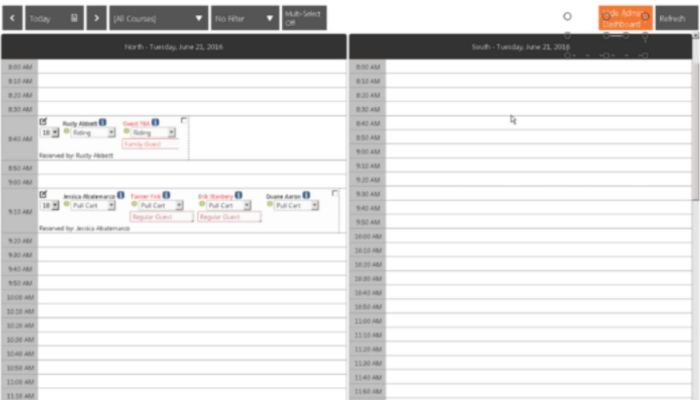
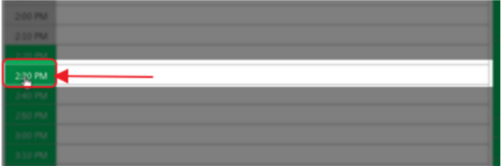
Scroll to find desired tee time, and click on the time to launch the “Book Tee Time” form. For this example, Member walked up and wanted to play at 2:30pm. Click, “2:30pm” to book respective tee time.
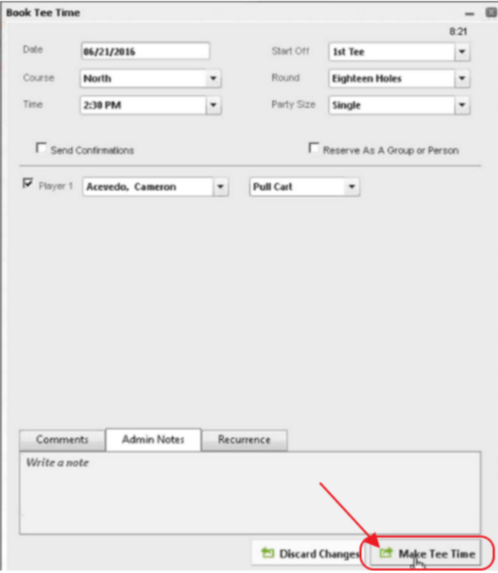
The form contains similar functionality to the form on the website.
Complete form, indicating party size, players, and whether player will be riding, walking or will have a pull cart. For walk-ups, it is common to uncheck the “Send Confirmations” option.
Once form is complete, click, “Make Tee Time.”
Back on the Admin Dashboard, the Tee Time displays.
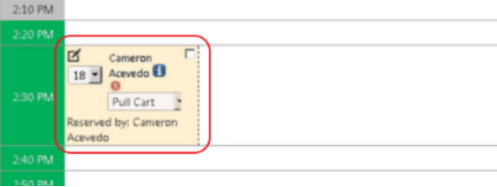
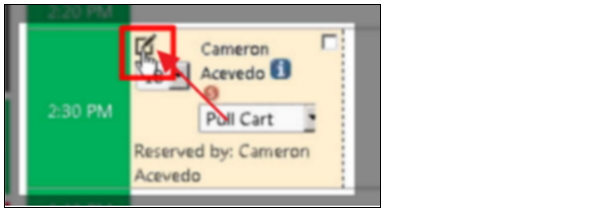
To make additional edits to an existing tee time, click the edit button to re-open the Tee Time.
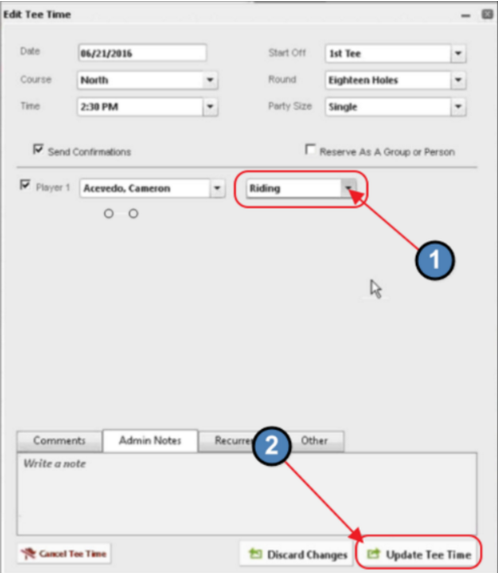
Make changes as necessary and choose the “Update Tee Time,” option. For example, perhaps the Member decided to ride at the last minute instead of using a pull cart.
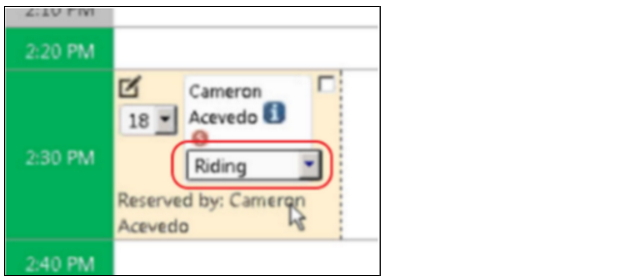
Note that once updated, the Admin Dashboard reflects the change.
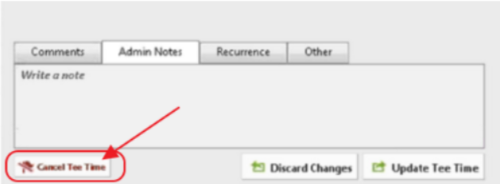
In addition to updating the tee time for changes, it is also possible to cancel the tee time by clicking on the “Cancel Tee Time,” button once in the Tee Time form.
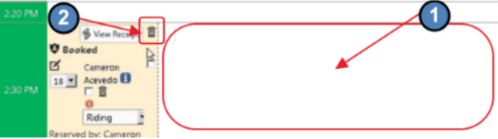
Another option for deleting the tee time exists within the Admin Dashboard. Click on the white space next to the tee time, and then, click on the Trashcan icon.
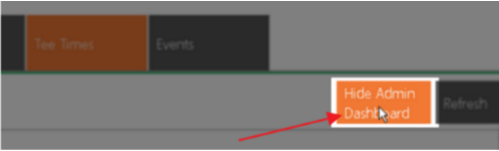
To return to the main Tee Times view, click on the “Hide Admin Dashboard” option in the upper-right corner of the screen.
The Tee Time will then appear in the Main Grid. Select to create ticket and charge to Member.

To ensure all Tee Times have come in from the Website, click the “Refresh” button.

Merge Multiple Tee Times into One Ticket
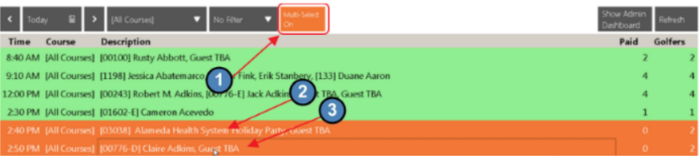
When multiple Tee Times exist that one party will be paying for, it is possible to select them using the Multi-Select feature and create one ticket that can be charged to one Member.
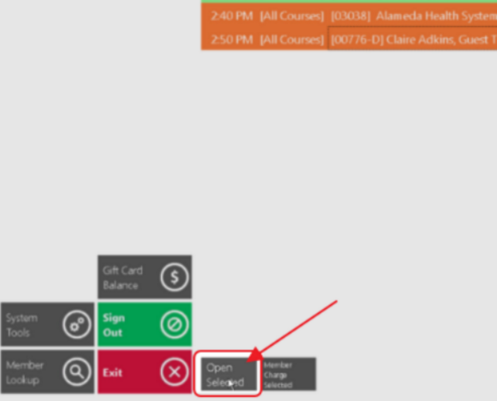
Click “Multi-Select,” then select the tickets to be consolidated.
Then, click, “Open Selected,” in the bottom left-hand corner of the screen.
When ticket opens, it will default to having selected the first Ticket Member, and will show who they were paying for from their original ticket. Check the additional individuals who they will be paying for (from the additional tickets), and click, “OK.”
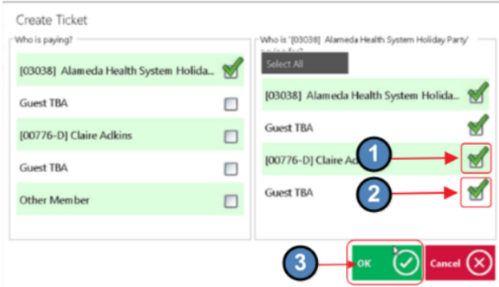
Create Ticket, select Guests as appropriate, and close to charge Member based on Member’s payment preference.
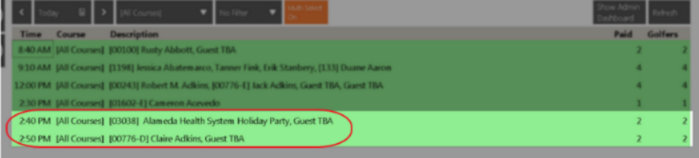
When complete, both Tee Times will show as Paid.
Complete Prior Day Open Tee Times
When reviewing prior day reservations, and Tee Times actually occurred, but were never charged to the Member accounts, it is important to address the open reservations, by creating tickets, and properly charging the Members.
For example, yesterday’s Tee Times showed the following Tee Times still open; and the Members did play their rounds.

To appropriately charge these Members, start by resetting the POS date back to yesterday’s date so that the charges appear on the proper day for accounting purposes.
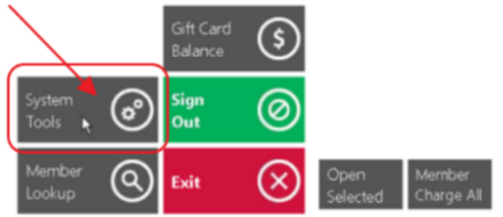
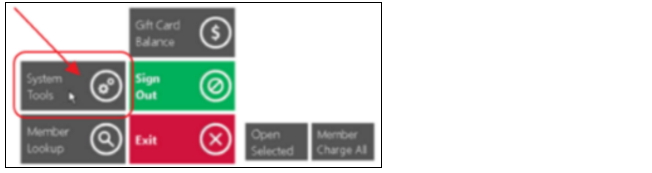
Choose, “System Tools,” in the bottom left-hand corner of the screen.
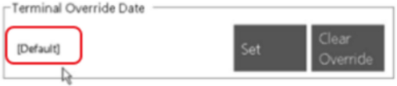
Then, click the “Utilities,” tab. Select the “Set,” button in the Terminal Override Data section. Set the proper date by utilizing the arrows, and click, “OK.”
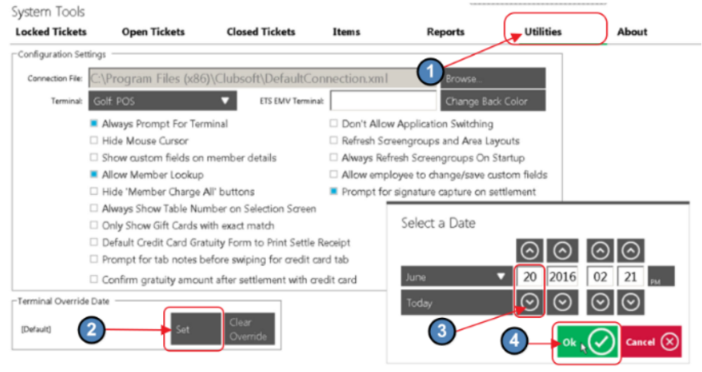
Note: Terminal Override date has been set to specified date.

Click “Exit” in the bottom right hand corner of the screen to return to the Tee Times grid.

Open Tee Times may then be selected for ticket creation and payment options.

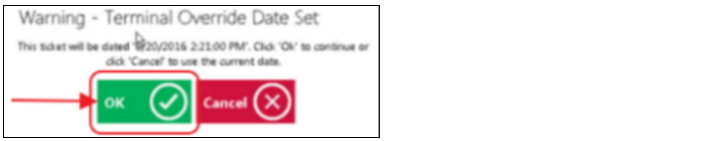
When generating a ticket, a Warning message will appear, confirming that an override date has been set. Click, “OK” to continue, or “Cancel” to revert back to today’s current date.
Once Prior Day Tee Times have been addressed, set the POS date back to today’s date.
Click, “System Tools.”
Click “Utilities,” tab. Then, click, the “Clear Override,” option in the Terminal Override Date section.
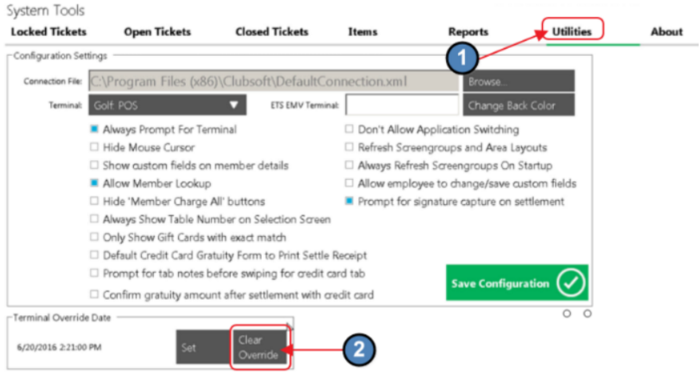
Note: Terminal Override date has been returned to Default date.
Click “Exit” in the bottom right hand corner of the screen to return to the Tee Times grid.
Member Charge All
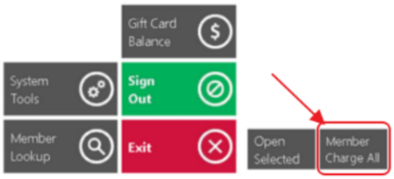
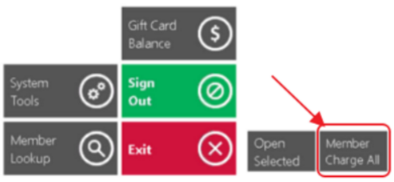
Also available for use is the “Member Charge All,” button. This button will take the Tee Times that have not been paid, create a Ticket for them automatically, and close them to Member Charge without going through the payment screen.
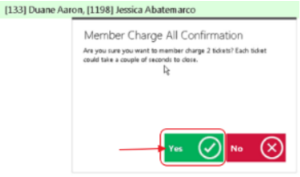
In this example, the only Tee Time still open, has two Members on it.

Click the “Member Charge All,” button.
Upon clicking the button, a ticket will be created for Duane, and will be charged to his Member Account. Additionally, a second ticket will be created for Jessica, and will be charged to her Member Account. Click, “Yes,” to confirm.
Option will exist to Print a receipt.
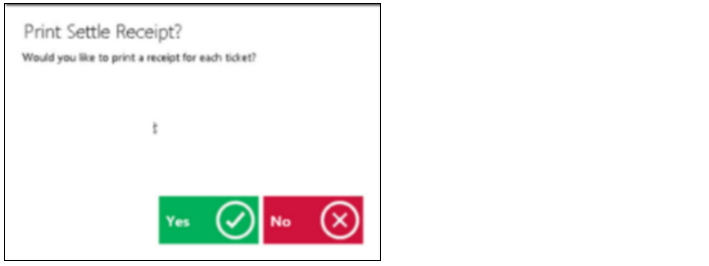
Member charge will commence.

Tee Time will then show as paid.

Note of Caution: When utilizing the Member Charge All function, when Guests are involved in a Tee Time, ensure the proper person is paying for the Guests.
If the Guests are not being paid for by the Member who made the Reservation (the default setting), then avoid using the Member Charge All function until all Tee Times with Guest have been closed out.
Other Features
Full Screen Button

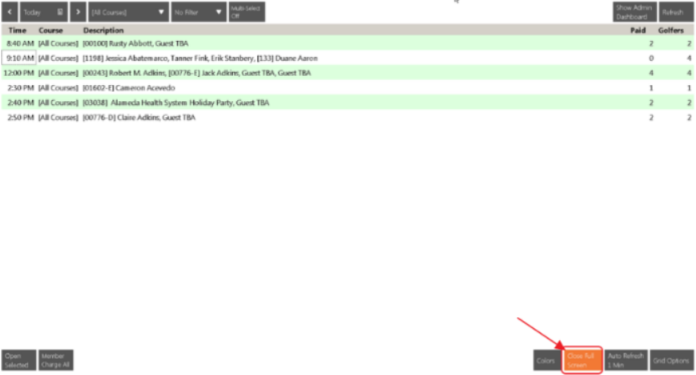
When the “Full Screen” button is selected, the side and top menus are eliminated from the Viewing area. Click, “Close Full Screen,” to reinstate top and side menu bars.
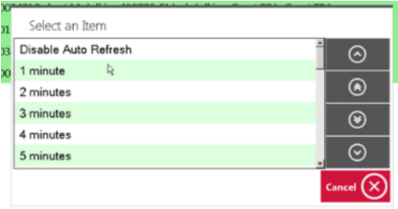
Auto Refresh
The Auto Refresh feature determines how often the POS will refresh with data from the Website. Set to desired time frame, or disable auto refresh to allow only Manual Refreshes.
Grid Options
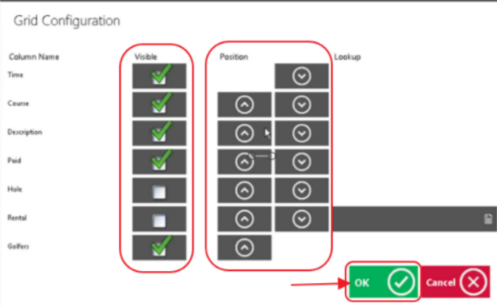
Use the Grid Options feature to design which columns appear in the grid, and how they appear.

Choose Columns to Show by checking the boxes in the “Visible” column, and change the order in which they display by using the Arrows in the position column. Click, “OK,” when complete.
Best Practices
Before utilizing the Member Charge All feature, ensure Guest charges are slated to go to the appropriate Members.
At the end of the shift or evening, go into System Tools, go to the Open Tickets tab, review open tickets and ensure all open tickets are closed appropriately.
FAQs
Q. What is the best way to charge multiple tee times to one party?
A. Use the Multi-Select feature to select more than one ticket to combine for payment by a single party, or to allow parties from one tee time to pay for Members/Guests of another tee time.
Q. Where is the best place to add the name in the system for a TBA Guest; the Reservation Tee Sheet, or the POS?
A. Either option will support the ability to add a Guest’s name. In the event the Reservation is still a couple of days away, it would be better to update in the Reservations system. In the event, it is at the time of play, the POS would be a better choice.
Downloadable Guide
Unification - Tee Times - Guide