Overview
How to create new records in the CRM, and edit existing records with new/updated data. Use Case(s) A CRM Record is a collection of data from related fields from within the same object. The most common example of a record is a single Contact. This contact record contains various fields, housing specific data pertaining to that contact. However, CRM Records are not limited to just Contacts. Often, you may need to create Activities, Notes, Event Opportunities … the list goes on! |
Content
Accessing the Tool
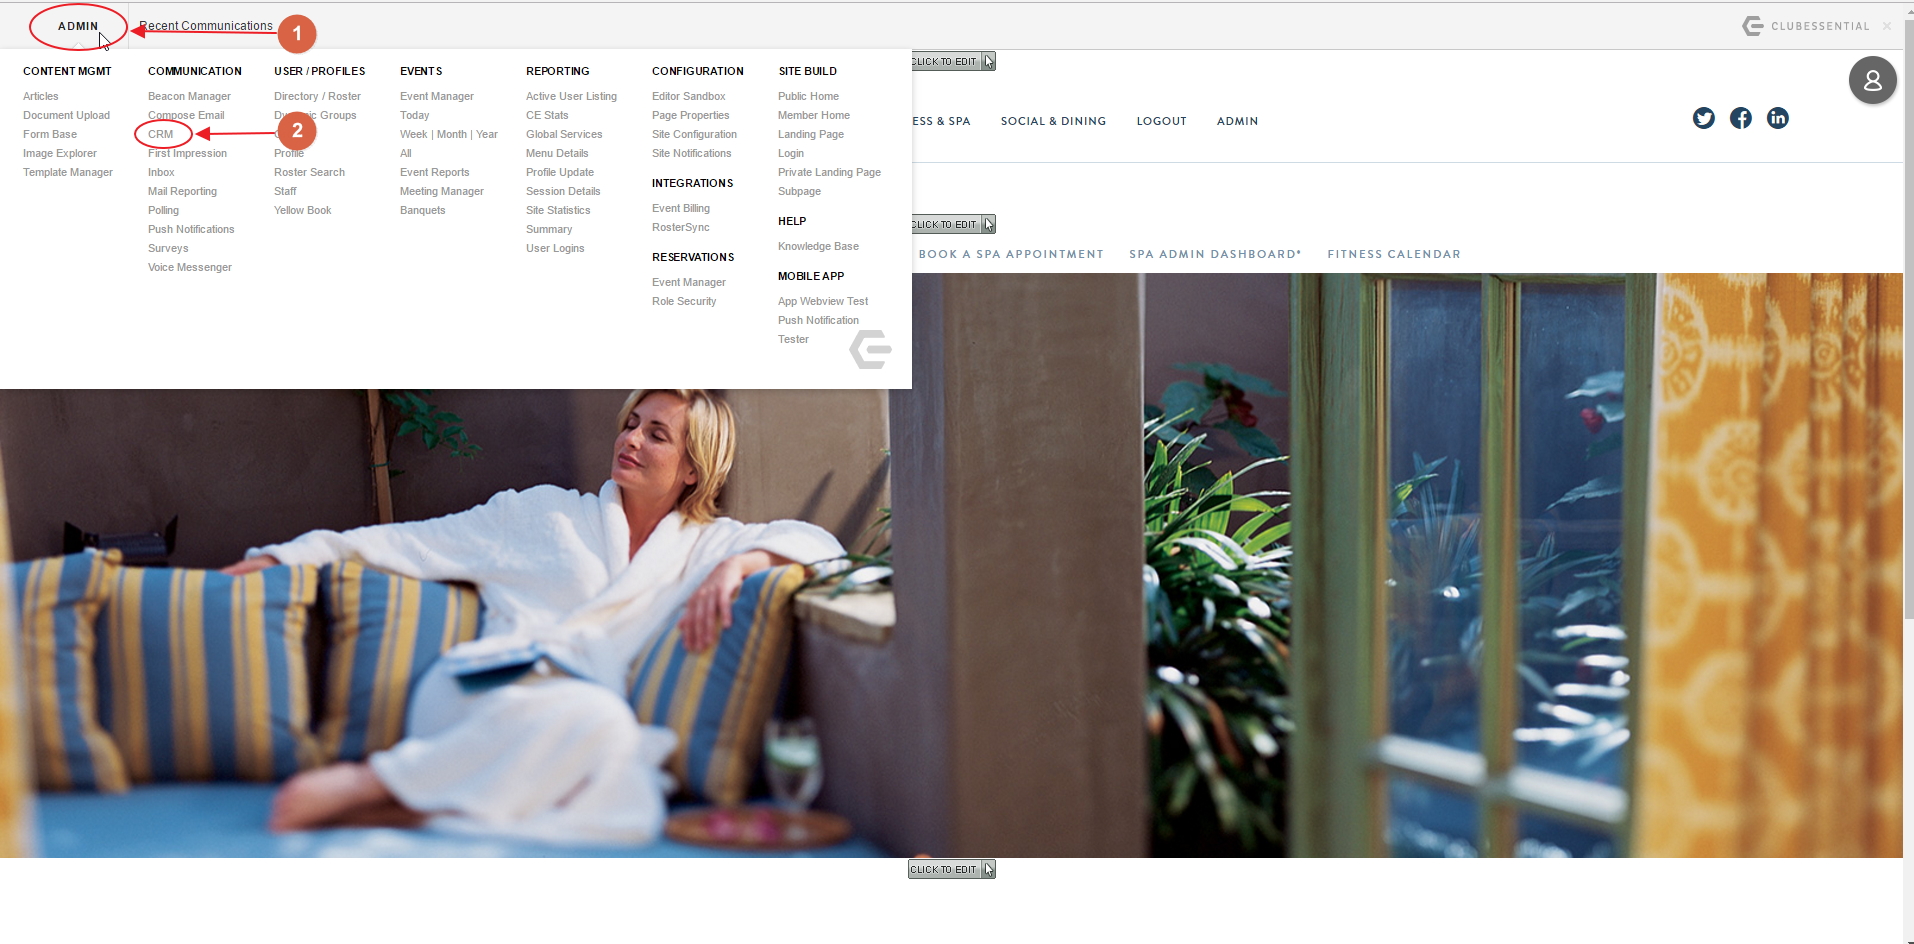
To access your CRM, sign in to your member website as an Administrator. Then, hover over the Admin toolbar in the top, left-hand corner of the page. The CRM link should appear in either the Communication or Content Management section, sometimes titled CRM & Data Warehouse.
The information covered in this section is mostly found in the Admin Dashboard of the CRM. To access this, while on the main CRM Dashboard (above), hover over your name in the top, right-hand corner of the CRM, and click the Setup option.

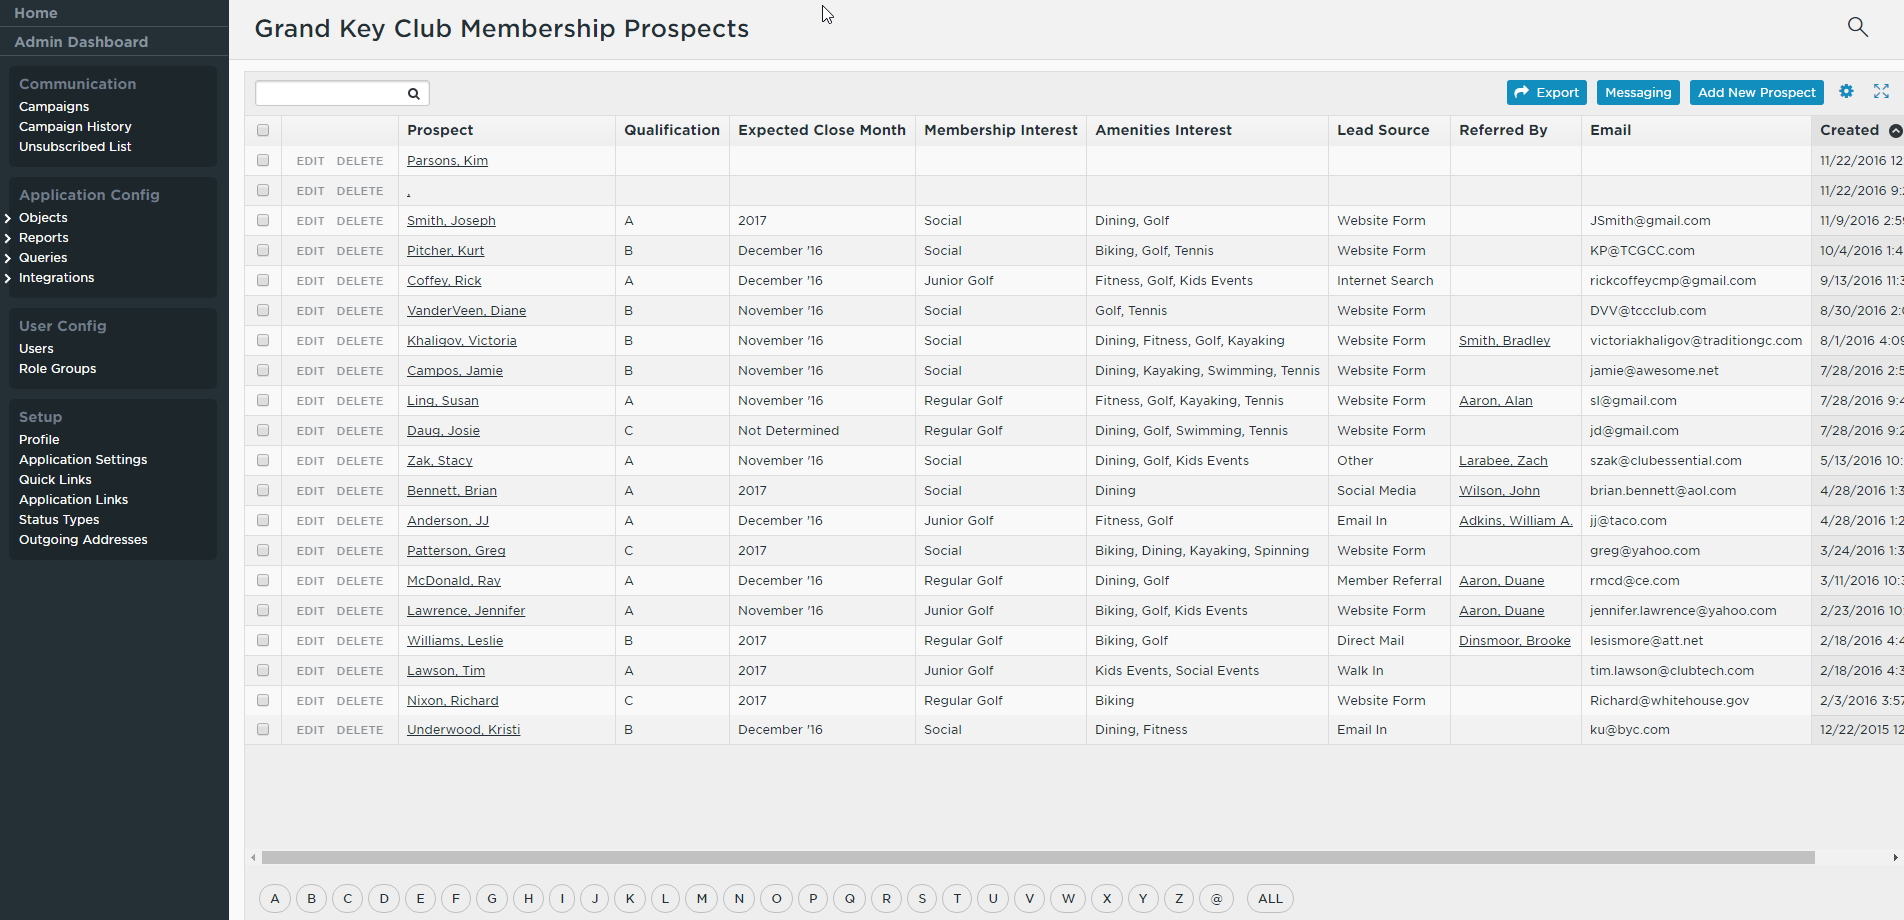
From here, you will see the CRM Admin Dashboard, which looks similar to the CRM Home Dashboard, but with a different sidebar on the left, and no Application Links at the top.
Editing Fields/Views/Layouts
As an administrative CRM User, you have access to almost all of the editable settings within your CRM. This includes creating new fields, adjusting the fields visible in a given View/Layout, and editing the values within an existing picklist field, among many other permissions.
Adding/Editing Fields
Your CRM should already include many different fields, containing a variety of different types of data. However, often you may need to begin storing a new piece of data that does not already have a corresponding field in the CRM, or you may need to edit the list of values available to choose from in a Picklist field.
Adding a New Field
To begin, you’ll need to first decide what Object your new field will reside in - that is, what is it that this field will be helping to describe? The most commonly used Object in CRM is Contacts Object. All fields in the Contacts Object should be used to directly describe a person, whether they are a Member, Prospective Member, Guest, or other. In this example, the field we are adding is “Beverage Preference”, which will allow us to choose which beverage this Member prefers when they dine. This field would most accurately describe a Contact, so we will create this new field in the Contacts Object.
To create your field, you’ll first need to access the Admin Dashboard. To do this, first start at your CRM home screen, then hover the mouse over your name in the top right corner, and click the Setup option.
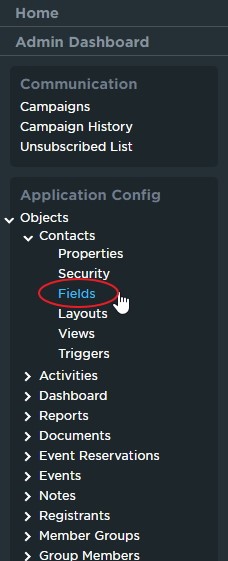
To add your new field from here, you’ll first need to open your Contacts Object for editing. From the left-hand sidebar, click on Options to expand the list and display all of the Objects present in your CRM. Contacts should almost always be the first Object listed. Click Contacts to expand the list further, and then click Fields to view the list of existing Fields for the Contacts Object.
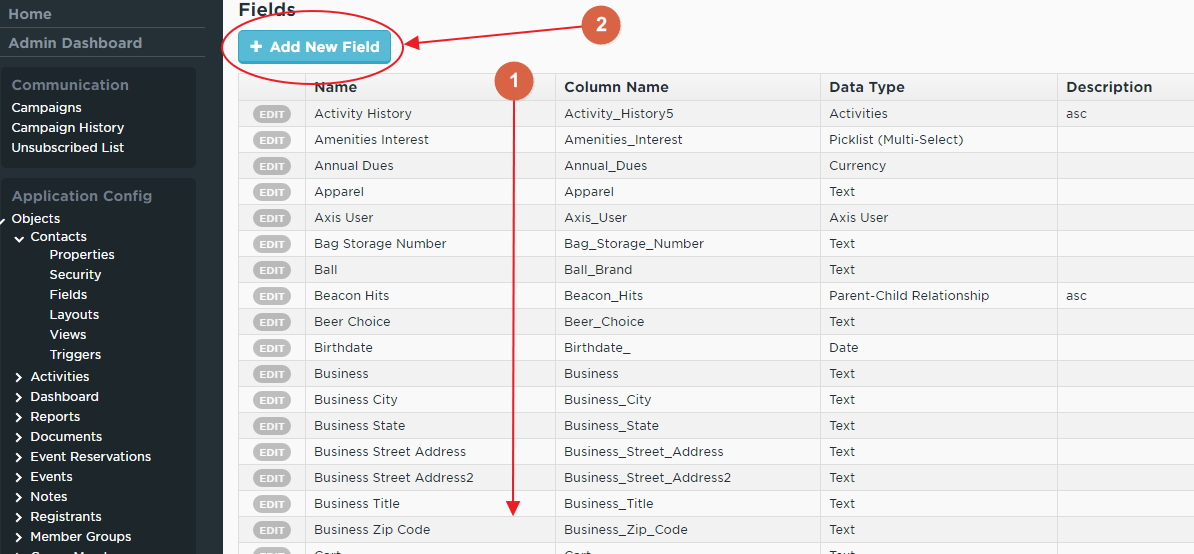
Before adding in your new field, scroll through this list to see if it already exists. If it does, then you can skip ahead to either Editing a Layout or Editing a View to add this field where needed. If it does not already exist, then navigate to the top of the list of fields, and click on the blue button titled + Add New Field.
Once you click on the + Add New Field button, you should see a list of blank field properties:
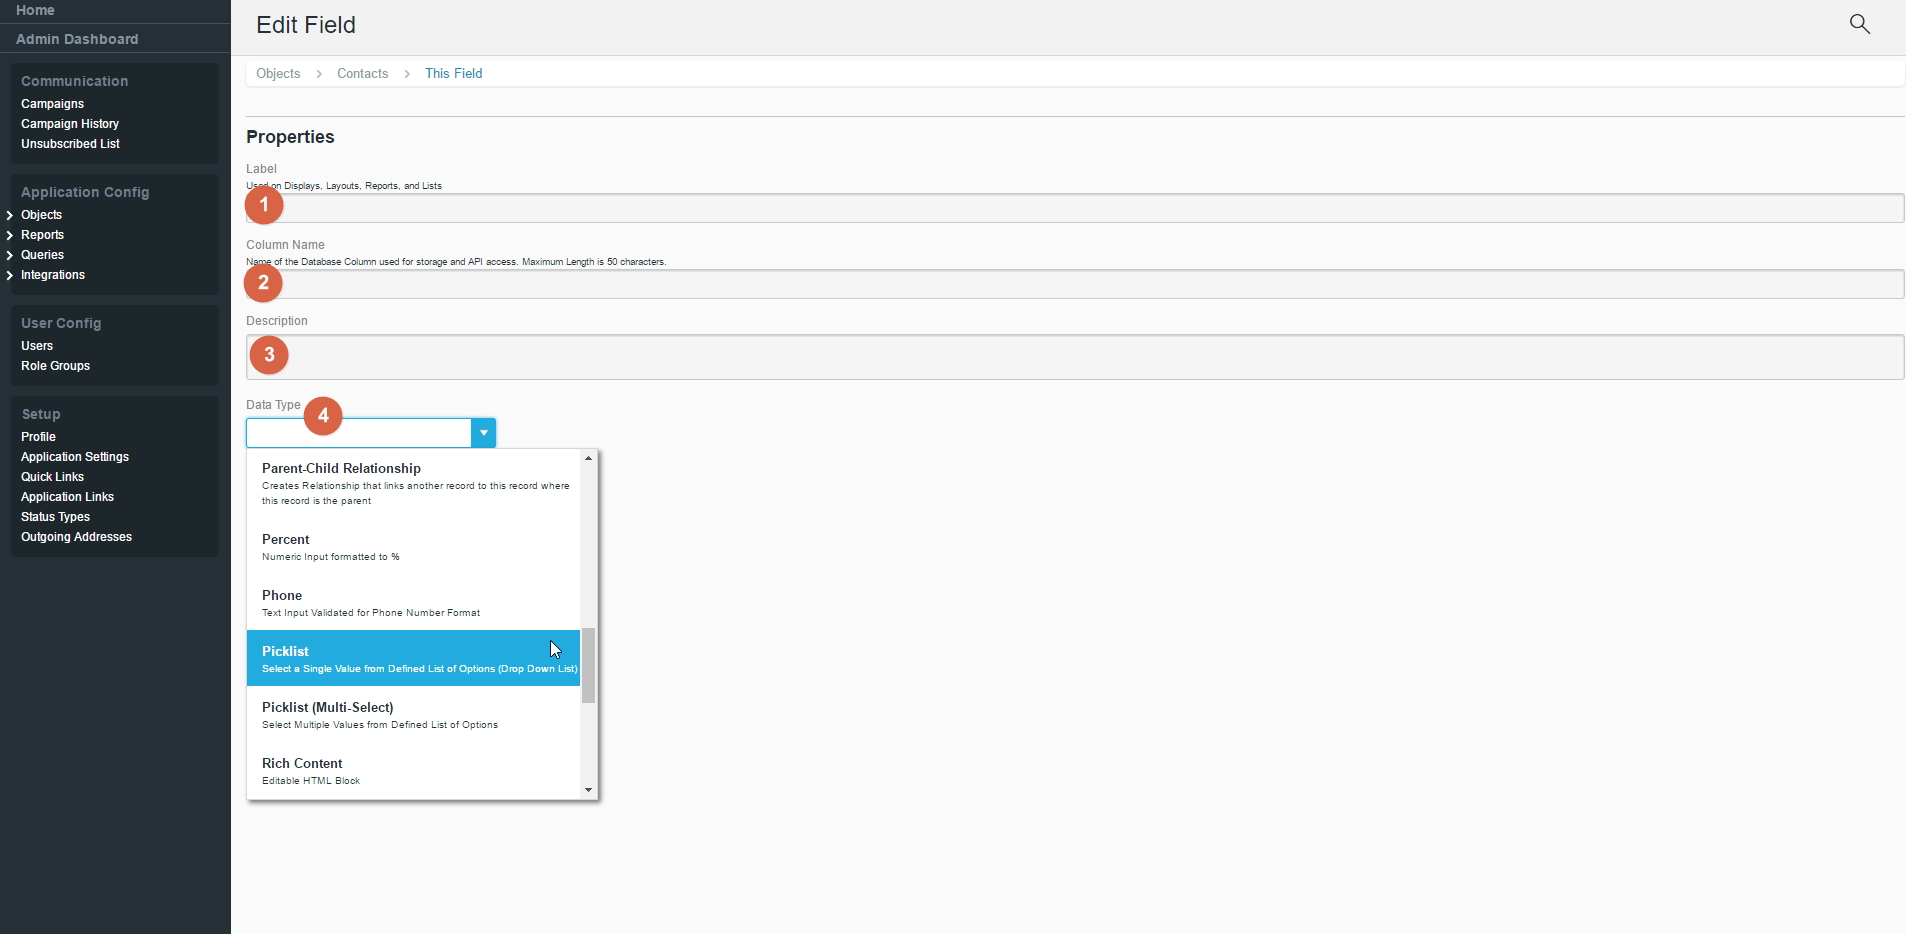
- Label: This is the field name, as it will display across the CRM. When choosing a name, be descriptive, but concise. Ex: Application Date
- Column Name: This is the database name of the field you are creating. This should automatically generate once you click out of the Label field. In most cases, it is best to leave this as the default value.
- Description: An optional field that allows you to enter a longer description of the field you are creating. This will only be seen in the full list of fields for the corresponding Object. Typically, if your Label is descriptive enough, this can be left blank.
- Data Type: Choose the type of data that will be accepted in this field. There are many options, but the most commonly used are:
- Checkbox: Sets this field as a checkbox, which can either be checked (true) or unchecked (false).
- Currency: Sets this field as a number, formatted for currency. Useful for tracking different revenue streams, and automatically appends the $ sign and decimal when entering data.
- Date: Sets this field as a date, with no time value. Brings up a datepicker when entering data.
- Date/Time: Sets this field as a date with the time appended. Brings up a datepicker with time selector when entering data.
- Email: Sets this field as a text box with forced formatting for email addresses. Fields of this data type can be used as targets for Campaigns, or can be used to directly send emails from a View/Layout.
- Number: Sets this field as a number, and allows you to configure the allowable size of number (in digits) and number of decimal places allowed.
- Picklist: Sets up a dropdown list of options to choose from, of which only one option can be selected.
- Picklist (Multi-Select): Sets up a list of checkboxes, representing options, from which multiple values can be selected.
- Text: A standard text box, with no formatting applied. Useful for displaying short pieces of basic information, such as names, addresses, phone numbers, etc. Allows you to set the maximum number of characters that can be entered, and whether or not all values in this field must be unique across the entire Object.
- Text Area: A larger text box, with no formatting applied. Allows you to set the maximum number of characters that can be entered.
For our example, we’ll choose the Picklist option, which will allow us to choose from a list of options (that will be populated now) when filling in this data on Member records later on. Once you select Picklist from the Data Type drop-down, the screen will reload and some new options will appear below.
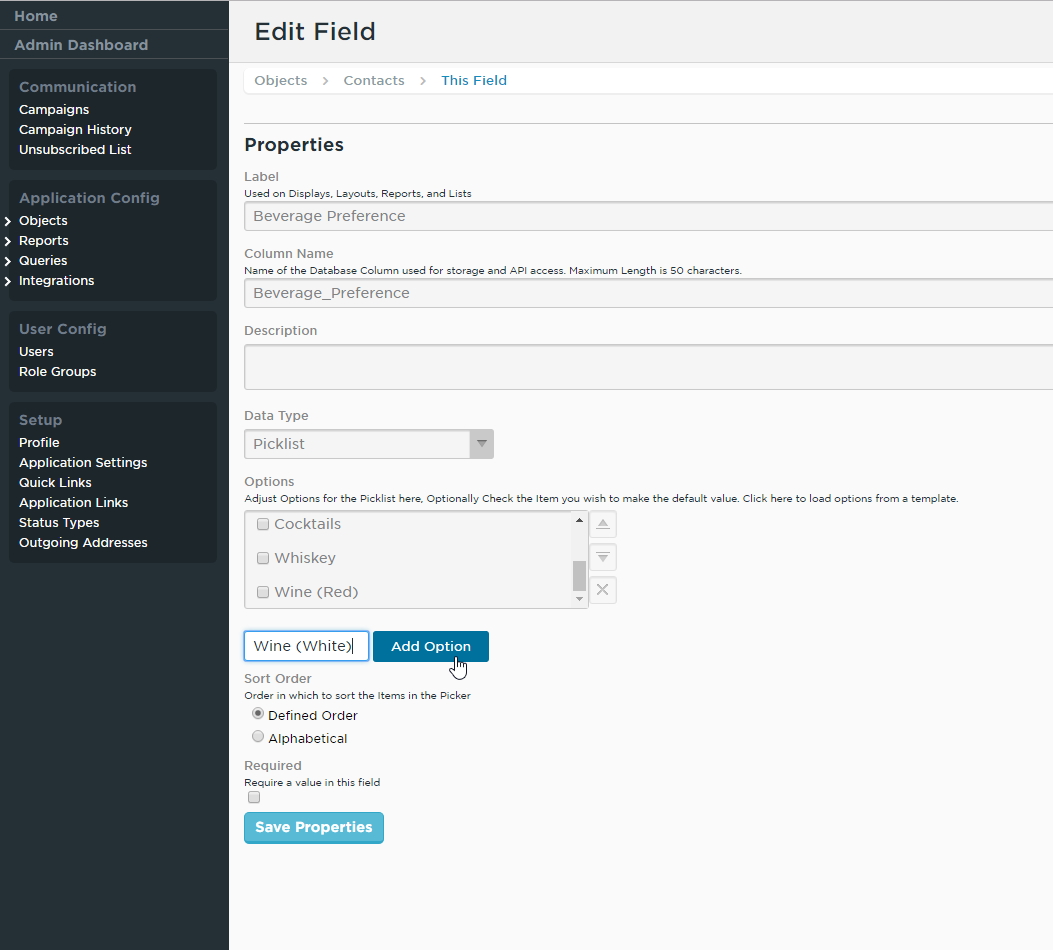
To begin, the list of drop-down options to choose from will be blank, so we will need to populate those options. To do this, click inside the text box next to the blue button titled Add Option and type the name of the option that you would like to add. Once complete, click the Add Option button, and your option will appear in the box above. Repeat this process as needed until all the necessary options have been added. You can reorder the list by clicking on an option, and then using the Up or Down Arrow buttons to the right of the options box to move that option up or down in the list. You can remove options by clicking on the option to remove, and clicking on the “X” icon just under the Up/Down Arrows.
There are two more Field settings available before the Save button. Choose whether to sort the options in the order they appear in the listing you just created (default), or to sort all the options alphabetically, regardless of how they were entered.
Finally, choose whether this field should be required. If the field is marked as required, any record that is created or edited in this Object will not save until a value is entered for this field. It is recommended to only use this for fields that would appear to all types of records within this Object (in our example, the Contacts Object). Therefore, making the Member Number field required would not be recommended, as all Prospects, Guests, Realtors, etc. do not have a Member Number, and you would not be able to save a new Prospect (or similar) record until a Member Number was entered. However, the Primary Email Field may be good to set as required, if you are certain that you will be able to fill this in for each contact that you enter.
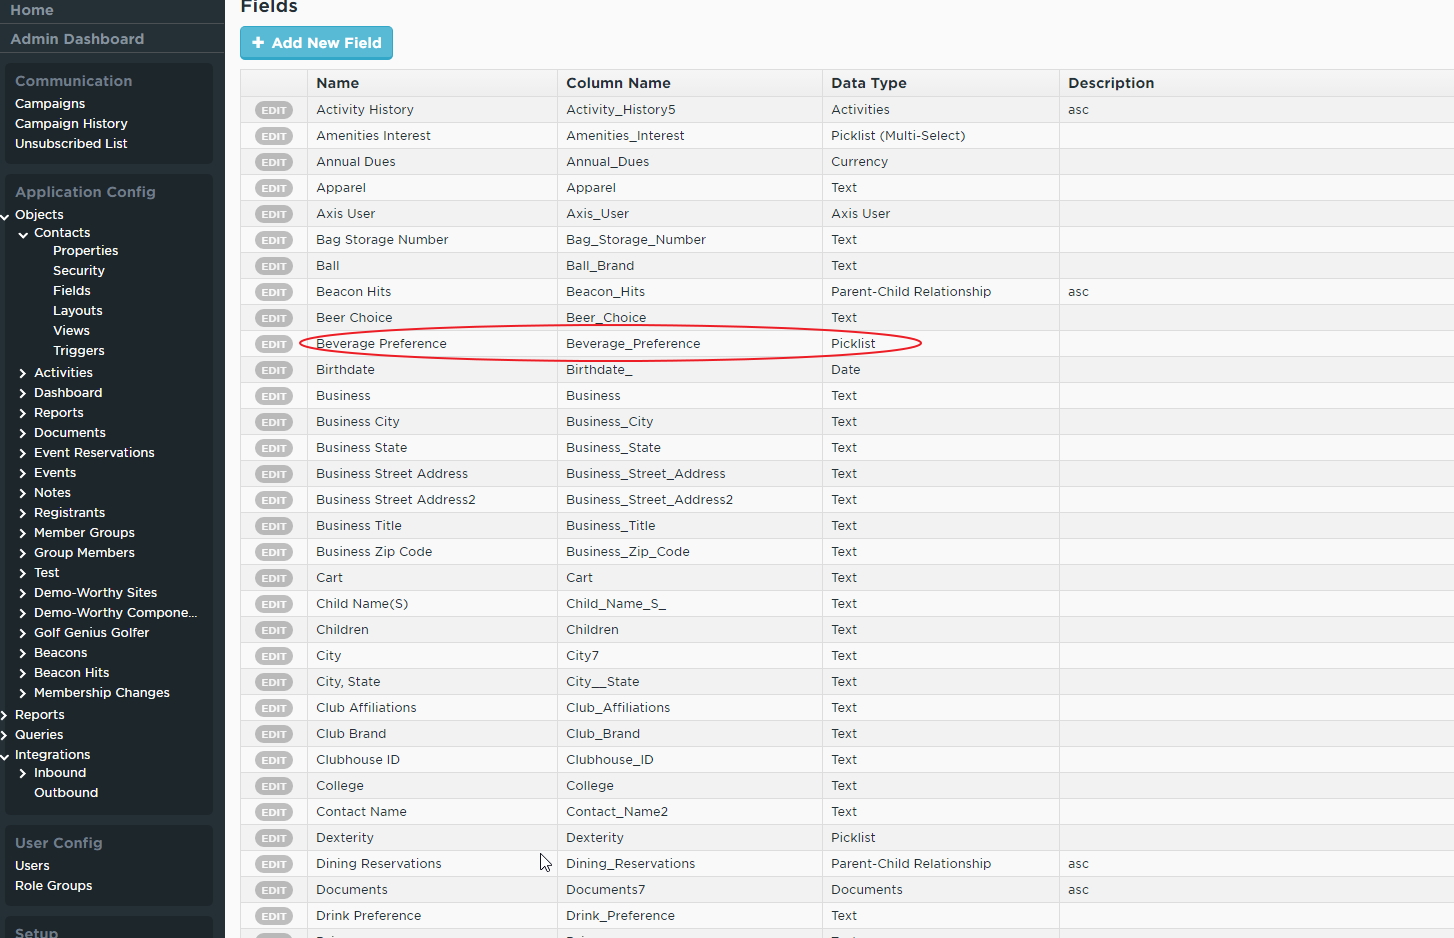
Once you have completed the steps above, click the blue button at the bottom of the page titled Save Properties, and your field will be created.
A field does no good if it is not visible, so continue reading to learn how to add this new field into a View and Layout, so you can both view and edit the information in this field for your CRM records.
Adding/Editing a CRM View
A View in the CRM is a screen that displays a high-level overview of a subset of records from within a single Object in the CRM. Views typically have filters in place that will display only records that meet certain criteria. For example, the “Our Members” View will display all records in the Contacts Object that have a status of “Member.” The fields displayed in a view are customizable to match the type of record displayed within. For example, the “Member Number” field makes sense to appear in the “Our Members” View, but not in the “Membership Prospects” view.
Adding a New View
To create your View, you’ll first need to access the Admin Dashboard . Similar to adding Fields, you’ll need to think about which Object this View will reside in. In this example, we’ll be adding the new View “Real Estate Prospects” to the Contacts Object.
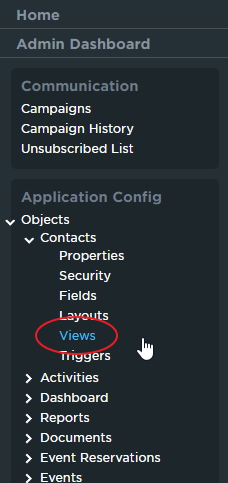
To add your new View from here, you’ll first need to open up your Contacts Object for editing. From the left-hand sidebar, click on Options to expand the list and display all of the Objects present in your CRM. Contacts should almost always be the first Object listed. Click on it to expand the list further, and then click on Views to be brought straight to the Views section of the Contacts Object setup screen.
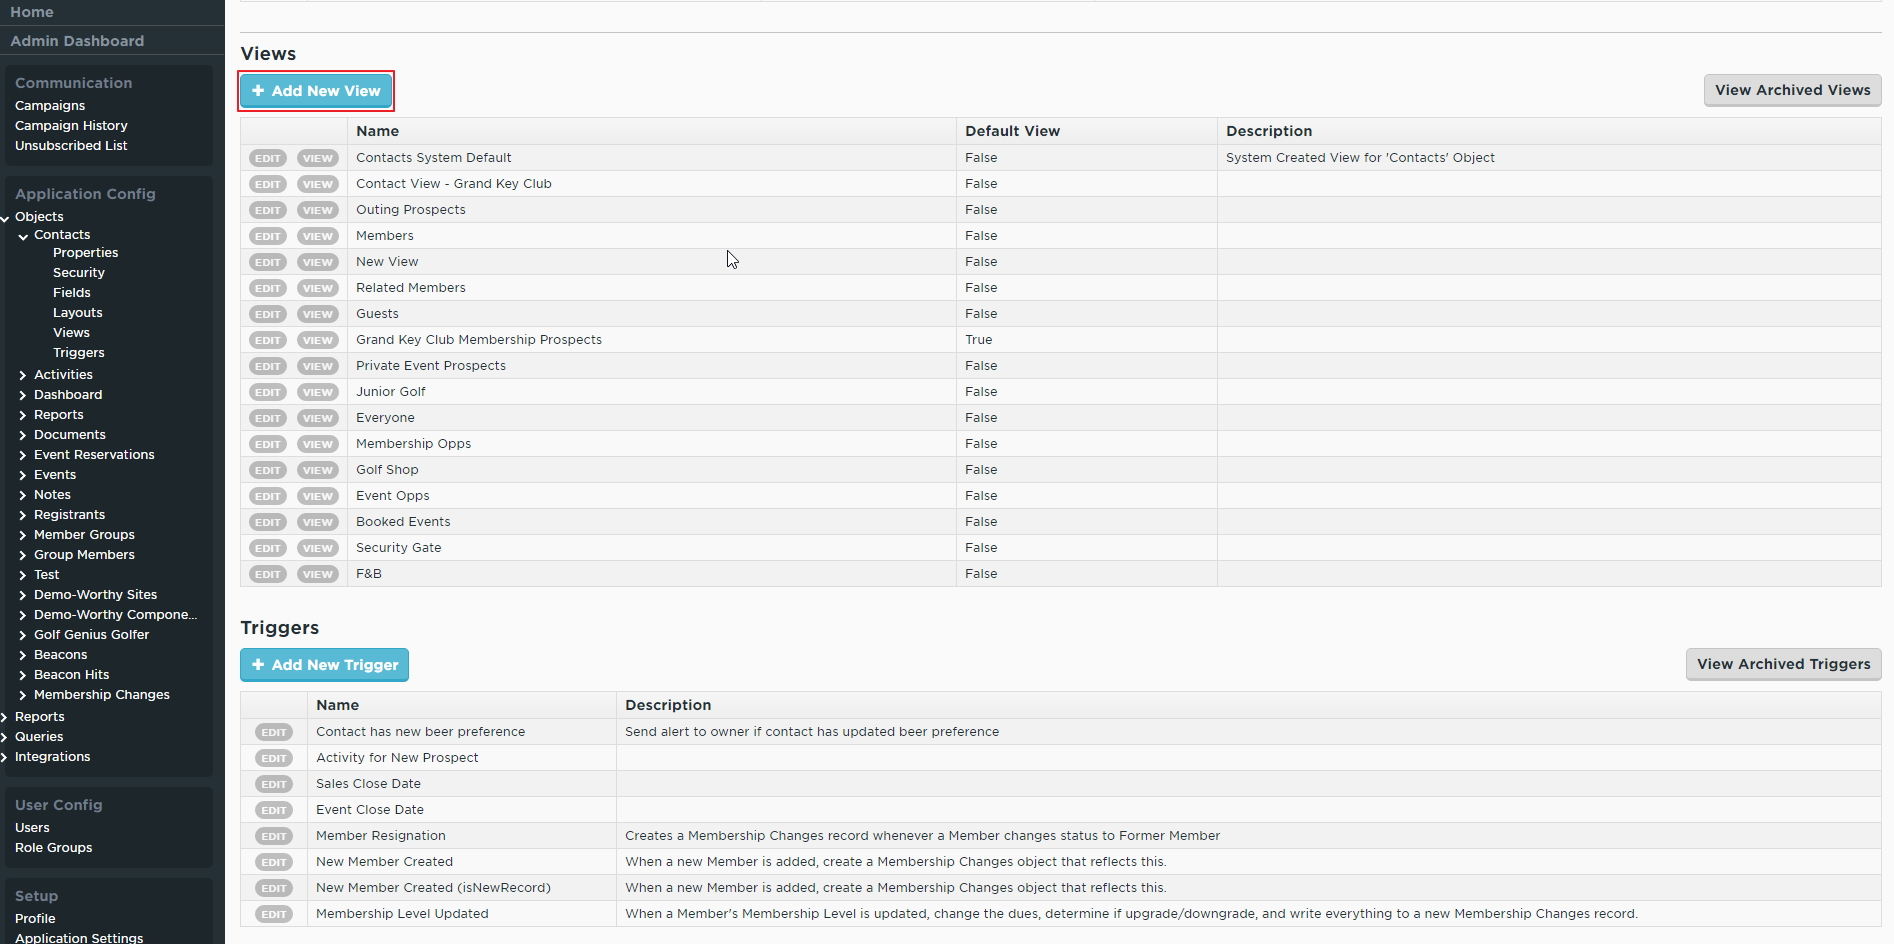
You should now see a list of all available Views within the Object you are editing. To edit an existing View, click on the gray Edit button immediately to the left of its name in the listing. To see a live representation of this View, click on the gray View button immediately to the left of its name in the listing. To add a new View, click on the large blue button titled + Add New View.
You should now see the Edit View screen:
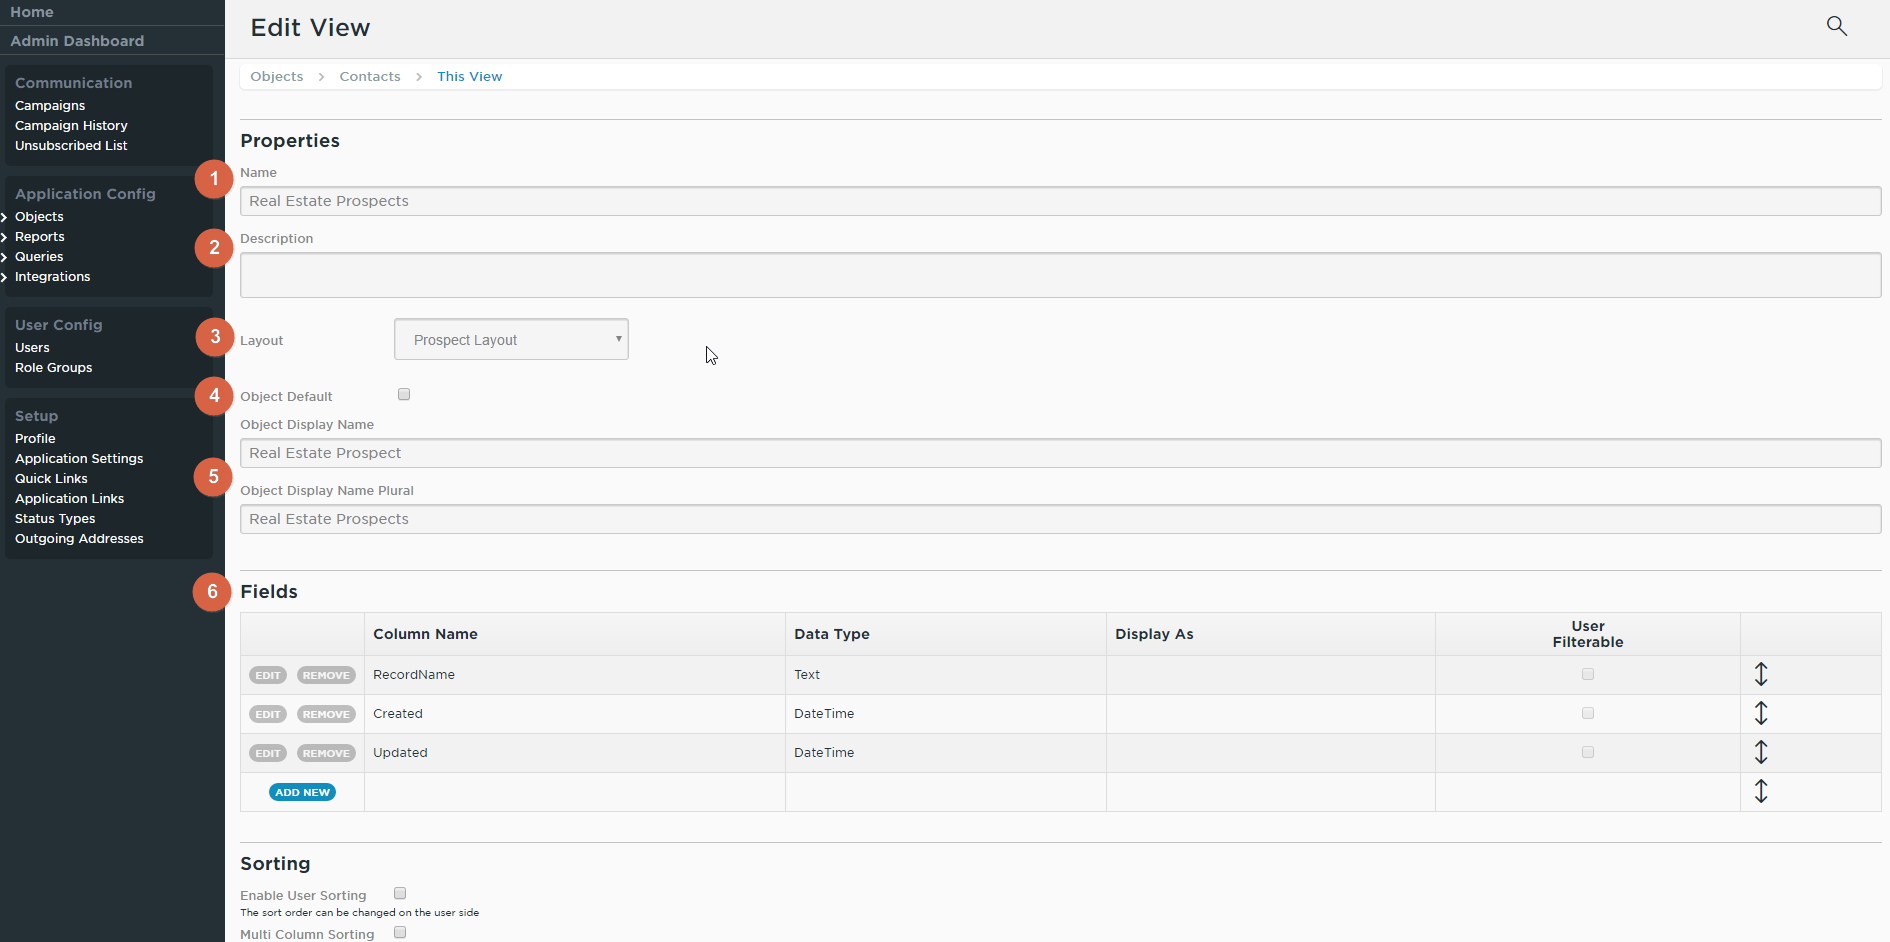
- Name: Enter a short, descriptive name for this View. Ex: “Real Estate Prospects”
- Description: Optionally, enter a longer description of this View. This would be seen only on the Views overview, and not from the View itself.
- Layout: Select which Layout will be related to this View. Whenever a user clicks to view a record from this View, this is the Layout that will display that record’s information. For example, a new View for “Members” should use the “Members” Layout so that, when a record is opened from within the new View, the full list of Member information is displayed.
- Object Default: Check this box to make this View the default for this Object. Any reference to this Object that does not point to a specific View will instead show the Object Default View.
- Object Display Name: Dictates how the Object will be referenced from within this View. For example, this changes the verbiage of the Add New Record button from within the View. If left blank, the default is set to the Object Name.
- Fields: Lists which Fields are visible within this View. By default the system fields RecordName, Created, and Updated are visible. The order that the fields appear in this list is the same as how they will appear in the View (the top-most field will appear furthest to the left in the View). The options for each row are:
- Edit: Allows you to change the value in the Display As and User Filterable columns for this row.
- Column Name: Displays the Column Name of the field that is set to display in the View in this position.
- Data Type: Displays the data type of the field that is set to display in the View in this position.
- Display As: Allows you to change the verbiage that displays for this field in the View. For example, you could change the wording of the Updated field to Time of Last Update.
- User Filterable: Enables this field to be added to an Advanced Filter in the View, for on-the-fly filtering.
- Positioning Arrow: Click and drag this arrow up or down to reorder the fields within the table.
At the bottom of the list of fields is a blue button titled Add New. Clicking this button will add a new row to the bottom of the existing list, and allow you to configure a new field in this View.
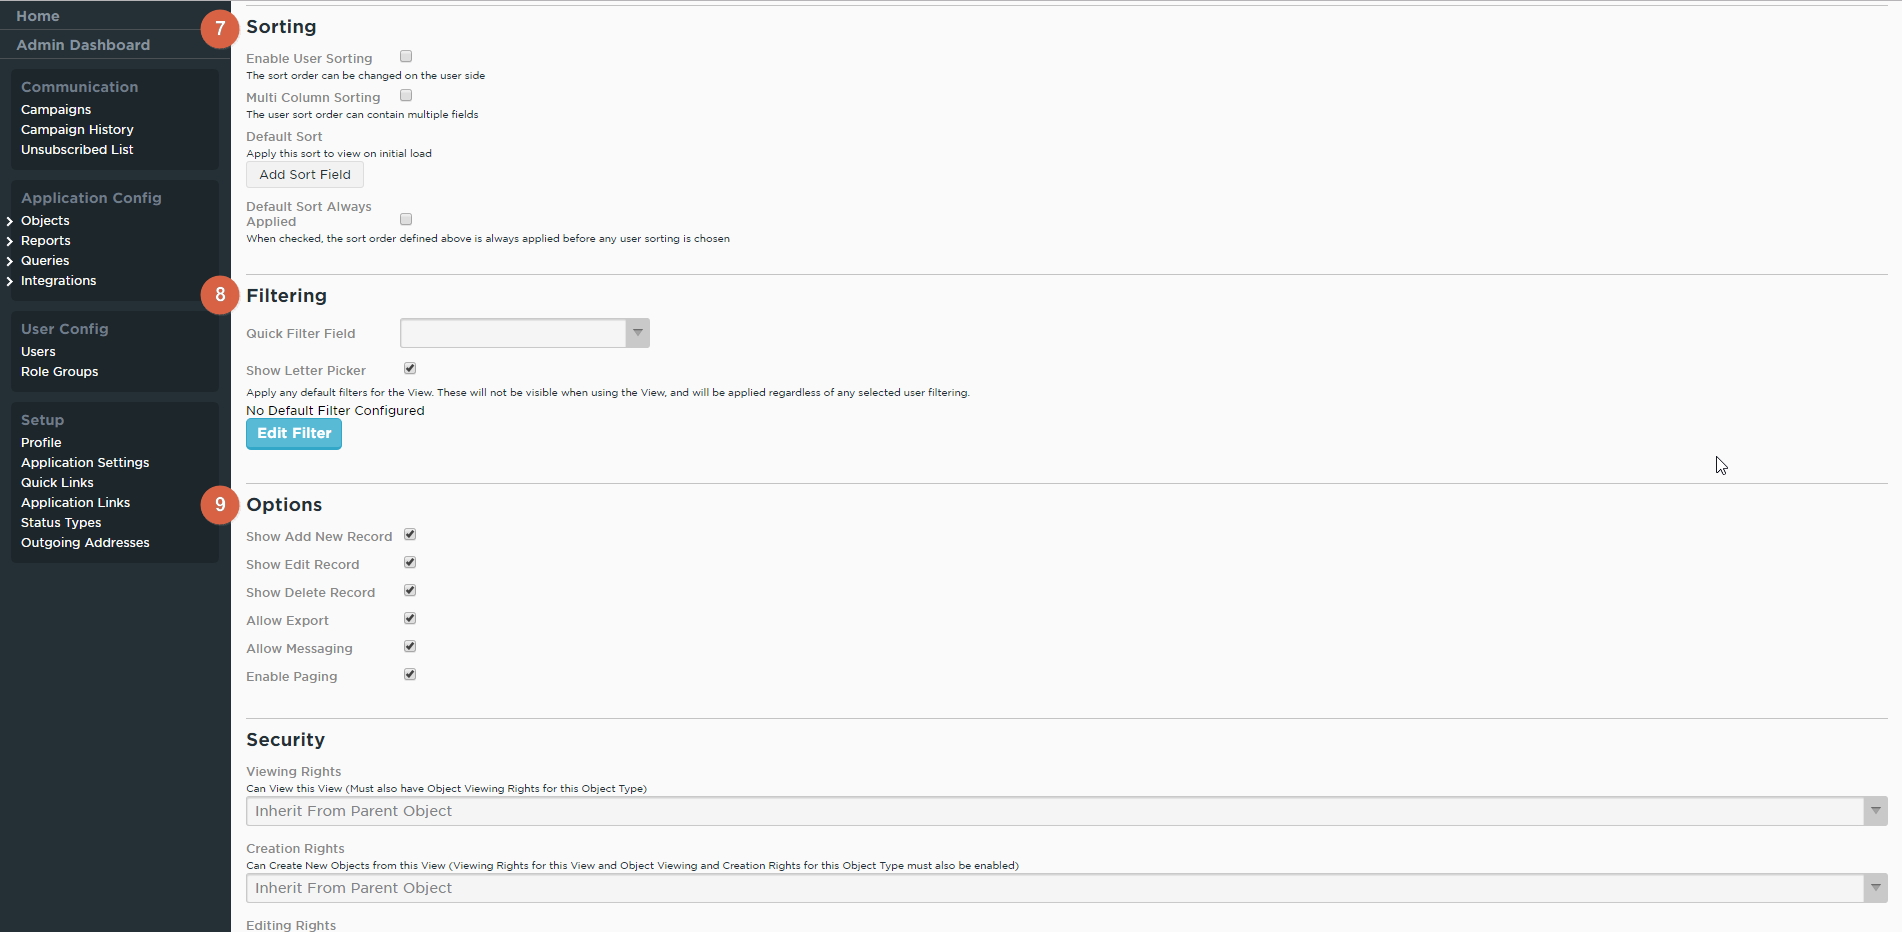
7. Sorting: Allows you to configure the sorting options for records within this View. All sorting can be in either ascending order (lowest to highest) or descending (highest to lowest) order.
- Enable User Sorting: Enables users to change the sort order in this View manually by clicking on the column header. Checked by default.
- Multi Column Sorting: Enables users to sort this View by multiple columns.
- Default Sort: Configures the sort order that will be applied to the records within this View by default when it first loads. More details on this below.
- Default Sort Always Applied: When checked, the default sort order will always apply. Any user sorting (if enabled) will only take place after the default sort. In many cases, this prevents user sorting entirely, so it is recommended not to select this option unless you want to prevent user sorting.

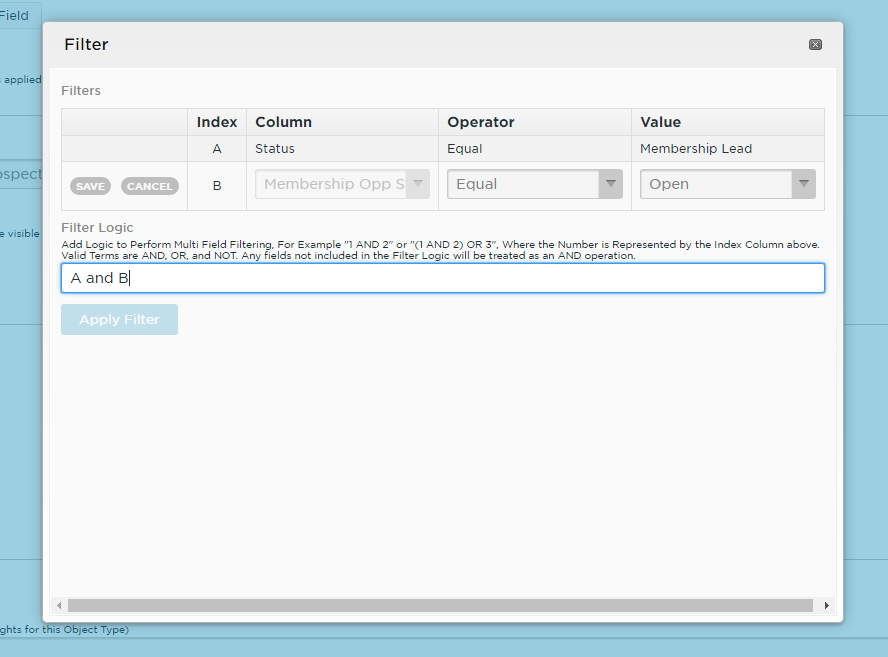
- Index: Used in the Filter Logic section below to target this line in the filter. This value is automatically generated.
- Column: Select which field to use in the filter.
- Operator: Choose how to compare the selected field to the value entered in the Value column.
- Value: Enter (or choose, for picklist fields) a value to compare the selected field against.
Once you have filled out all the fields in this line, click Save, and your new field comparison will be added to the table. You can repeat this as many times as necessary to build your filter.
Underneath this section is a text box to enter in logic commands to combine the fields entered in the table. This is only necessary if more than one field is selected in the table (if only one field was chosen to filter, then this section should be left blank).
In this section, use the operators “AND”, “OR”, “NOT”, and parenthesis to combine the field comparisons from the table above, using the Index value to refer to a specific line. See the below image for example:
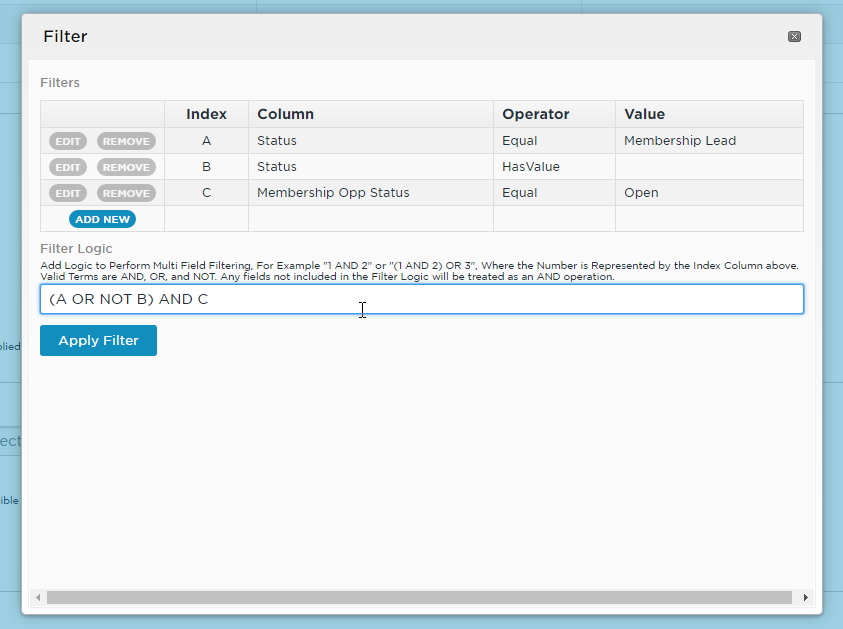
In this image, there are three lines of logic entered:
- Status Equal “Membership Lead”: will be True if a record has a value of “Membership Lead” filled out in their Status field, otherwise will be false.
- Status HasValue: will be True if a record has any value at all in the Status field, otherwise will be false.
- Membership Opp Stats Equal Open: will be True if a record has a value of “Open” filled out in their Membership Opp Status field, otherwise will be false.
In this example, we’ve entered the following line of logic:
- (A OR NOT B) AND C
In plain English, this states that:
- Records that have a Status that is either EQUAL to “Membership Lead” OR that have no value entered in the Status field, AND which have a Membership Opp Status EQUAL to “Open”.
Once you have set up your filter as needed, click on the blue button labeled “Apply Filter” and your filter will be applied to the View.
9. Options:
Use this section to configure some final miscellaneous options for this View. The Options available are:
Show Add New Record: When checked, a button will be present in the View to allow users to add new records. Unchecking the box will hide this button from this View only.
Show Edit Record: When checked, a link will be present next to each record allowing users to edit the selected Record. Unchecking the box will hide this link from all records in this View only.
Show Delete Record: When checked, a link will be present next to each record allowing users to delete the selected Record. Unchecking the box will hide this link from all records in this View only.
Allow Export: When checked, a button will be present in the View to allow users to export the records within this View. Unchecking the box will hide this button from this View only.
Allow Messaging: When checked, users will be able to send messages to records containing email addresses either by hovering the mouse over an email address visible in the View, or by selecting a record and clicking on the Messaging button. Unchecking this box will hide the button from this View only, and also prevent the Message option from appearing under email addresses in this View only.
Enable Paging: When checked, this View will be split into pages of 20 records each, which can be scrolled through to view all records. Unchecking this box will force all records returned in this View to load on the same page, and remove the paging for this View only.
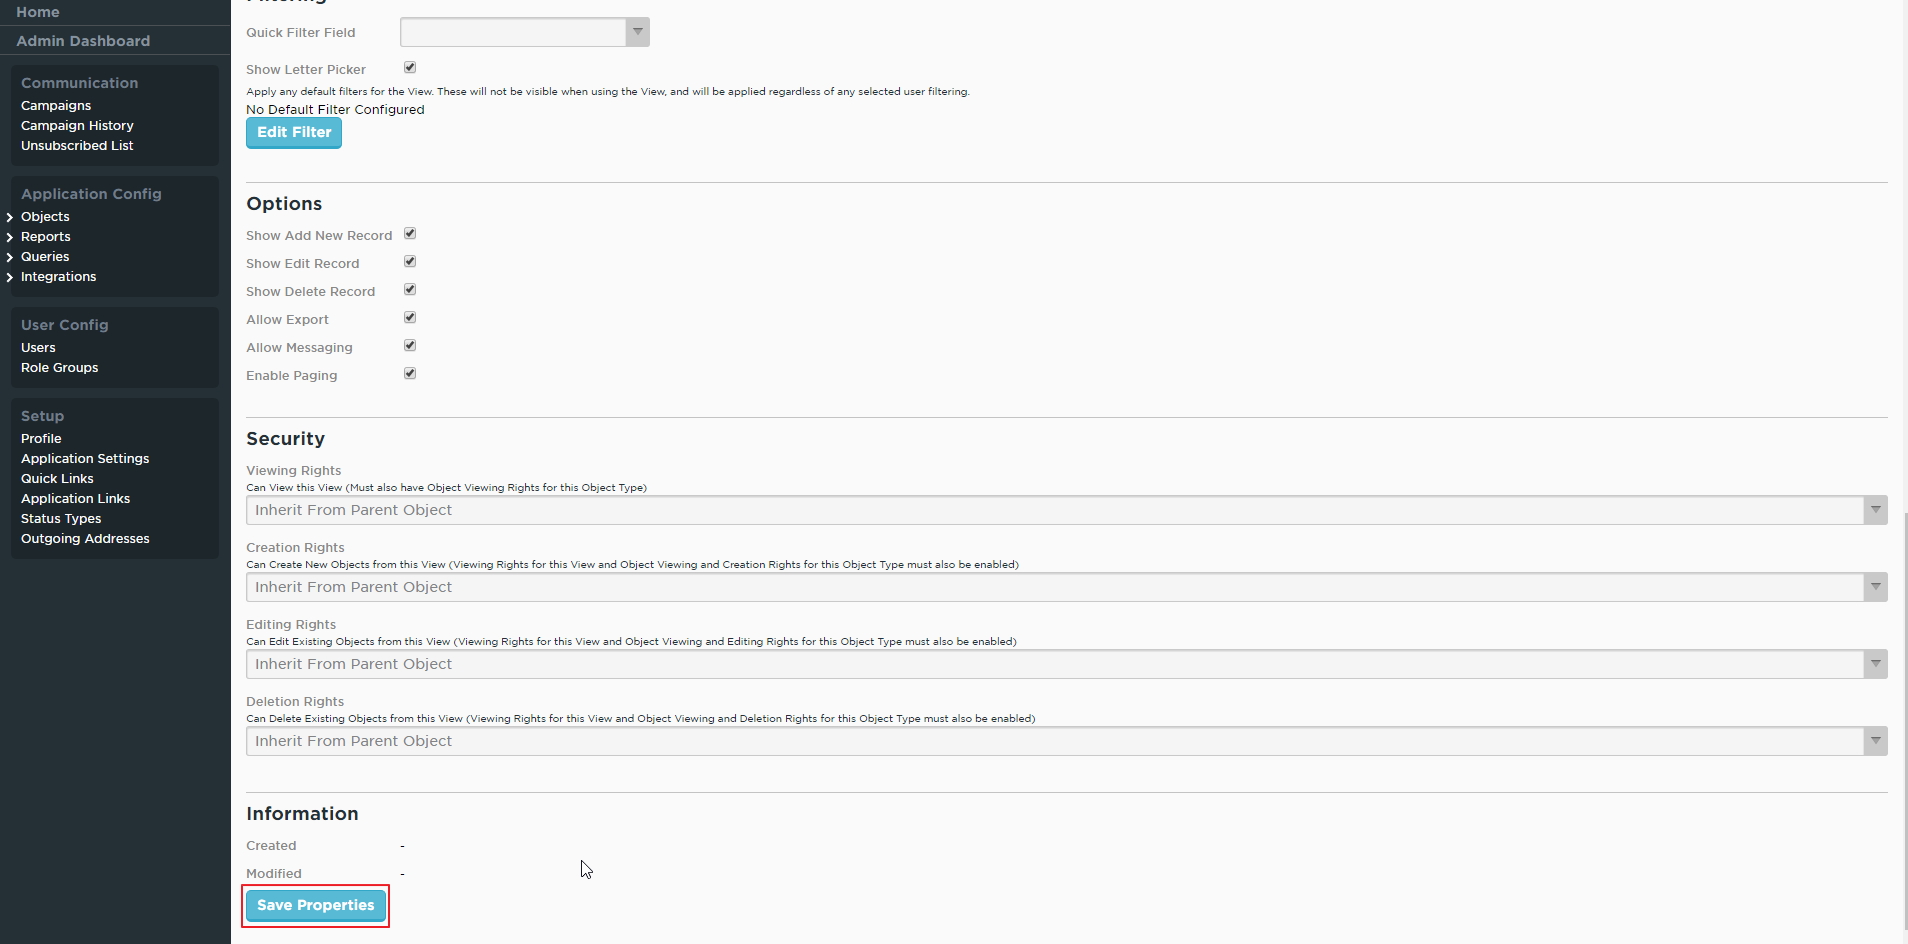
Security:
Generally, security options for Views are not configured from the View itself, but rather in the Role Groups section, so we will not cover this section. By default, all options are set to Inherit From Parent Object.
Please contact your CRM Support Team if you need to lock down a View from certain users, as we are happy to cover this with you on a one-on-one basis.
Adding/Editing a CRM Layout
A Layout in the CRM is a detailed listing of all fields being used to store data for every Record in a CRM Object. A Layout is typically accessed by clicking a Record Name in an associated View. Layouts are typically broken up into sections, and can have up to four columns to store information in varying configurations.
Adding a new Layout
To create your Layout, you’ll first need to access the Admin Dashboard. Similar to adding Fields and Views, you’ll need to think about which Object this Layout will reside in. In this example, we’ll be adding the new Layout Real Estate Prospect Entry to the Contacts Object.
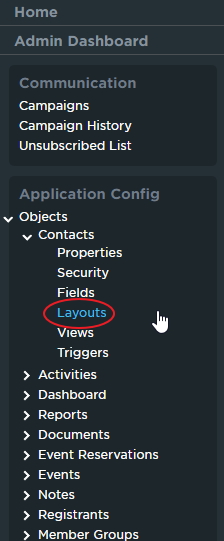
To add in your new Layout from here, you’ll first need to open your Contacts Object for editing. From the left-hand sidebar, click on Options to expand the list and display all of the Objects present in your CRM. Contacts should almost always be the first Object listed. Click on it to expand the list further, and then click on Layouts to be brought straight to the Layouts section of the Contacts Object setup screen.
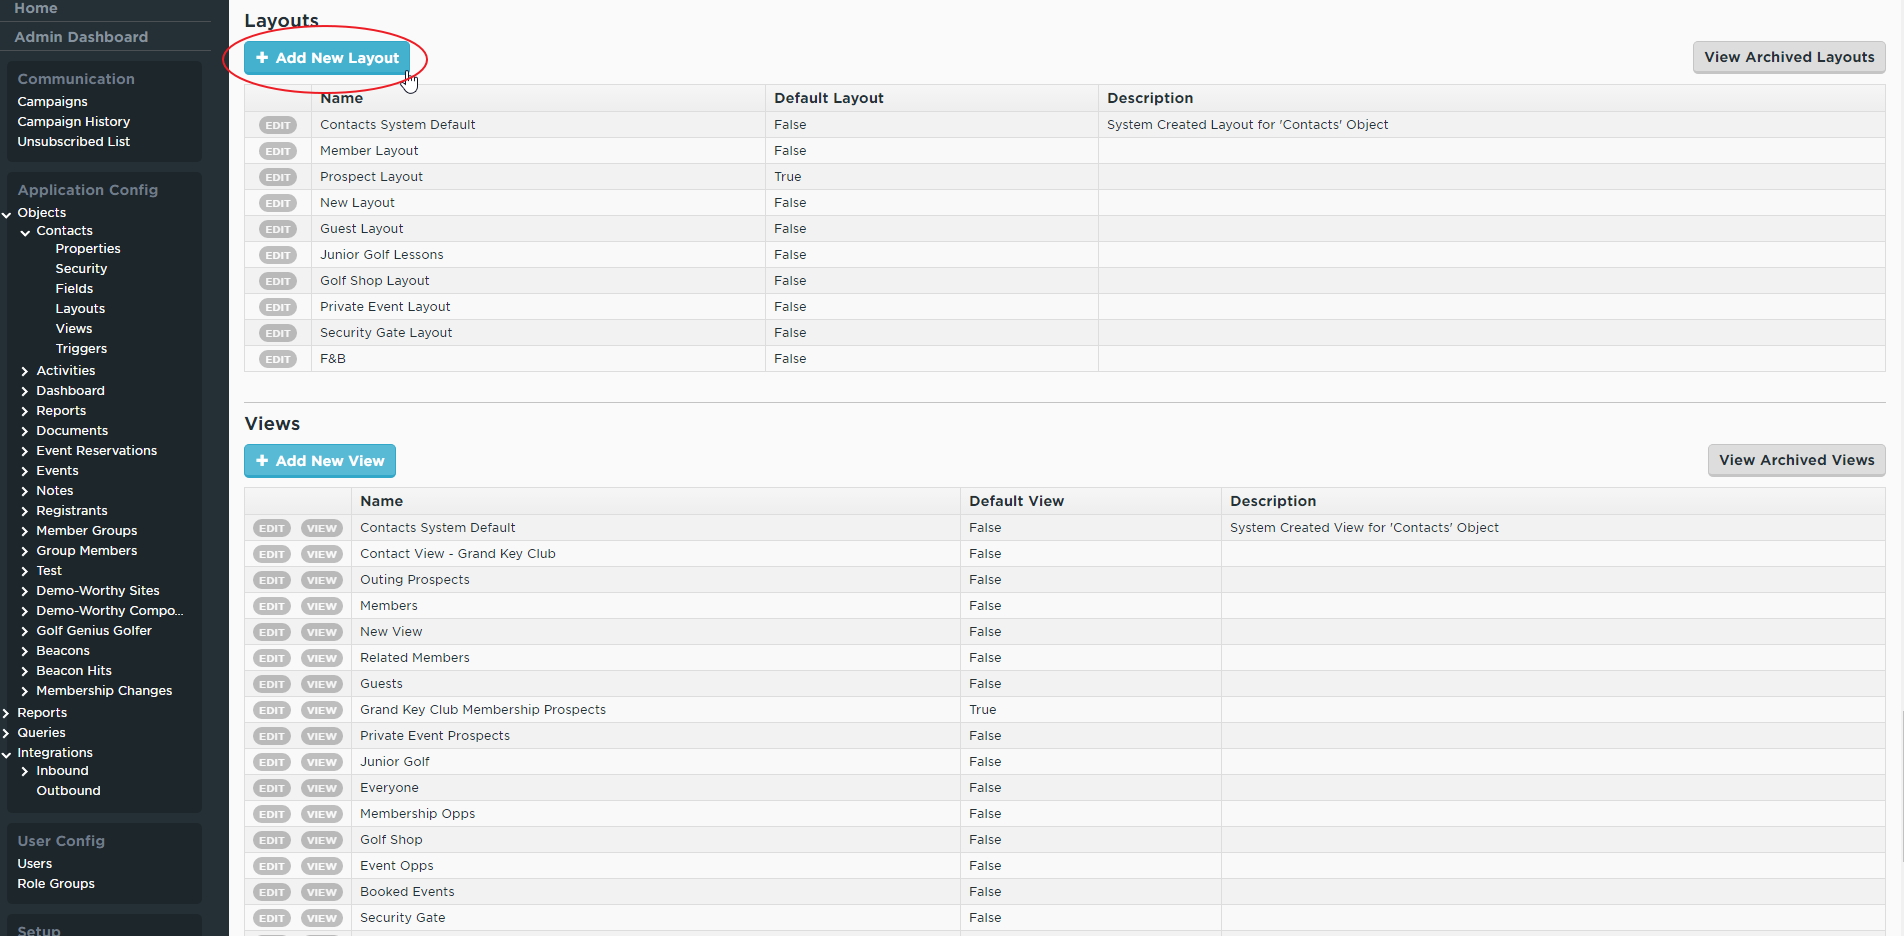
You should now see a list of all available Layouts within the Object you are editing. To edit an existing Layout, click on the gray Edit button immediately to the left of its name in the listing. To add a new Layout, click on the large blue button titled + Add New Layout.
You should now see the Edit Layout Screen:
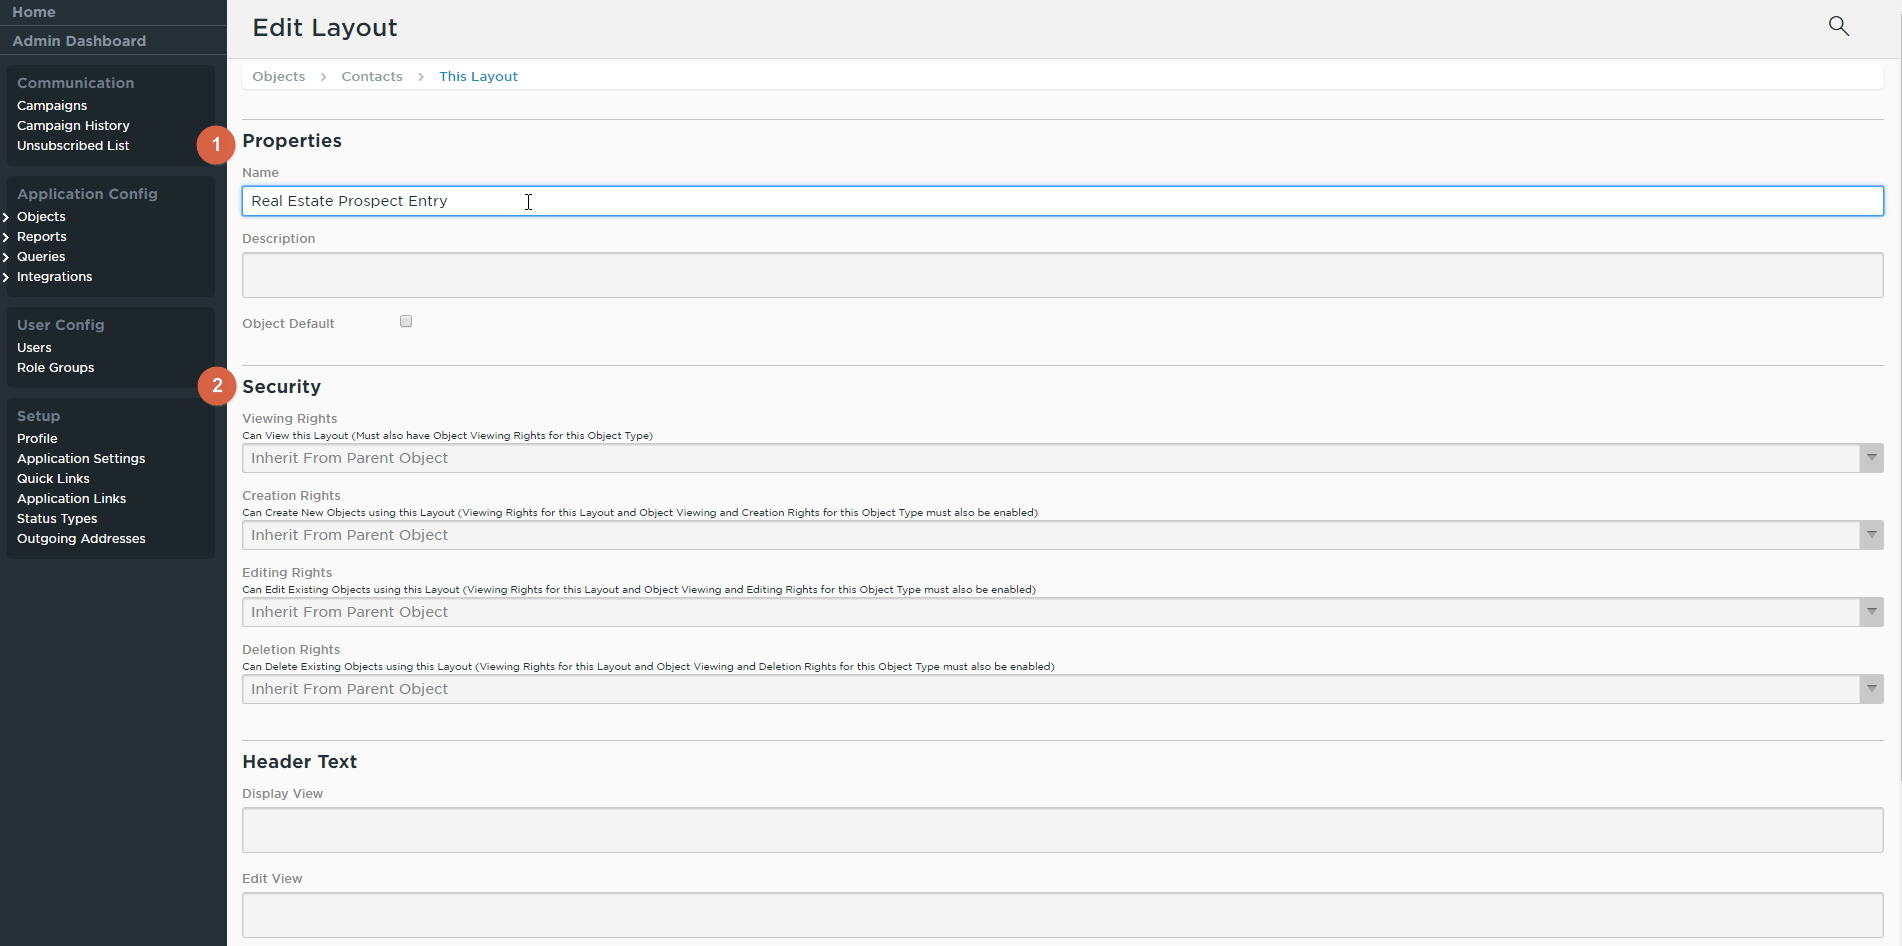
When first creating a new Layout, you will only see sections 1-4. Section 5 will appear once you click the Save Properties button.
1. Properties: In this section, enter the basic identifying information for this Layout.
Name: Enter a name for this Layout. You will use this to reference your Layout in a View, or for future editing.
Description: Optionally, enter a description of this layout. This is only visible when editing the Layout, not when viewing data within the Layout, so most users will not see anything written here.
Object Default: Check this box to set this Layout as the default for this Object. Any links to records of this Object will open the default Layout unless the link specifically targets a different Layout.
2. Security: Generally, security options for Layouts are not configured from the Layout itself, but rather in the Role Groups section. By default, all options are set to “Inherit From Parent Object”.
Please contact your CRM Support Team if you need to lock down a Layout from certain users, as we are happy to cover this with you on a one-on-one basis.
3. Header Text: This section is used by your CRM Support Team to add in client-side scripting or style code to this Layout. Generally, it is advised not to enter anything in this section yourself unless you are proficient in writing Javascript and/or CSS code.
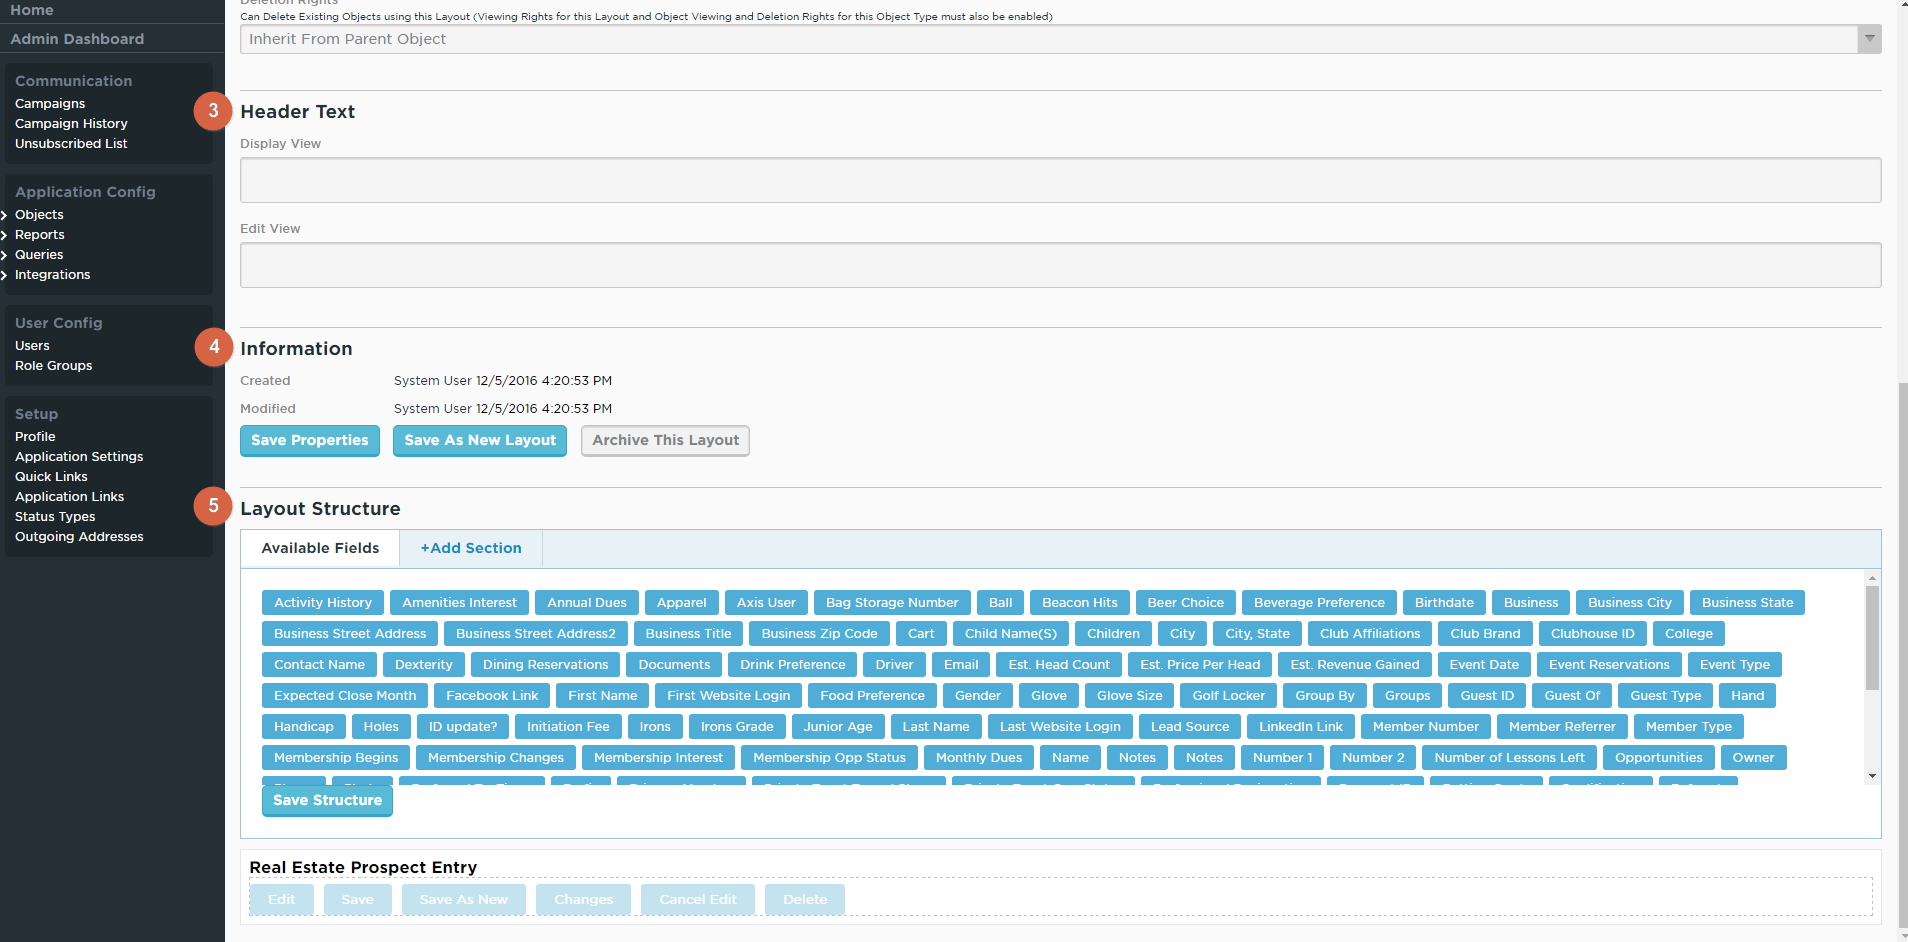
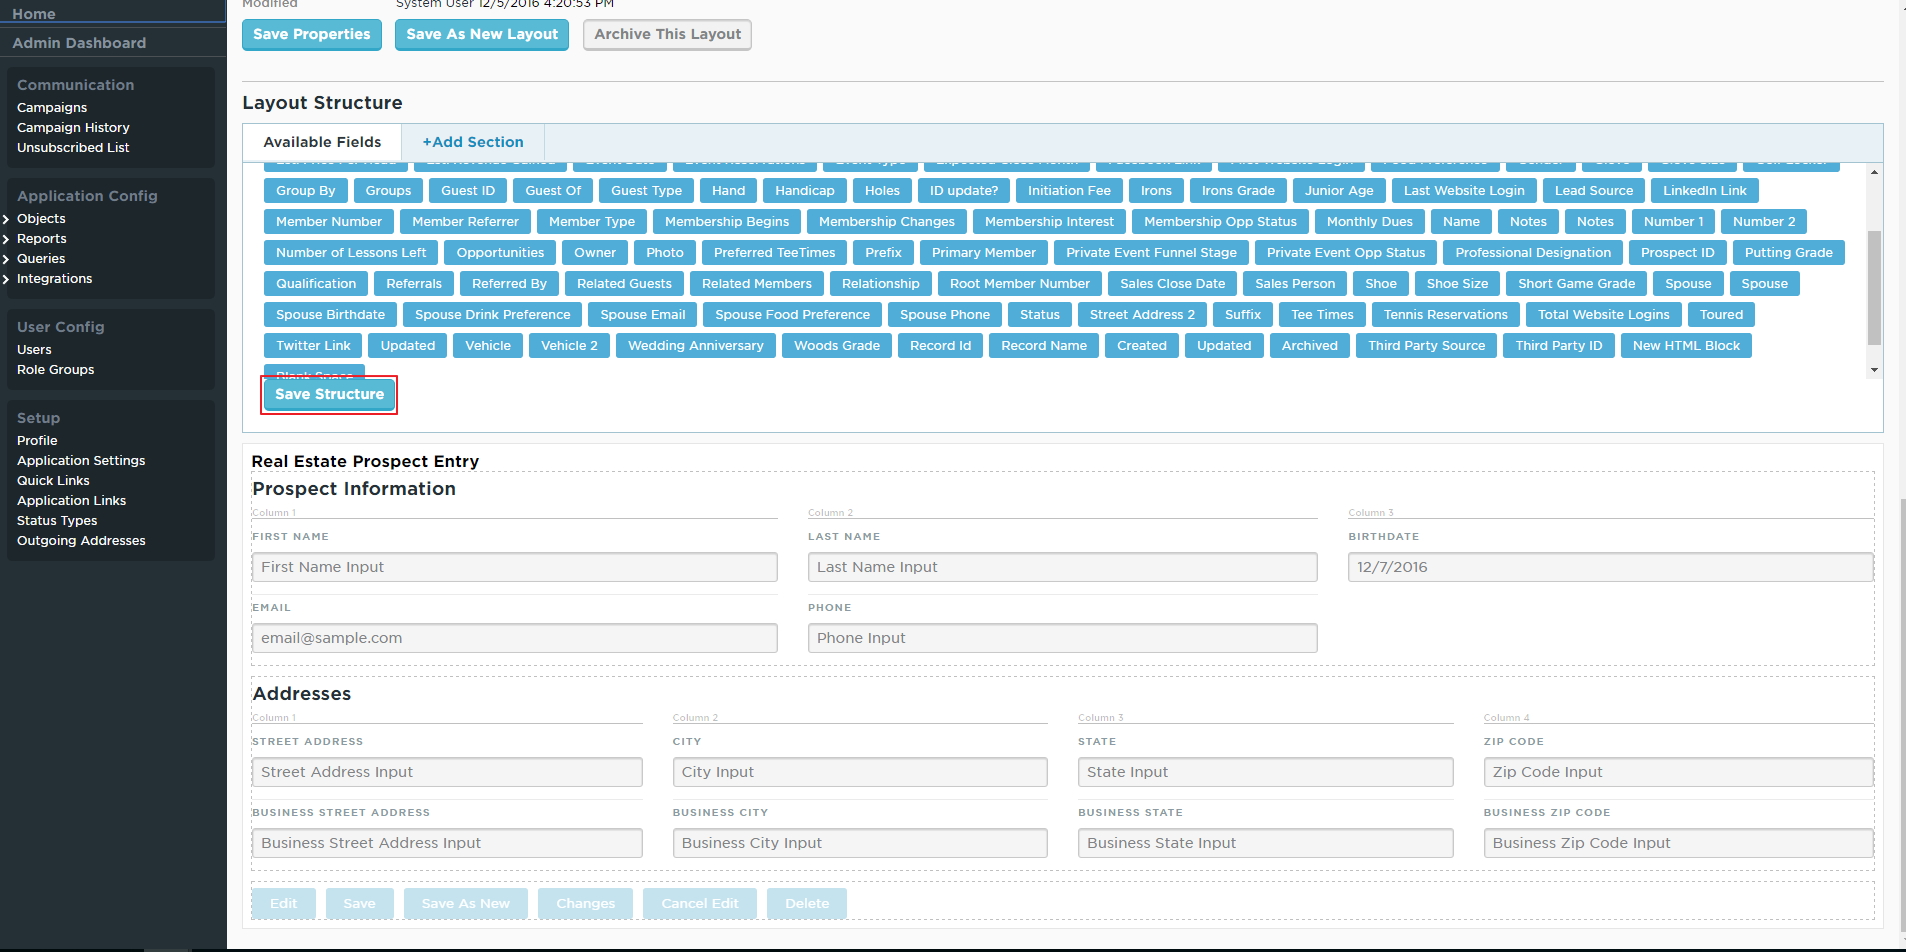
4. Information: Displays system information about this Layout, and includes action buttons for the Layout.
- Created: The time this Layout was created, and the user that created it.
- Modified: The time this Layout was last modified, and the user that made the changes.
- Save Properties: Saves the Properties of this Layout (anything entered in sections 1 -3 above).
- Save As New Layout: Creates a brand new Layout in this Object, and gives it the exact same Properties and Structure as this Layout. Useful for creating two similar Layouts with only minor differences.
- Archive This Layout: Will remove this Layout from the list of Layouts in this Object, and will prevent it from being displayed to Users.
Layout Structure: This section allows you to configure the structure of the Layout. Here you can determine which fields are shown in this Layout, and in which order.
At the top of this section is a list of actionable items (Available Fields and + Add Section), which can be dragged below to place them in the Layout body.
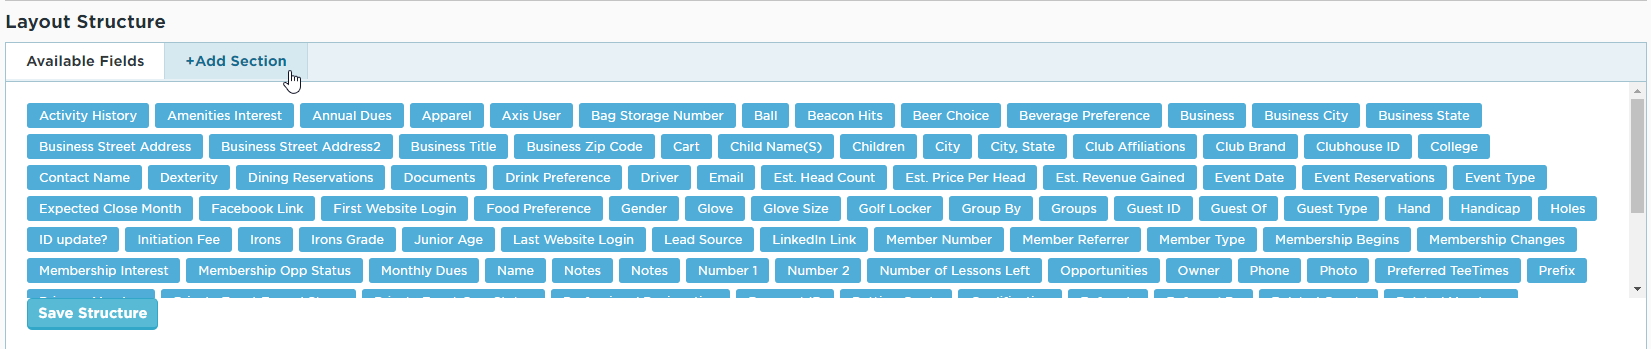
Beneath this is a canvas, on which you place Sections and Fields to display in the body of the Layout. This canvas is made up of Sections, and each Section is made up of Fields. When viewing a Layout from the user facing side, Sections keep fields organized within the Layout by providing a header/title, and each Section is also collapsible to enable the user to hide certain fields that they aren’t using at the current time. Typically, it is a good practice to have as many Sections as possible in your Layout to help group like fields together, and allow for a logical and visually pleasing display of data.
Utilizing these two sections, you should now be able to begin formatting this Layout by clicking any item in the top section, and dragging it to the desired location in the canvas below.
First, and most importantly, you’ll need to add in at least one Section, in which you’ll be able to place and order fields. Fields cannot exist in a Layout outside of a Section, so it is necessary to add in at least one Section before adding any Fields.
To add a new Section, find the tab at the top of the Layout Structure section titled + Add Section. Click and hold on this, and drag it down to the canvas section, then release it where you would like it to be placed. You can reorder existing Sections in your Layout by clicking on the Section heading and dragging it up or down in the Layout to its desired location.
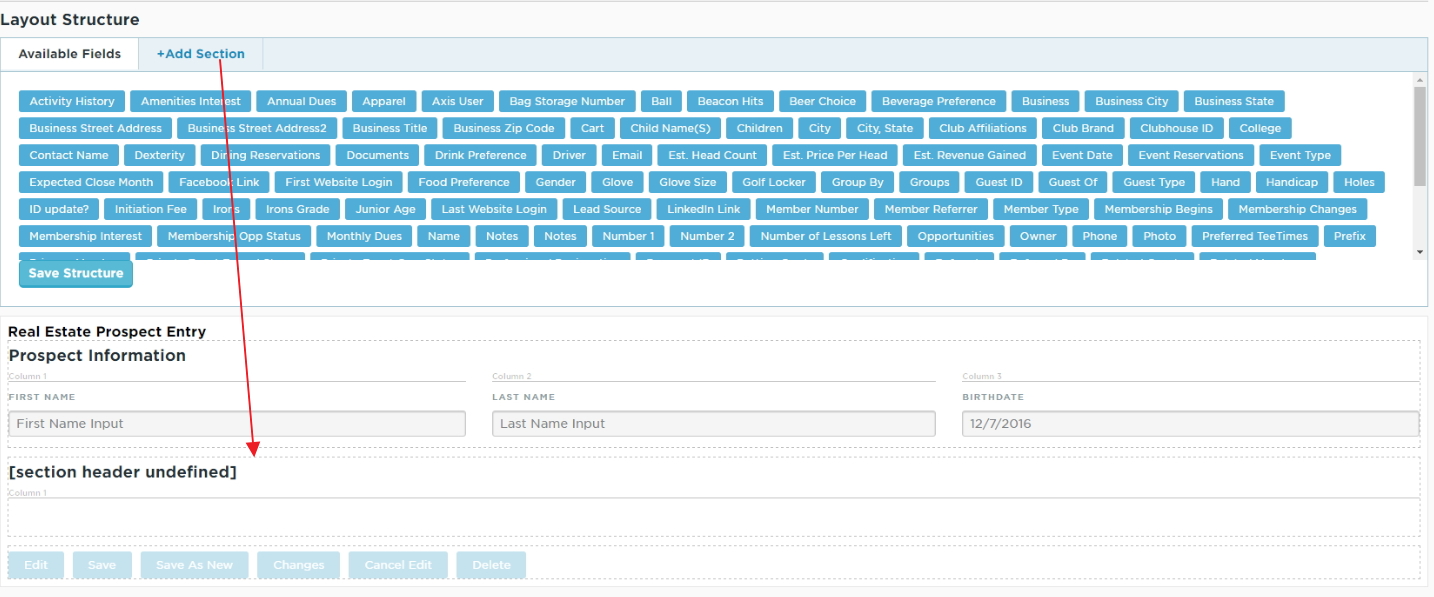
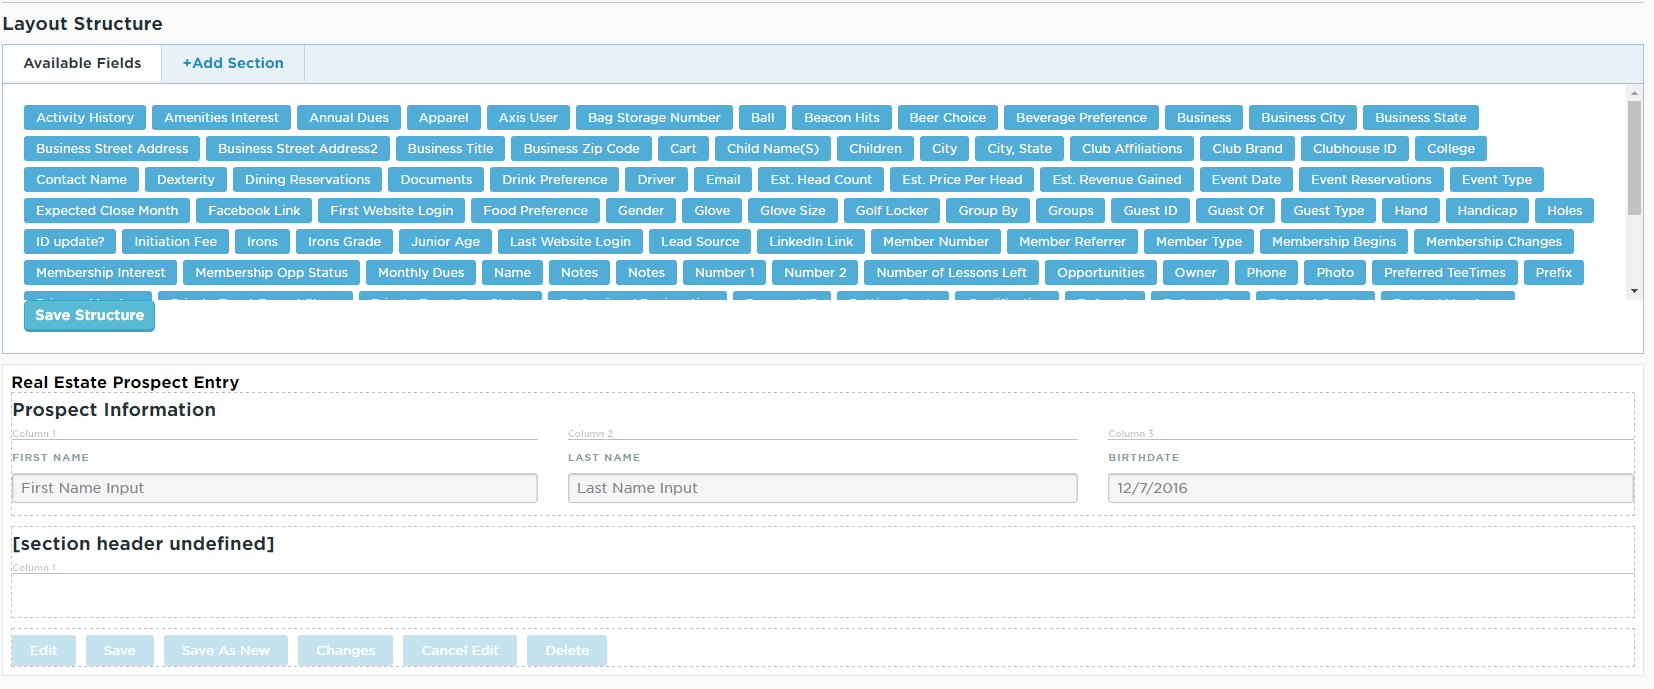
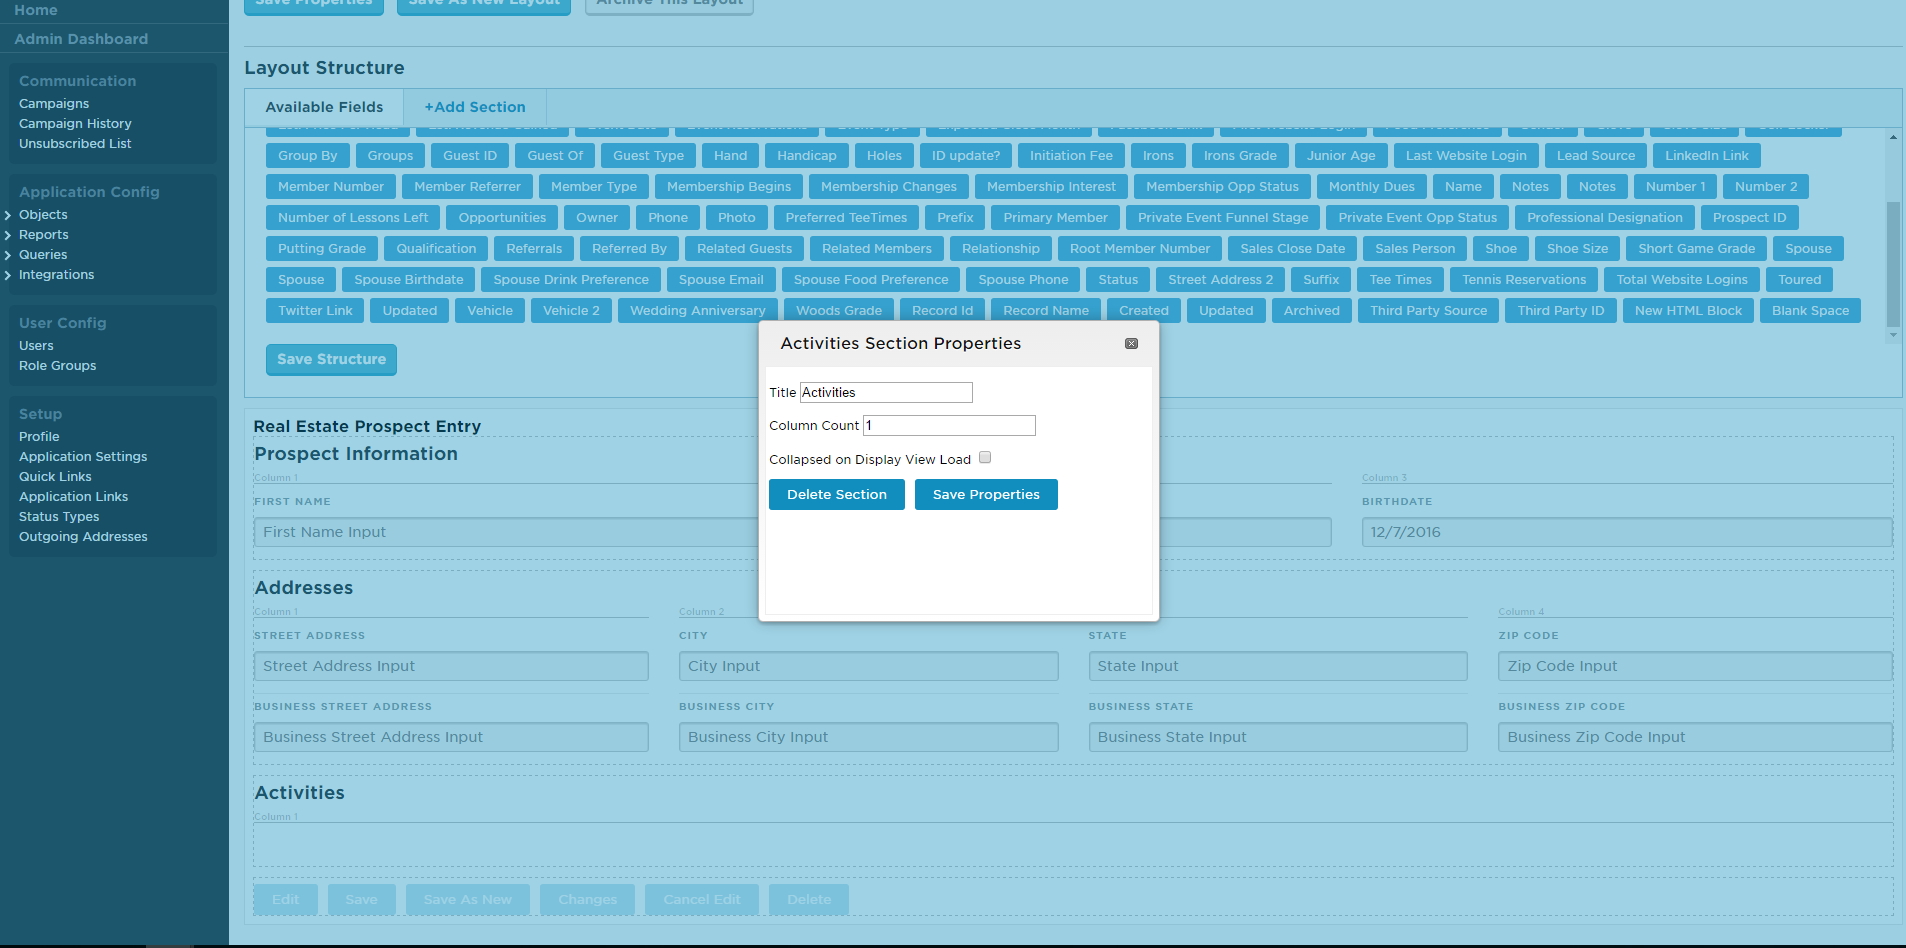
By default, your new Section will not have a title, and it will contain only one column for Fields. To edit the settings of this Section, click on its title, and a popup will appear in which you can edit the Section settings.

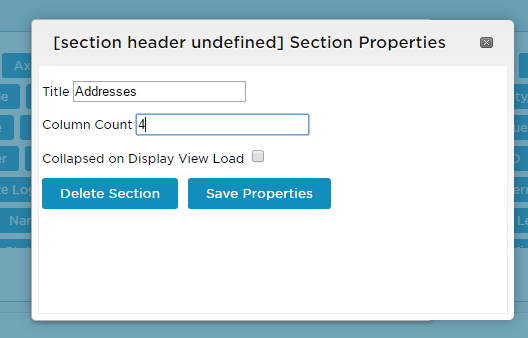
In the Section Properties window, you can edit the following information:
Title: Give a title to this Section, which will be visible to users when viewing this Layout.
Column Count: Choose how many columns of fields should be available in this Section. The minimum number of columns allowed is 1, and the maximum is 4. Fields will stretch to fill the entire screen regardless of the number of columns. Therefore, fields will appear larger in a Section with fewer columns, and will appear smaller in a Section with more columns.
Collapsed on Display View Load: If this box is checked, then this Section will default to collapsed when the Layout is first loaded. Users would have to click on the Section title to expand it and view the Fields within. If this box is unchecked, then this Section will default to display all Fields within, unless the User clicks on the Section title to collapse it.
Once you’ve configured the Section as desired, click on the Save Properties button and this window will disappear. Then the Section will update in the Layout Structure beneath.
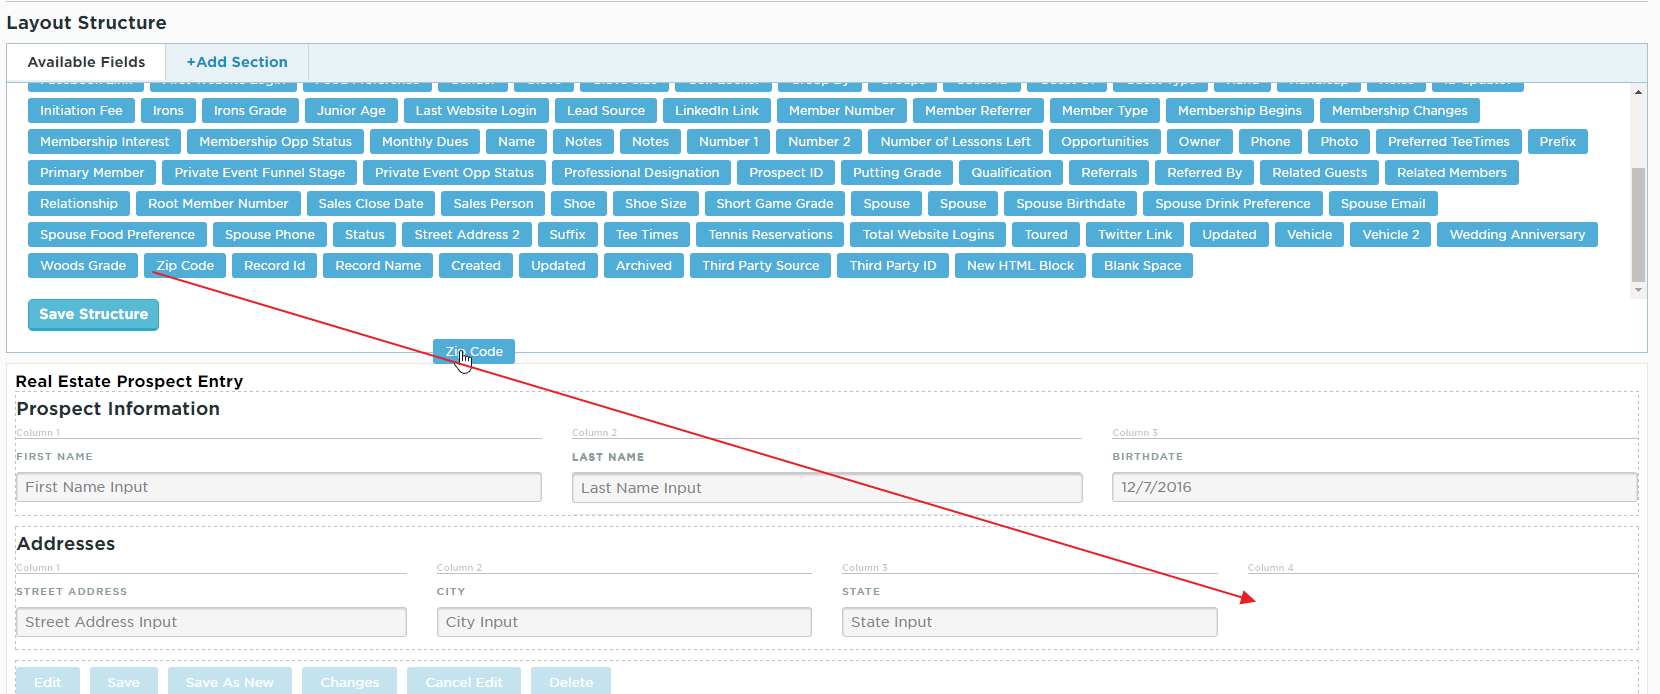
With a new Section in place, now you can place some Fields. Adding Fields works very similarly to adding Sections - simply find the Field you would like to add in the list of available Fields in the top section, then click and drag it down to the canvas where you would like to place it. You can also reorder existing Fields in the canvas by clicking and dragging them around to their desired location.
Each field within a Layout has some basic properties that can be edited. To access these properties, hover over the field you need to access, and click on the small gear icon that appears over the bottom-right corner of the field.
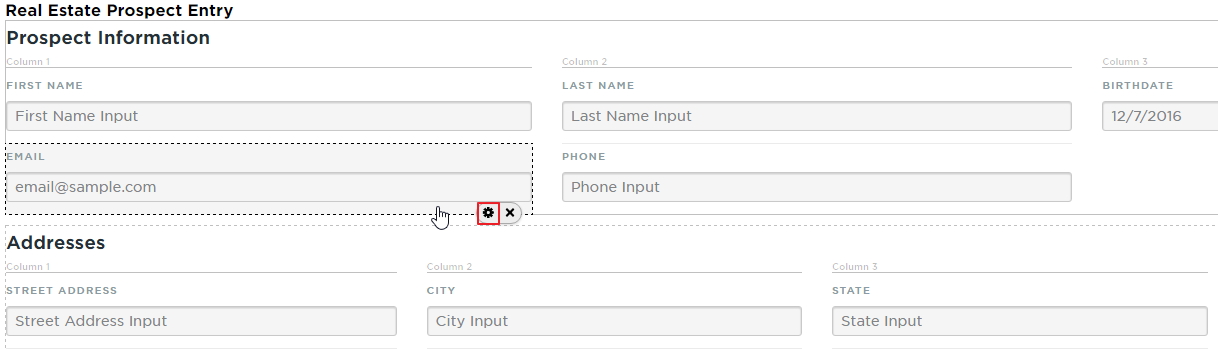
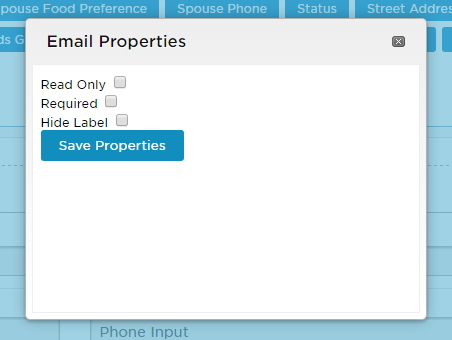
For most fields, there are only a few properties to edit:
Read Only: Mark this field as read only, so that users can view the content within it, but never edit it.
Required: Mark this field as required to be filled out before saving the record in this Layout. Choosing this option will only affect this field in this specific Layout.
Hide Label: When this box is checked, only the data contained within this field will be displayed - not the name of the field itself.
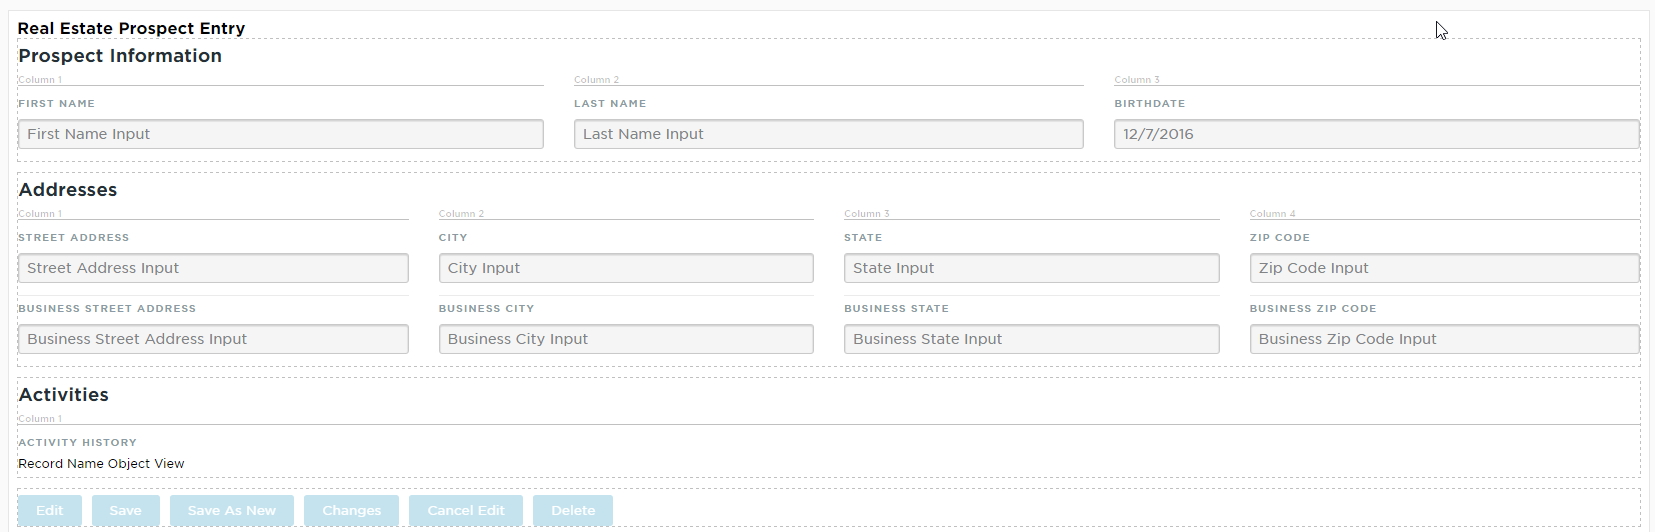
Accessing Data From Outside Objects in a Layout
While using your CRM, you may have noticed cases in which data from one Object is displayed inside a Layout of a different Object. The Activities section within a Prospect Layout is a great example of this, as is the Notes section.
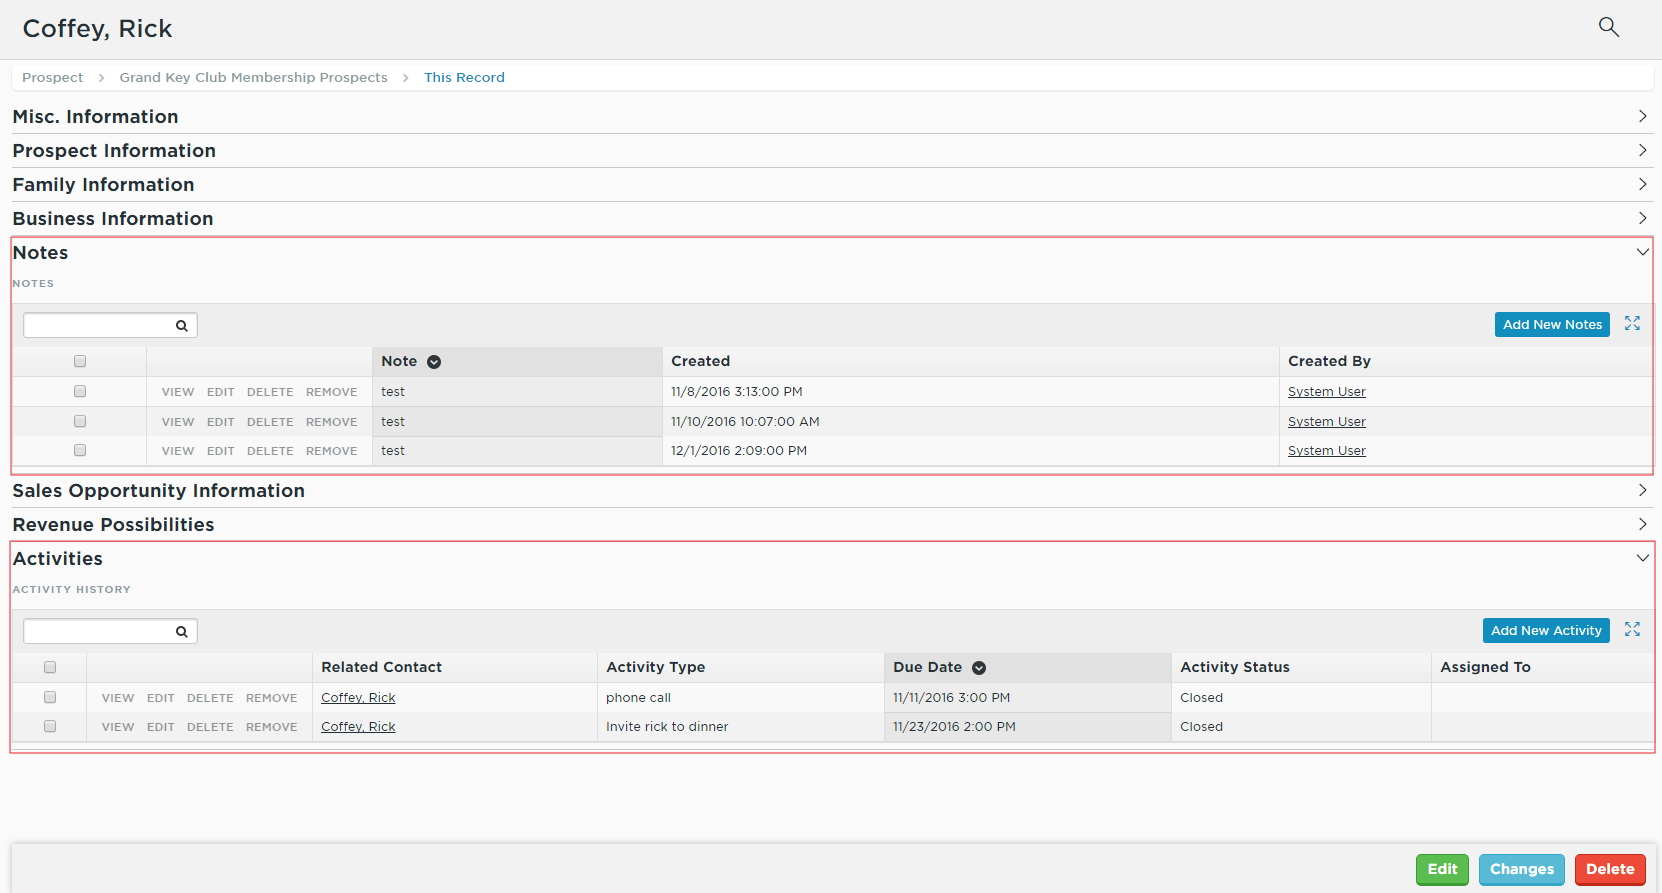
These sections within the Prospect Layout are what are called Parent-Child Relationship fields. They allow data from one Object, in this case either the Activities or Notes Objects, to be displayed within a different Object, in this case the Contacts Object. In order to display this kind of information in a Layout, the associated Parent-Child Relationship field should be added to the Layout.
Before editing the Layout, you should first determine which Parent-Child fields are available in your Object. Open up your Object for editing, and view the list of available Fields. You will be able to tell if a field is a Parent-Child field based on the Data Type of the field. Instead of showing a standard data type, a Parent-Child field will instead show the name of the Object that it is relating to.
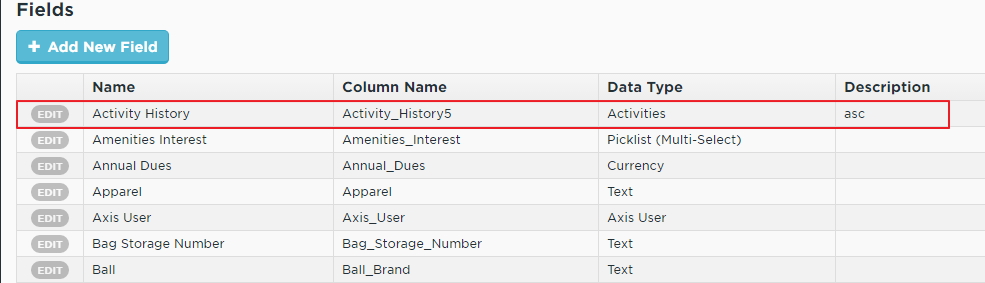
In the above example, the field Activity History has a data type of Activities signifying that it is a Parent-Child field, relating to the Activities Object.
Once you’ve identified a Parent-Child field, open up the Layout to edit, and scroll down to the Layout Structure canvas. To begin, add a new Section to house this field - generally you will want to have each Parent-Child relationship field to live in a section alone, as the field will display as a full section in the Layout. Typically, it is best to leave this section set to only one column as well, for the same reason.
Next, locate the Field that you identified earlier from the list of available fields, and drag it down to this new Section. Instead of appearing as most of the other fields, this field will instead say “Record Name Object View”.
Once the field has been added to the Layout, click the Save Structure button, and it should be ready to use. However, there are a few more properties that can be edited for this type of field, which can improve the user experience when viewing this Layout. To access the field Properties, hover over the field in the canvas, and click on the small gear icon that appears over the bottom-right corner of the field. This will bring up a popup window, pictured below:
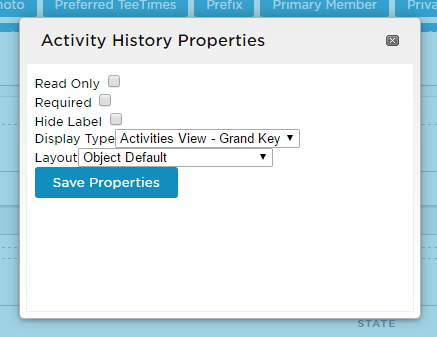
Here you’ll see the same list of field properties that exists for all fields, plus two new options:
- Display Type: Select from the list which View from the Child Object (in this case, Activities) to use to display the content within this Layout. The fields that will be shown in your Layout are determined by the View selected in this option.
- Layout: Select from the list which Layout from the Child Object (in this case, Activities) to display when a record from within this View is clicked.
If none of the options available in these lists are what you need, you’ll need to open up the Child Object and edit/create the Views/Layouts as needed.
FAQs
Q: Why can't I access the Object settings? I'm receiving an error 'Invalid Permissions to View This Page"?
A: Only Object Administrators have access to edit settings within an Object. If you are receiving this message, your account may not be set as an Object Administrator. Please note that CRM pricing is based on a per admin user basis, so adding additional Object Administrator accounts may incur additional fees. Contact your Account Manager to discuss this further.
Best Practices
- Adding/Editing Fields: Be as descriptive as possible with field titles to make data entry easier in the future. Typically, if a piece of data can be described using multiple fields instead of just one, it should be, to allow for more granular reporting. For example, instead of one address field, we have 5 - Street Address 1, Street Address 2, City, State, Zip Code.
- Adding/Editing Views: Keep the filters in Views simple - leave the more advanced filtering options for queries/reports. Try to design your Views to display large chunks of similar records, separated out by basic identifying features, such as Status, or Contact Type, etc.
- Adding/Editing Layouts: Generally, it is easier for users to use a Layout that has more Sections, as opposed to those that have fewer Sections. Use Sections liberally to group like fields together. For example, have a “Prospect Information” Section containing basic identifying and demographic information about a Contact, a Section for Addresses, one for Opportunity information, and another for Spouse/Family information.
Downloadable Guide
Creating Editing CRM Fields Views and Layouts - Guide