Overview
Your Clubessential CRM is capable of holding a large amount of data pertaining to your Club’s interactions with your customers. Using the Query Builder and Report Builder, you are able to generate reports that can make it easier to draw insights from your data, and which are easily exportable to bring to presentations to your various stakeholders.
Accessing the Tool:
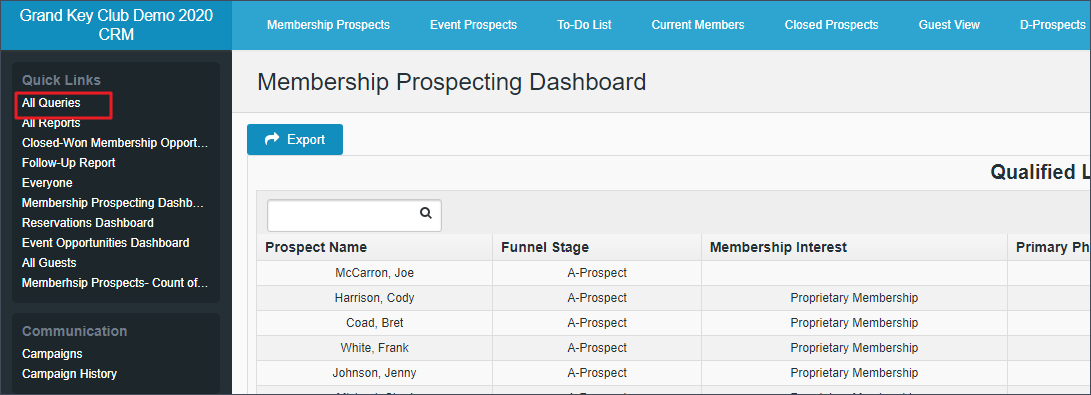
From the CRM Dashboard, click All Queries from within the Quick Links side bar:
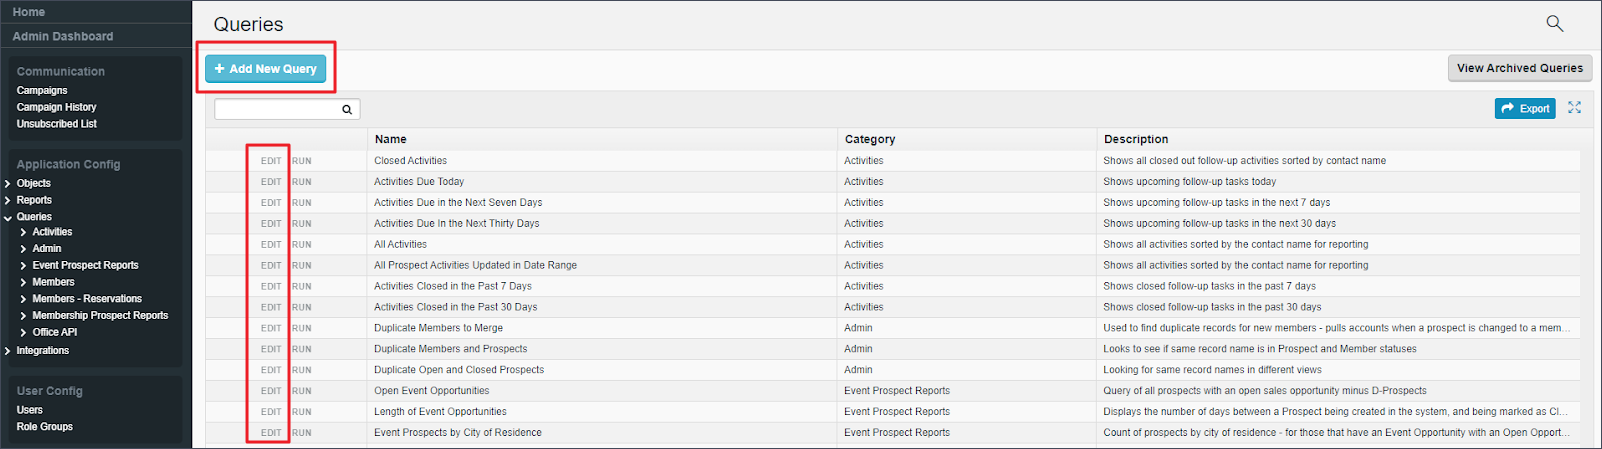
From the Query screen, click either Add New Query at the top of the page, or click Edit next to a query you’d like to make adjustments to. In this walkthrough, we’ll be building a brand new query.
Query Builder - Sections and Resources:
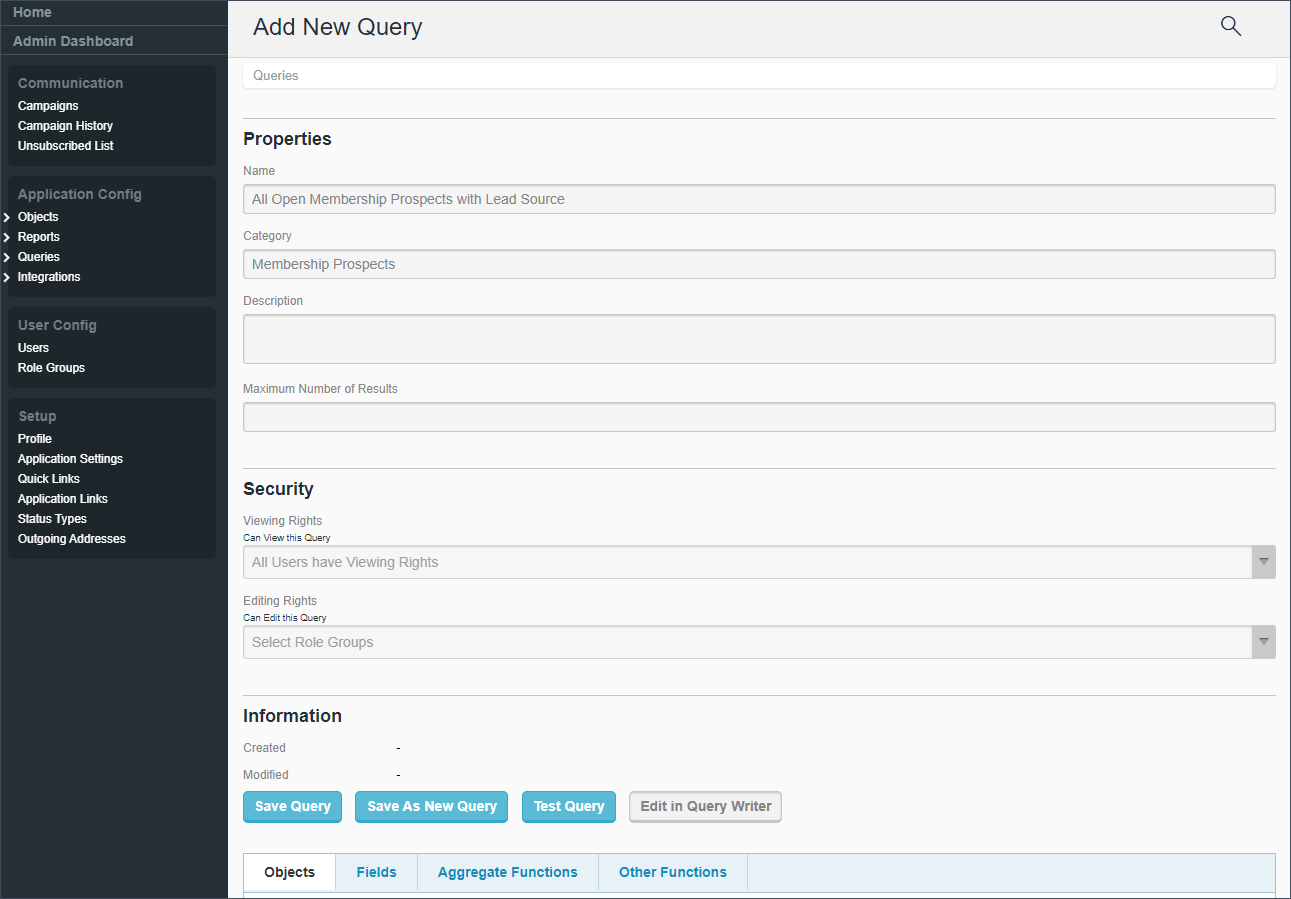
Properties:
In this section is where the properties of the query are defined, used to identify and categorize the query for easy access when it needs to be run.
Name: Give your query a name. Typically, you should choose something descriptive that will make it easy for you to know what this query is about at a glance.
Category: Optionally, give your query a category. Queries will be grouped together by category on the Query screen, so utilizing this field can help with organizing your list of queries.
Description: Optionally, write in a short, plain text description, describing the purpose of this query. This description appears on the Query screen, so can be useful in elaborating on the differences between queries that have similar names, but slightly different purposes.
Maximum Number of Results: Optionally, define a number at which to stop returning results. To return all results from the data set defined by your query, leave this field blank. In most queries, this is left blank.
Security:
In this section, you can optionally define which role group(s) have access to be able to view and/or edit this query. Note that only CRM Users with an access level of User are impacted by role groups - Editors, Administrators, and Object Administrators will always be able to run and edit all queries, as well as create new ones.
In most organizations, all users have equal access to data in the CRM, so this section is used less frequently.
Query Builder:
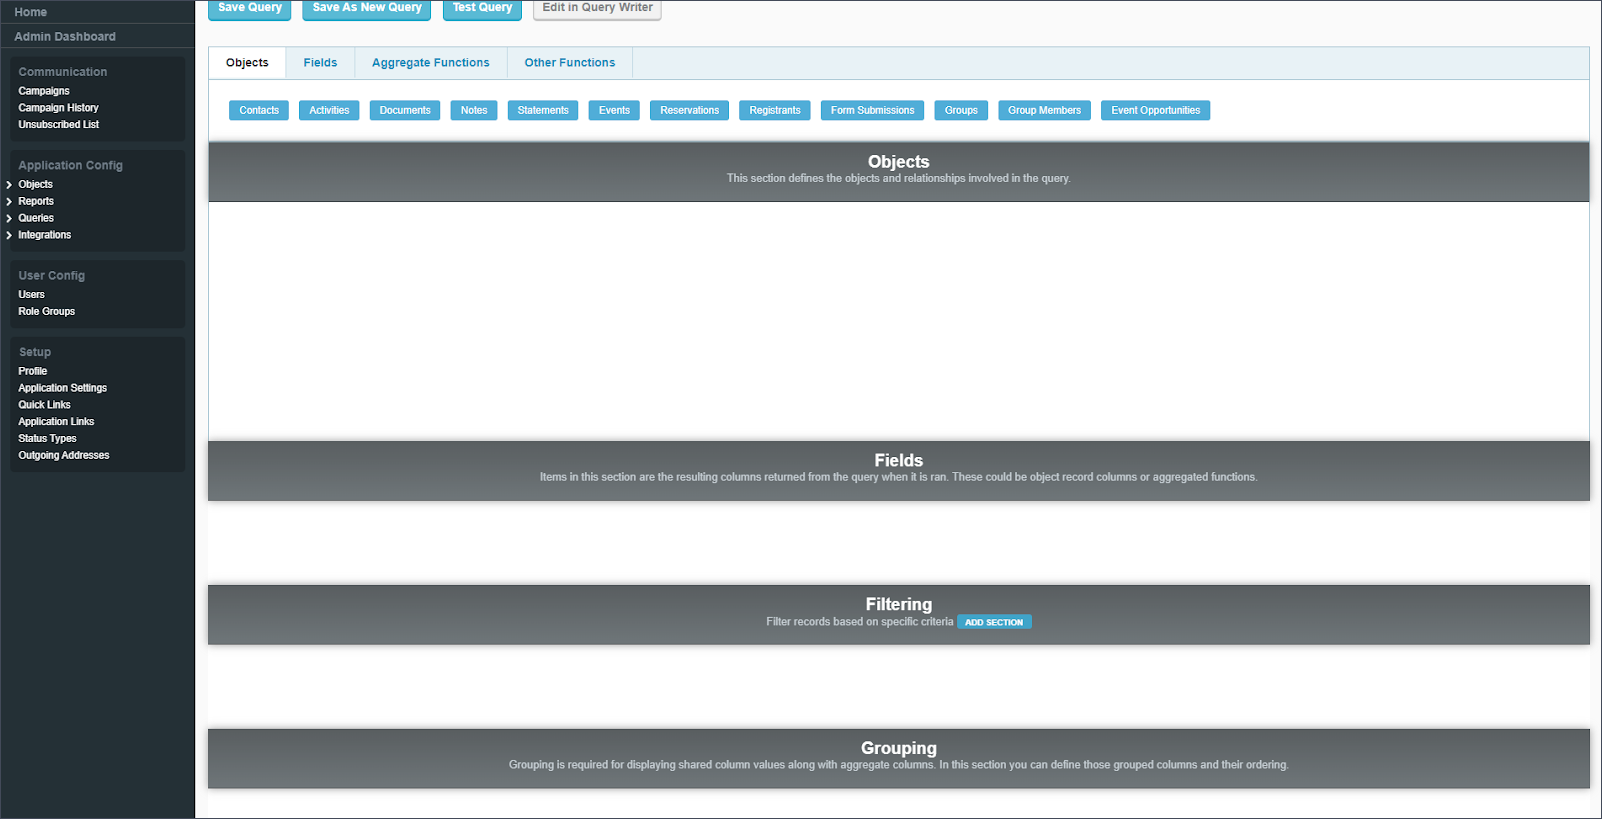
In this section is where the query is built. This section is broken down into two sections, both of which are further broken down into additional sections. The top section is the Resource Bank, and the bottom section is the Query. Above both of these sections are four buttons:
Save Query: This will save the query and any changes made to it
Save As New Query: This will create a new query with the exact parameters as the current query. This can allow you to use an existing query as a template to create a new, similar query without having to start again from scratch.
Test Query: Once the query is created and saved, this button will run the query, and display the results in a popup window. This is essentially the same as clicking Run Query from the main query list, but accessible within the query builder for easy testing.
Edit in Query Writer: This will change the Query Builder to the Query Writer, which will allow you to write queries in pseudo-SQL code instead of the visual editor.
Resource Bank:
The Resource Bank contains the various resources (Objects, Fields, Aggregate Functions, and Other Functions) that you can click and drag down into the Query section to build your query. The Objects and Fields sections contain resources based on the configuration of your specific CRM build, while the Aggregate Functions and Other Functions sections contain a set list of generic functions applicable across all CRM builds.
Objects:

This tab displays the Objects configured in your instance of CRM. Objects represent the sections of data within a CRM, or more specifically, the tables of data in the database. Objects are the top level of organization of the data structure of CRM, and contain all the various fields that you’ll store data in, and report on.
The specific Objects you’ll see may vary slightly, as these can be custom configured per CRM build, however most builds will have a similar set of standard Objects, similar to what is shown in the image above.
Fields:
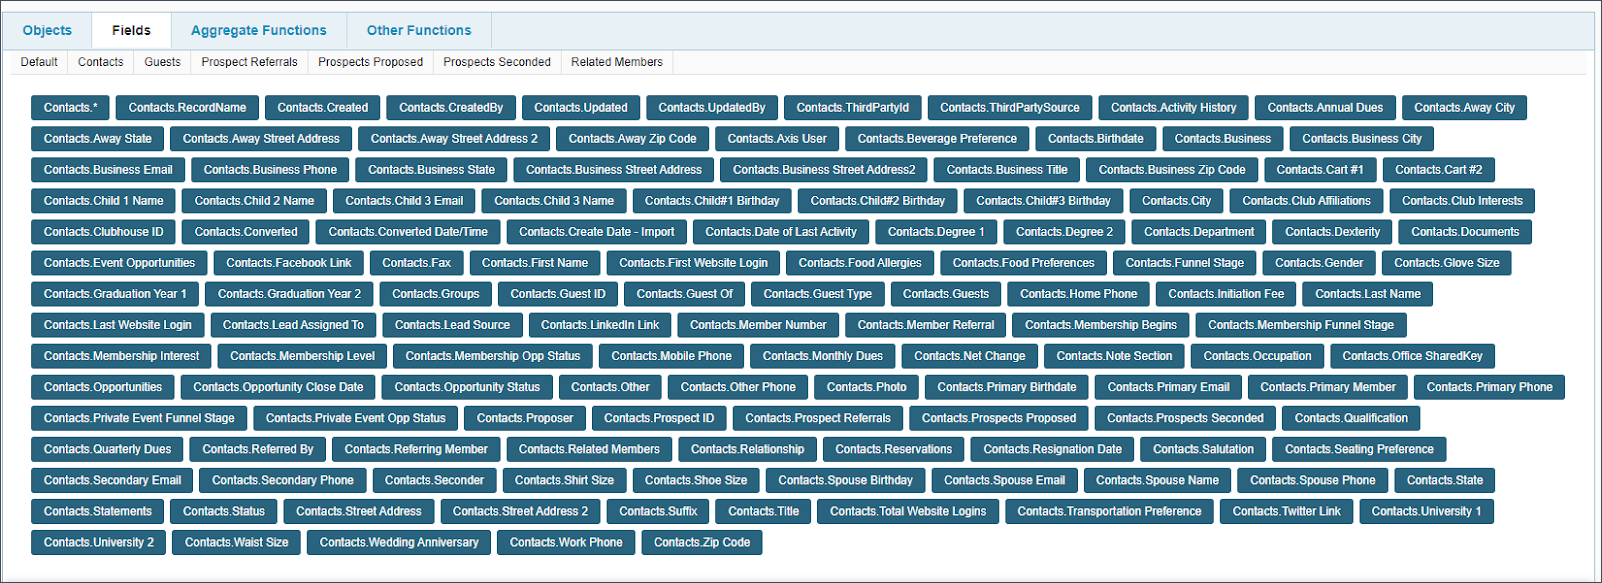
When you first open this tab, you’ll need to select which Object to display the fields of. Once you’ve selected an Object, all the fields within that Object will display. Aside from a few system fields which are listed first, the fields are listed in alphabetical order.
Aggregate Functions/Other Functions:

These are functions you can insert to perform certain actions in your query. The most commonly used aggregate functions are Count(value), Sum(value), and Average(value), which will perform these mathematical functions against the data in your query, while most commonly used other functions are Today(), and Datediff() to determine the difference between two dates. More information about the various functions can be found at this external link: https://www.w3schools.com/sql/sql_ref_sqlserver.asp
Query:
In this section, you will drag and drop resources from the Resource Bank into the various subsections of your query to configure how the query will display and function.
Objects:

In this section, you will define which Object(s) you are pulling data from for this query. To choose an Object to select from, you will click on an Object from the Objects tab of the Resource Bank above, and drag it into the Object section of the query. Dragging more than one object will draw a relationship between the two, if one is defined via a parent-child relationship in the Object settings.
Technical note: As it correlates to a query in SQL, this section represents the FROM clause. Also of note, all relationships between objects are considered inner joins, meaning that in order to appear in the results of the query, a record will have to be present or related to an existing record in ALL objects selected in this section.
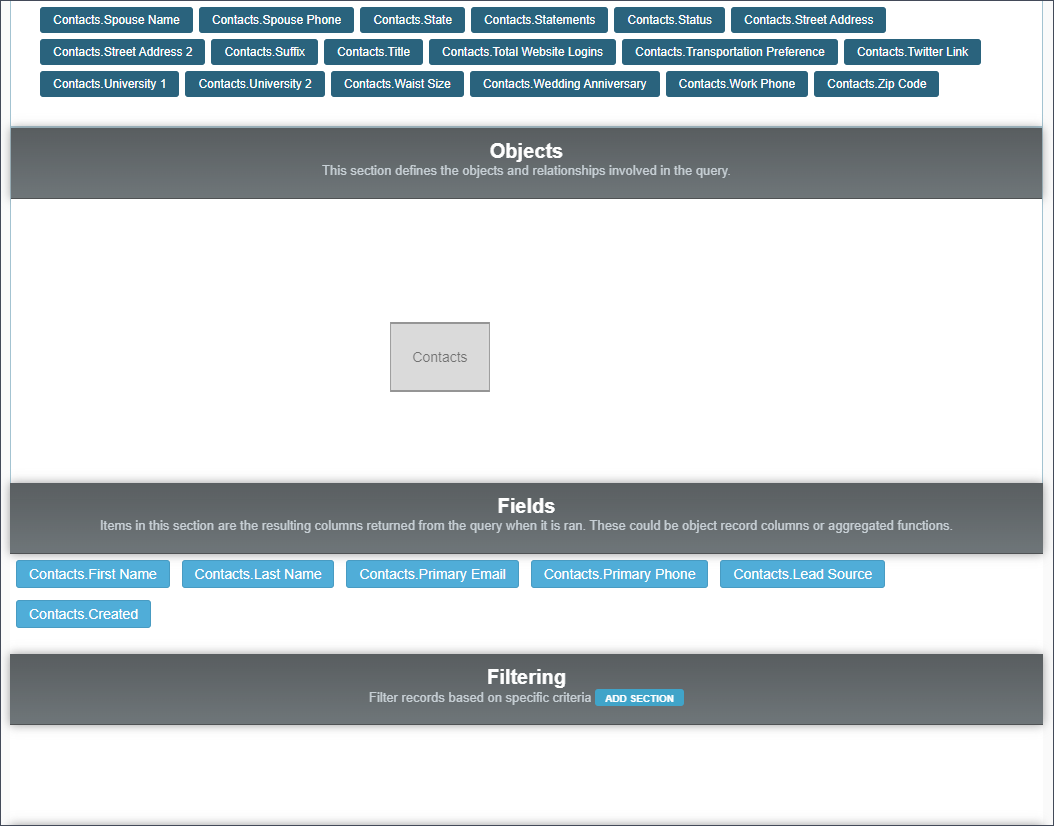
Fields:

In this section, you will define which fields and functions will display when you run your query. Similar to Objects, to add a field to the query structure, you will click on the field or function from the Fields (or functions) tab of the Resource Bank above, and drag it into the Field section of the query. You can also rearrange the order of the selected fields by clicking and dragging them within the section.
Technical Note: As it correlates to a query in SQL, this section represents the SELECT clause.
Filtering:

In this section, you will define which records will be selected and displayed in the query. To do this, you will select one or more fields from the resource bank to run checks against, dragging and dropping them into the Filtering section on the query similar to the Objects and Fields above.
Technical Note: As it correlates to a query in SQL, this section represents the WHERE clause.
Grouping:

In this section, you will define the field(s) around which you will group your data. You will only need to use this for queries which utilize aggregate functions - if your query does not use these, you may skip this section.
For queries containing aggregate functions, such as COUNT() or SUM(), you will need to have all non-aggregated fields in this Grouping section. See example query #2 below for a more detailed description of how this works.
Technical Note: As it correlates to a query in SQL, this section represents the GROUP BY clause.
Ordering:

In this section, you can optionally define a field or fields against which to order the results of your query. You may order by a standard field, such as First Name or Last Name, or by an aggregate function.
Technical Note: As it correlates to a query in SQL, this section represents the ORDER BY clause.
Building a Query (example):
In this section we’ll build sample queries in the query builder. The first will be a simple report displaying some basic information on all contacts in our demo CRM that are Membership Prospects, and have a Lead Source defined. The second will be an example of a query using aggregate functions and containing a join between two Objects. Both walkthroughs will start from the query builder screen - see Accessing the Tool above if you need instructions on how to get to this point.
Example 1: All Prospects w/ Lead Source
In this example, we’re going to create a query that pulls records from our Contacts object, that have a Status of Membership Prospect, an Opportunity Status of Open, and that have any value entered in the Lead Source field. The query will display the First Name, Last Name, Primary Email, Primary Phone, Lead Source, and Created Date fields for each of these records. There will be no grouping, and we’ll order it by the Created date to show the most recently created records at the top.
To start, we’ll first navigate to the All Queries screen, then click Add New Query. Then, we have to give the query a name, and optionally a category and description. In this case, let’s name it ‘All Open Membership Prospects with Lead Source’, and give it a category of Membership Prospects. I’ll leave the Description field blank, but you could type something in here to help you know what this query will do, if you’d like. We’ll also leave the Maximum Number of Results field blank. In this walkthrough, we’ll skip over the Security section, as we want all of the users in our demo CRM to be able to view this query once it is complete.
We’re now ready to start building the query, but at this point it is a good idea to click the Save Query button, just to be safe.
The first step within the query builder section now, is to define which Object(s) we want to select data from. In this case, the data we’re looking for pertains to people saved in our CRM, so we want to drag in the Contacts object.
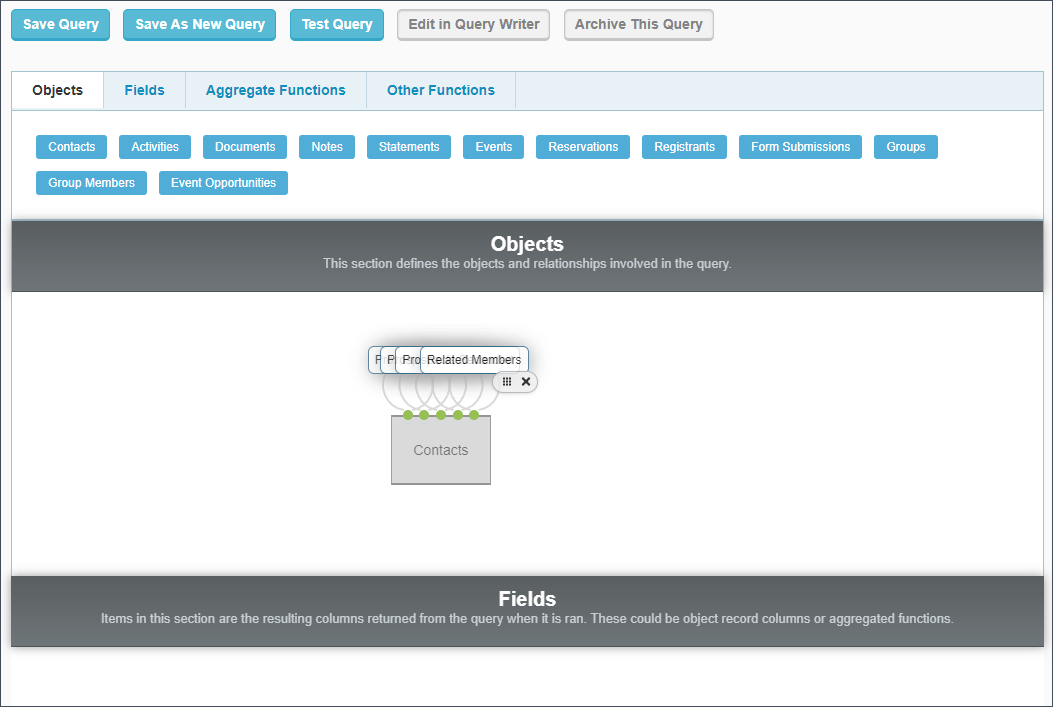
When you first drag in the Contacts object, you may notice a few circular relationships that display above the Contacts block by default - these aren’t necessary for most queries, but they don’t typically hurt anything either, so you can choose to leave them alone, or delete them. I’ll delete them in this example.
Next, it is time to pull in the fields of data that are to be displayed in this query. Click on the Fields tab in the resource bank at the top of the query builder, and then click on the Contacts sub-tab at the top of this tab.
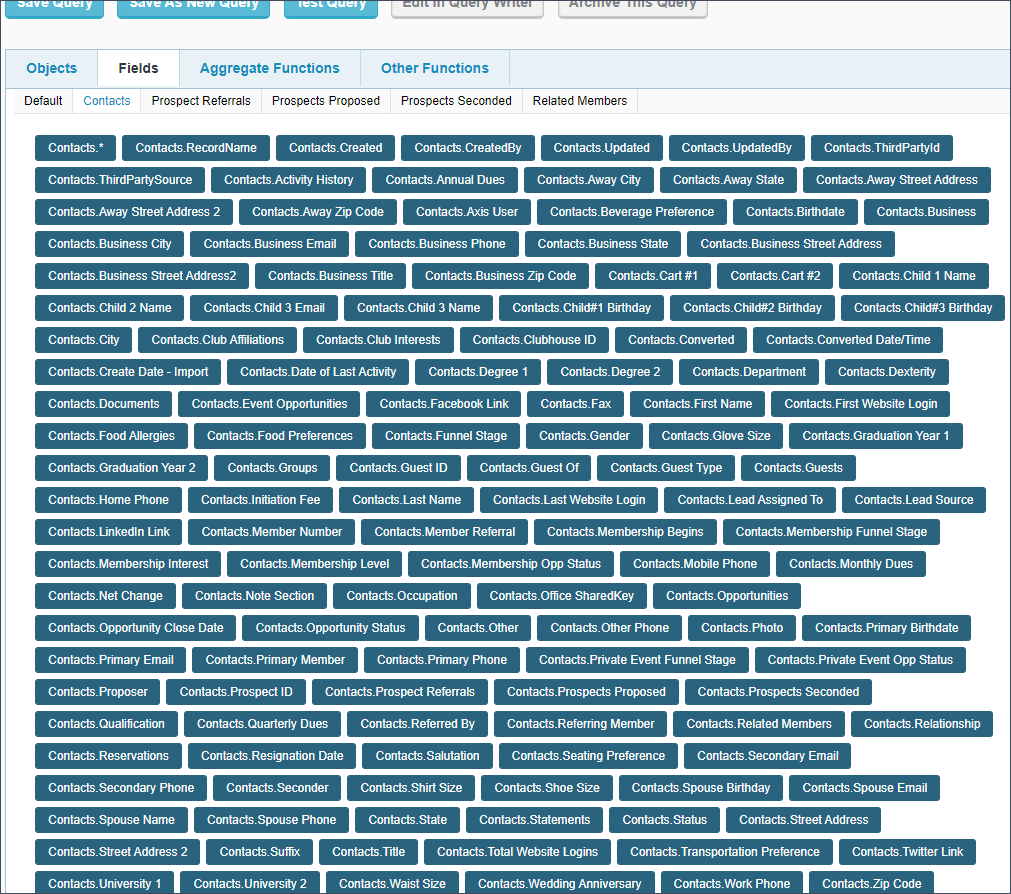
Aside from some system fields, which will display first in the list of fields, the fields will be listed in alphabetical order. Once you find a field you’d like to display in the query, click on it and drag it down into the Fields section of the query builder. If you have a lot of fields, and/or a smaller screen, you may need to drag the field to the bottom of your screen to scroll the page down in order for you to see the Field section.
In this example, I pulled in the First Name, Last Name, Primary Email, Primary Phone, Lead Source, and Created fields. The Created field is a system field, so it is found toward the beginning of the list of fields, instead of alphabetically. This field represents the automatic date/time stamp of when a record was created in the CRM system.
Now that we’ve told the query what fields of data to pull for the records it selects, it is now time to tell it which records to select! We’ll do this by creating Filters - by default, with no filters applied, the query will select ALL records from the object(s) it is targeting, but in this case we only want Membership Prospects with an Open opportunity status and a value in the Lead Source field, so we’ll have to add three filters.
Adding a filter is similar to adding a field to the Fields section - find the field that we want to run a filter against, then click it and drag it down into the Filtering section. Once you release the field in the Filtering section, a popup will appear with some more options, to configure how the filter will work.
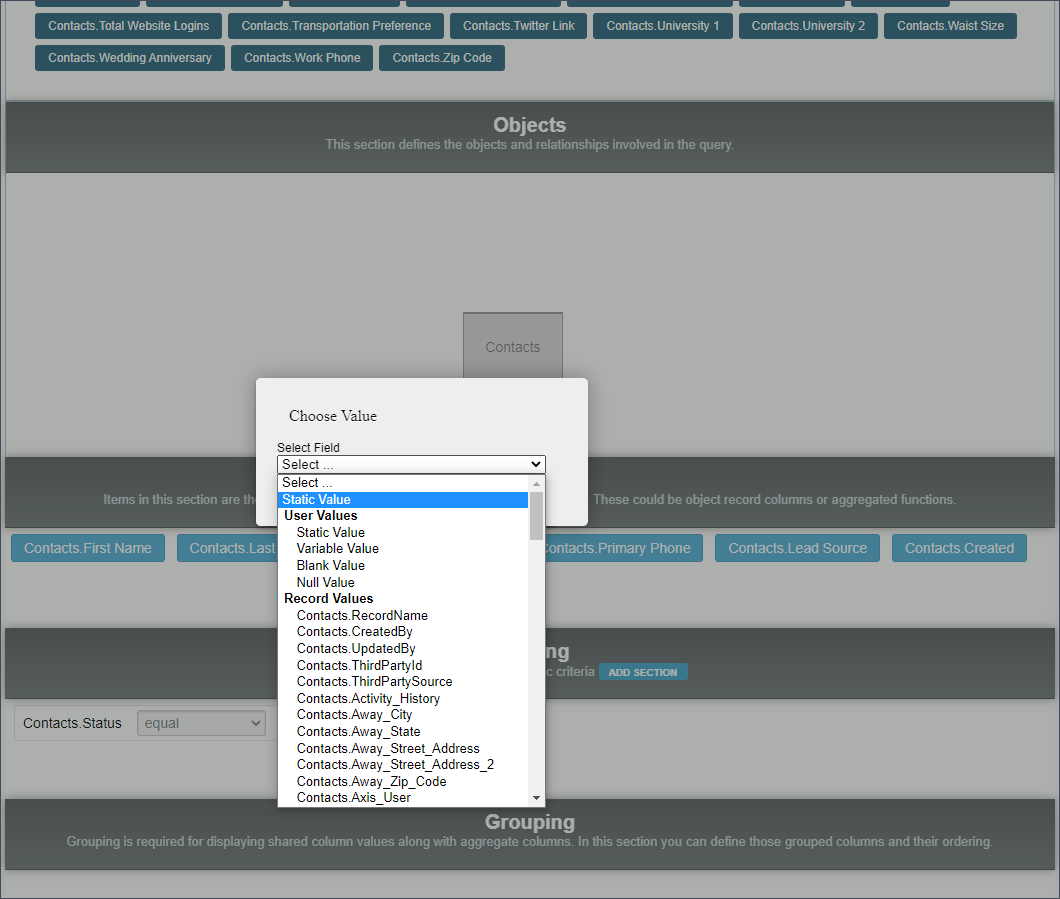
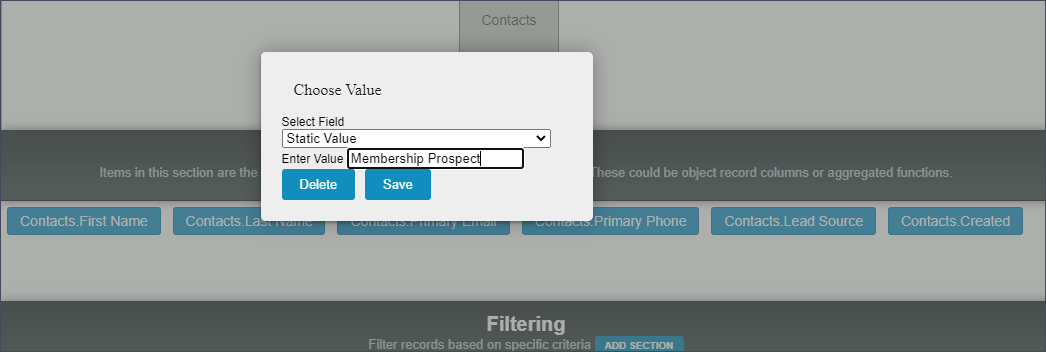
This screen is asking us how the query will compare the value of all records it scans against this field (in this case, the Status field) to determine if it will select the record to display when the query is run. The most common options selected here are Static Value, or Blank Value. For this filter, we’ll select Static Value, which will then give another option, in which you will need to type the value against which the query will compare all scanned records. In this case, type in the words ‘Membership Prospect’, then click Save.
Once saved, you should then see the filter displayed in the query builder:
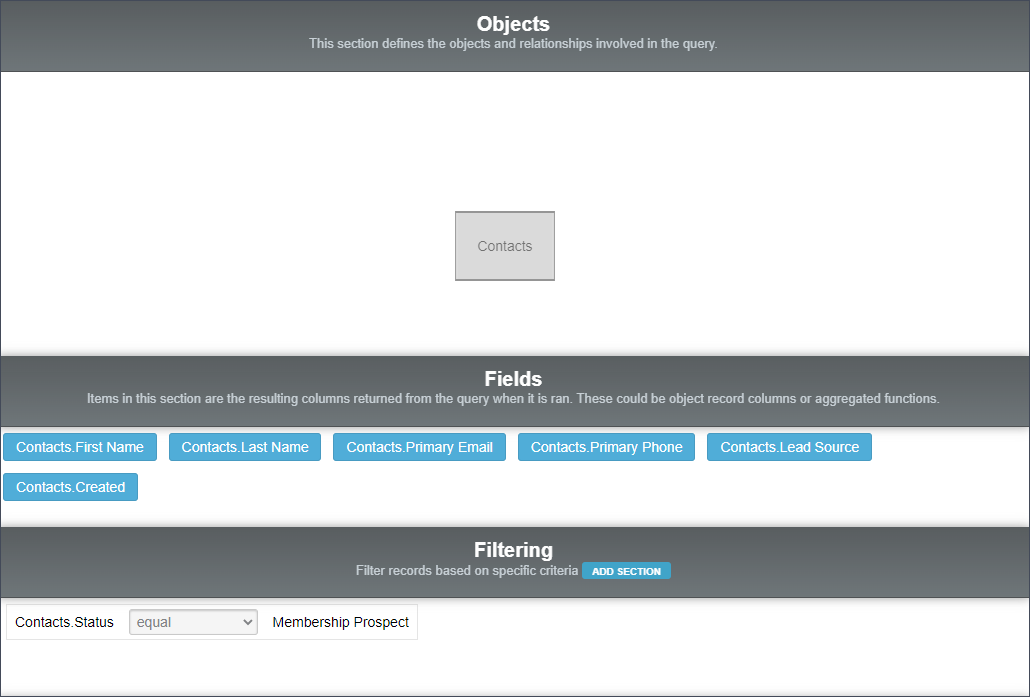
At this point, we now have a fully functional query! This is a good time to hit Save, just to be sure that we don’t lose any of our progress. After you save it, you can click Test Query to see how it is looking so far - at this point, it should be displaying the fields that we’ve defined for it, and selecting all of your contact records with a status of Membership Prospect.

This is close to our end goal, but not quite there yet, so let’s add in a couple more filters now. We can do this the same way as we did the first one - just find the field we want to filter on, then click and drag it down into the Filtering section. This time, let’s grab the field ‘Opportunity Status’, and compare it to a Static Value, in which we’ll type in ‘Open’.
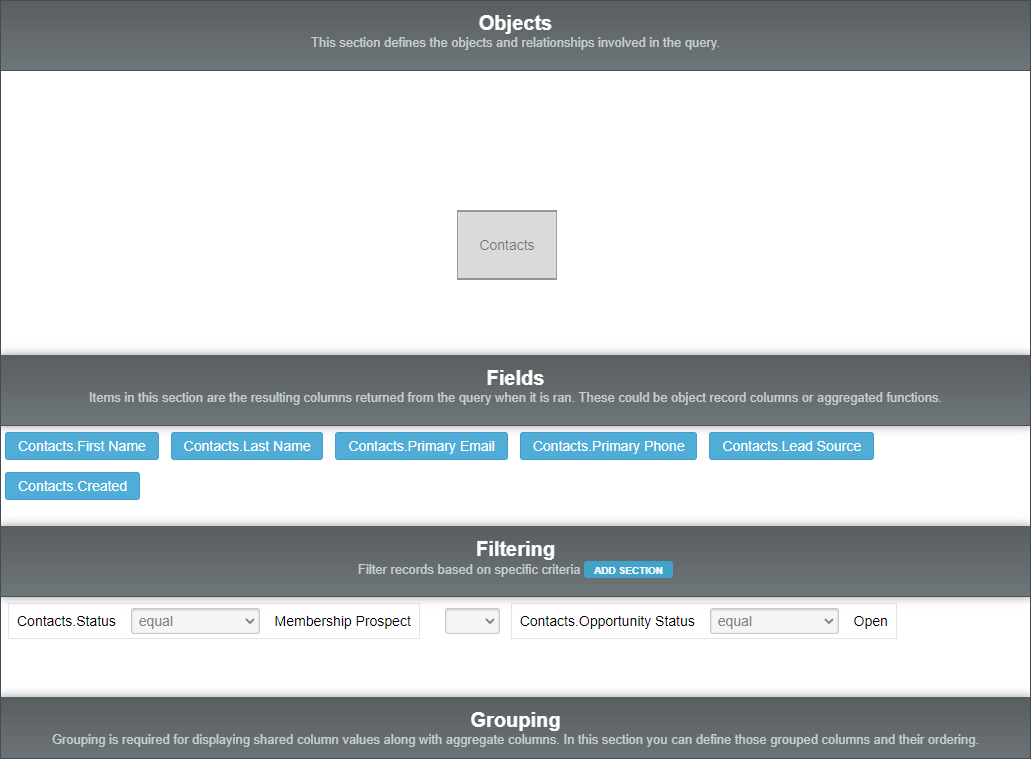
With this second filter in place, you should notice that a new dropdown box appeared between the two filters. This box contains the words AND and OR, and defines how these two filters work together. Selecting the AND operator means that in order for a record to display in our query, it will have to pass both filters - Status = ‘Membership Prospect’ AND Opportunity Status = ‘Open’. Selecting the OR operator would mean that a record can display in the query if it meets just one of the criteria (if it meets both criteria, it would also pass the filter). In this case, we want to use AND so that records will only be selected if they meet both criteria.
Finally, we want to filter this query to display only those records that have a value entered in the Lead Source field - or in other words, if there isn’t a value selected for this field, the record will not display in the record. To do this, let’s pull down the Lead Source field into the Filtering Section - this time though, instead of comparing to a Static Value, we’ll want to select the option Blank Value instead. Once saved, change the comparison from Equal to Not Equal, and apply the AND logic to this one as well, as we want a record to meet all three criteria in order to display in our query.

This is another good time to click Save, and run a test of the query to see how it looks now. Depending on the data in your CRM, you probably will have fewer returned results now that you’ve added in the two new filters.
There is only one thing left to do for this query, which is ordering the results to show the most recently created records at the top of the list. There are two ways to do this - first, you can click and drag the Created field from the Resource Bank down into the Ordering section. Alternatively, in the Fields section, you can hover your mouse over the Created field, and then click on the Star icon that appears in the contextual menu:
Once again, click Save - and now your query is complete! You can now access this query whenever you need it, or if you’d like to make it even easier to access, you can add it to your Quick Links.
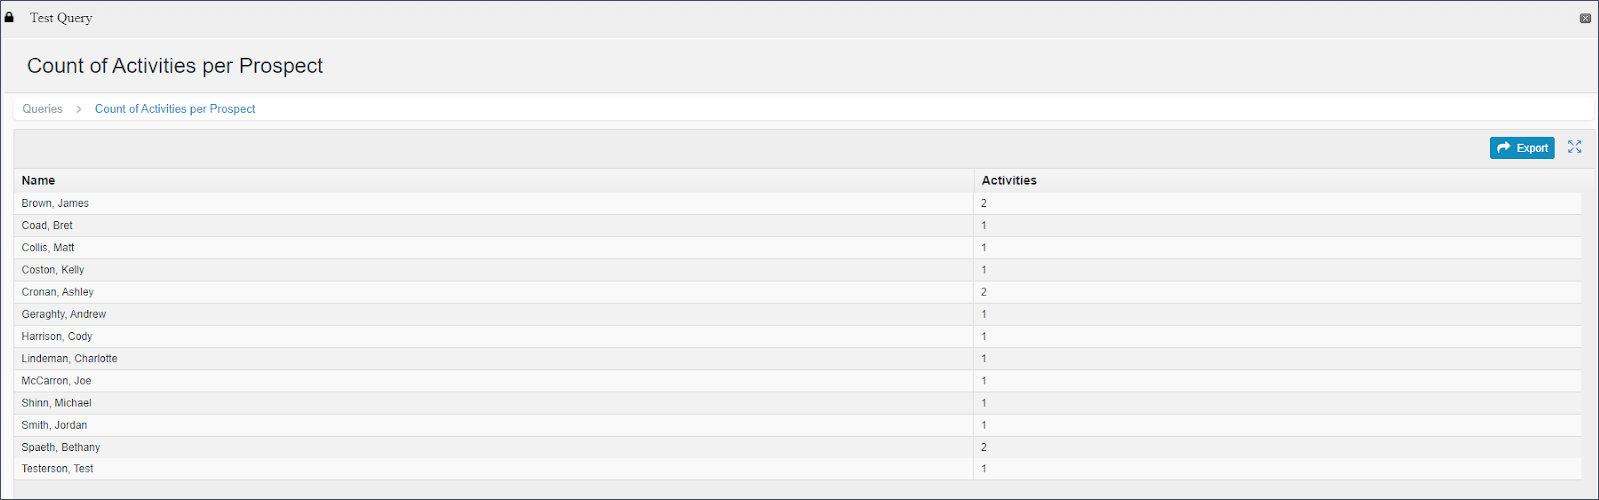
Example 2: Count of Activities per Prospect
In this example, we’re going to create a query that pulls records from our Activities Object, which are joined to another record in the Contacts Object. We’ll just be selecting the Contact name, and an aggregate function to display how many attached Activity records there are to that Contact. As such, we will need to utilize the Grouping section in this query, as opposed to the previous example.
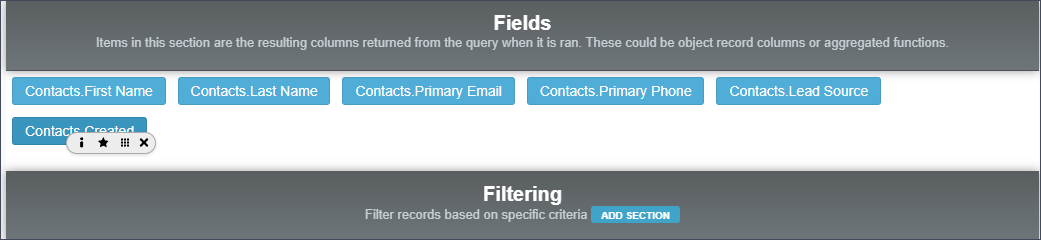
Here is how the query builder will look once it is complete:

And here is how the results will look, accordingly:
A lot of the fundamentals covered in the previous example are applicable here as well, but in this case the query will be also be using an aggregate function and the grouping section, so we’ll focus mainly on these pieces.
To start off the query, we need to select data from both the Contacts and Activities objects - once the second object is dragged down into the Objects section of the query builder, the relationship between the two will be drawn automatically. This is represented by the lines originating from each Object and terminating into a central box, in this case labelled “Activity History”
In the Fields section, this time there will only be two selections - one from the Fields tab of the Resource Bank, and one from the Aggregate Functions section. First, select the Contacts.RecordName field from Fields, then the Count(value) function from the Aggregate Functions tab. Once you drop this function into the Fields section, a list of options will appear, as seen below:
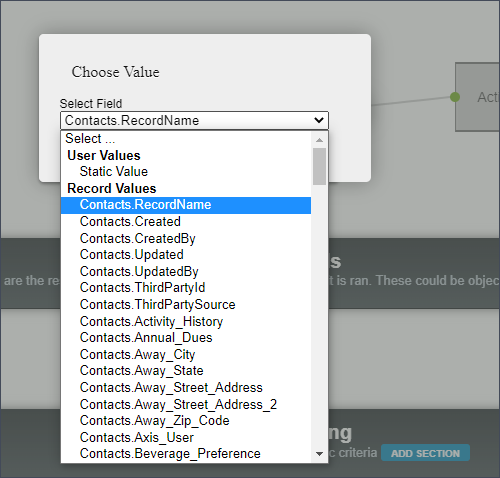
In this selection, you will almost always want to select the same field that you had selected as the other field in the query, in this case Contacts.RecordName.
Once both the fields are selected, they will need to be given an alias, or a display name. Hover your mouse over the Contacts.RecordName box in the Fields section of the Query Builder, and click the option that looks like a lowercase ‘i’:

This allows you to give a name to each of these fields, since neither of them are self-descriptive on their own. In this case, I named the fields ‘Name’ and ‘Activities’, so when the query is run, each contact’s name will appear in the Name column, and the number of Activities they have attached will be in the ‘Activities’ column.
In the Filtering section, you can filter however you need to - in this case, I want to display only Membership Prospects, so I am filtering on the Contacts.Status field to be equal to the value “Membership Prospect”. We don’t need to add any filters to ensure we only count prospects that have at least 1 Activity attached - this is actually done by nature of having a join between the Contacts and Activities objects - the relationship between the two Objects is known as an Inner Join, meaning that records will only appear in the results of the query if a match is found in both selected Objects, so any contacts that have no Activities associated with them will not show up in the results.
Next is the Grouping section - any time you are utilizing an aggregate function, you will need to define how the query groups the data to calculate the aggregate function. Typically, any field that is not itself an aggregate function will need to appear in the Grouping section in order for the query to function properly. There are two ways of adding fields to the Grouping section - you can either click/drag the fields from the Resource Bank, or from the Fields section, while hovering your mouse over a field, click on the icon that looks like a grid of 9 small dots, which will add that field to the Grouping section.
Optionally, you can also choose to add one or more fields to the Ordering section, which will define the order that the records are displayed when the query is run. In this case, the query is ordered by the Contacts.RecordName field so that the results are sorted alphabetically by name.
Finally, scroll back to the top of the query builder, and click ‘Save Query’ - then you can test it to make sure that it displays the way that you want it to. If it does, then you’re all done!