Overview
Monthly, Clubs perform month-end activities associated with the Membership module. The biggest portion of this month-end process is generating Member statements, and emailing or mailing the statements to a Club’s Members. To ensure Statements reflect the appropriate charges and desired messages, Clubs must perform the proper preliminary steps, and then execute the Month End Wizard to process the Member Billings, Minimums, and Late Fees as applicable. Once Generated, Statements can be printed or emailed. Once finalized, the A/R aging details can be tied to the General Ledger. Use Case Monthly, the Club runs statements on the second business day of the new month. Prior to running their statements, they ensure all charge batches are posted, and update the statement message to promote an upcoming Club Event. They then generate their statements, and get them out to their Members. They finalize their month-end process by clearing the Member minimum adjustments, and confirm their A/R Aging agrees to their General Ledger balance. |
Content
Video
Navigation
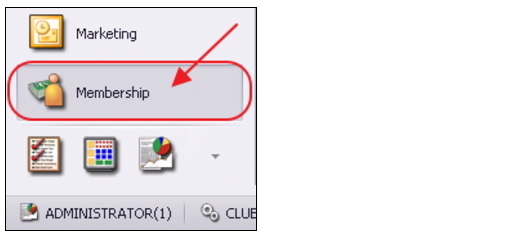
The Main tools utilized in this process will be found in the Membership Module of the application.
Prepare for Statement Generation
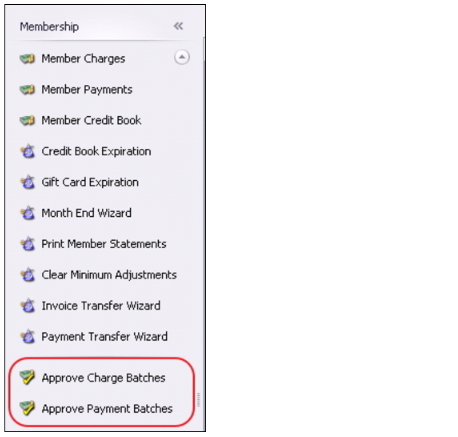
Post Open Batches
To ensure all charges are properly included in the Member statements:
Post all Charge batches for the period
Enter and Post all Payments for the period
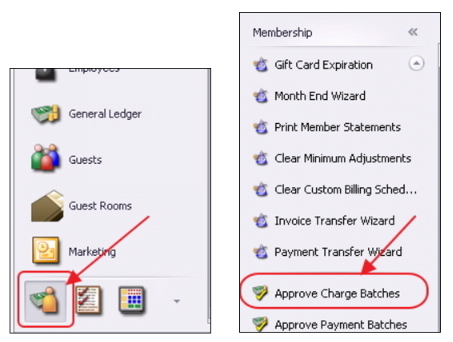
Navigate to the Approve Charge Batches grid and then to the Approve Payments Batches grid within the Membership module. In each grid, set the filter on the Posted column to Unchecked. Unposted batches will display. Post any batch with a Transaction date in the period you are closing.

Enter Statement Messages
Next, update the Statement Messages that will appear on the Member Statements. This is an excellent opportunity to promote an upcoming event, or pass along any additional information to Members.
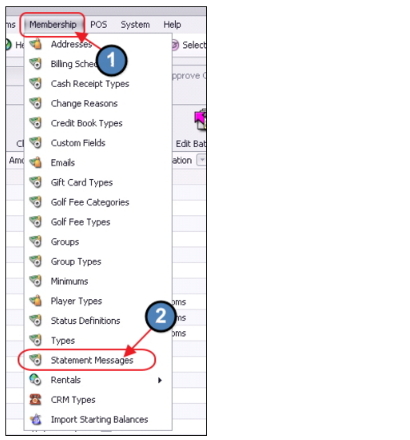
To access Statement Messages, click on Membership in the top menus. Then, select Statement Messages from the drop-down menu.
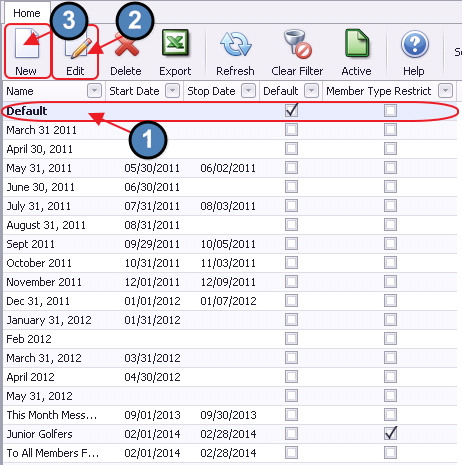
From here, Edit a previous statement message by clicking on it, and then selecting Edit, or create a new message by clicking the New button.
When creating a New message, give the message a Name. Include a Start Date and End Date for the message as applicable. Mark the message as the Default message if it is to be utilized as the current message, by checking the Default box. Then, enter message. Keeping the formatting simple and the message relatively short will ensure the message fits into the statement message box.
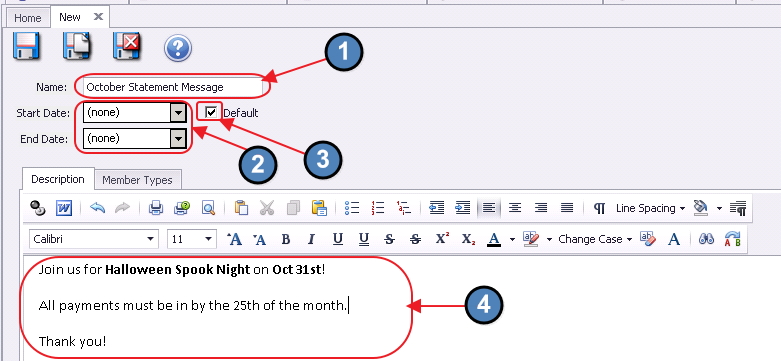
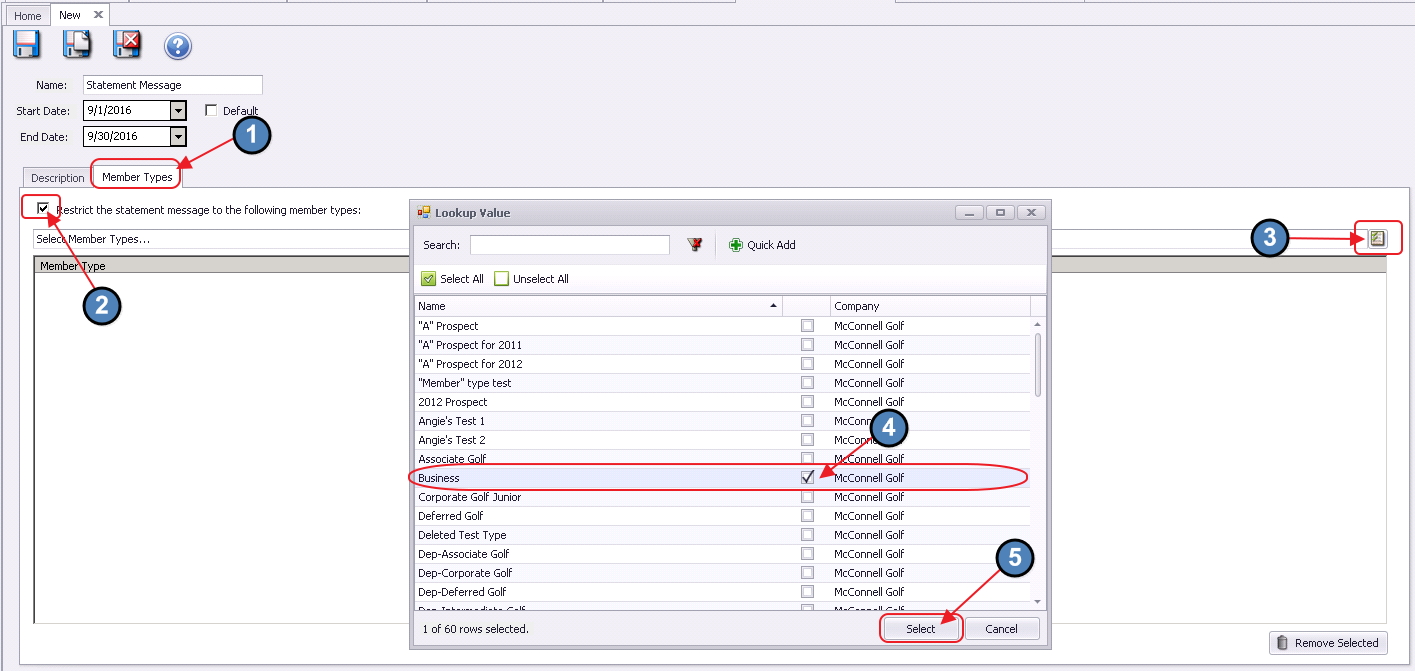
Also note there is a Member Types tab. This tab should be utilized to designate which Member Types should receive the message. To designate a Member Type, check the Restrict the statement message to the following member types: box. Then, click the Member Selection box, and designate the Member Types to include. Then, click Select. If the message applies to all Members, disregard this tab.
When finished, click Save and Close.
Past Due Messages
The Office System has the ability to place canned Past Due Messages on any Member’s Statement who is over 30, 60, or 90 days past due. Please follow instructions below to create/ update a Past Due Message.
Accessing the Tool
To create/ update a Past Due Message:
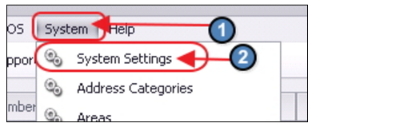
Select System across the top toolbar and choose System Settings.

2. Navigate to the Membership tab on the left pane of System Settings.

3. Use the Over 30, 60, or 90 day Past Due Statement Message section to enter your canned message.

4. Now, the corresponding message will appear on a Member’s Statement if they are Past Due.

Month End Processing
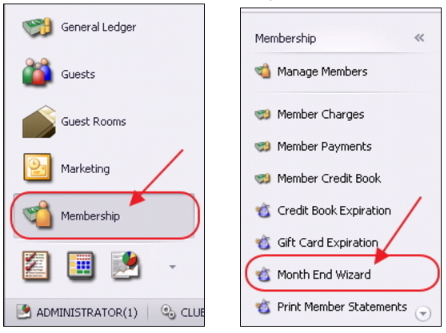
Once preliminary steps are complete, launch the Membership, Month End Wizard.
To access the Month End Wizard to generate the statements:
- Click on Membership
- Then, click on the Month End Wizard option.
Month End Wizard
Once the Month End Wizard launches, designate the Month and Year of the month end process to run, the Company (if more than one exists) to process, and the month end processes to run. Click Next to continue.
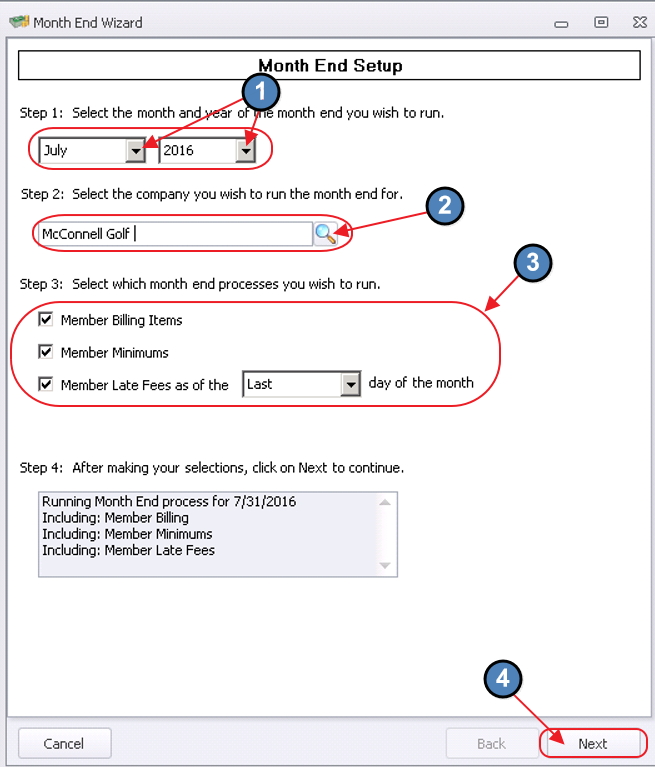
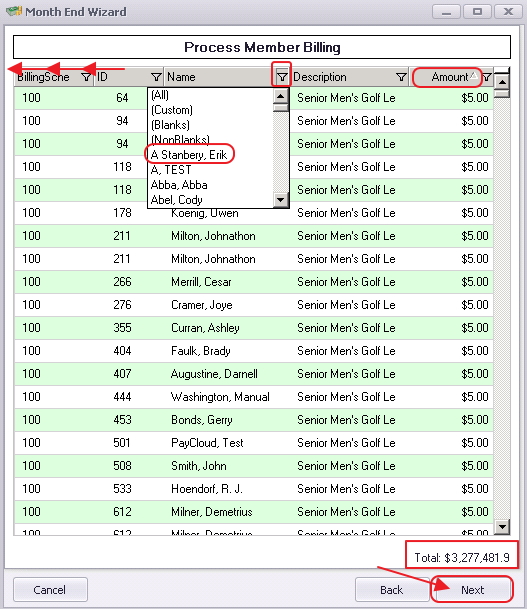
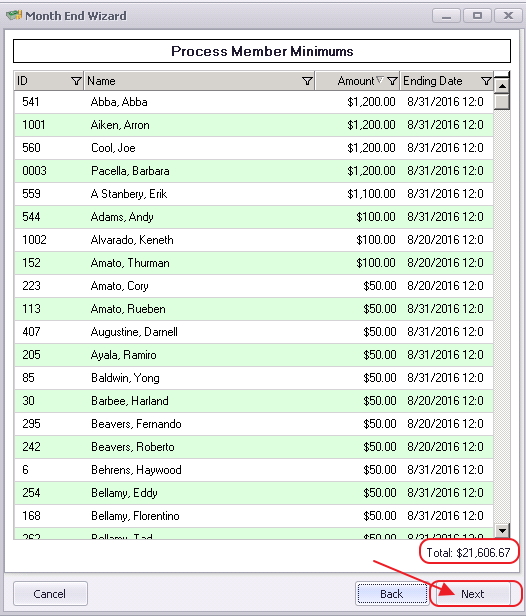
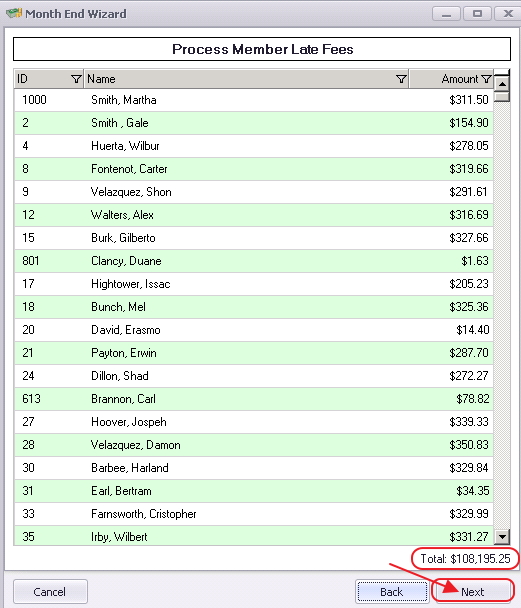
The next screens summarize the results of the selected month end processes. In each of the following screens, grid filters, navigation, and sorting are all available to assist with reviewing the data. To re-organize columns, click on column heading of column to be moved, and drop in new desired location. Once filter is set, the filter on the column will turn blue. To see all records, set filter back to (All). Click on column heading to sort data and display arrow in the direction of the sorting. In all screens, the total amount to be billed will be displayed in the bottom right-hand corner. Click Next to continue through all month end processes previously selected.
Member Billing Items
Member Minimums
Member Late Fees
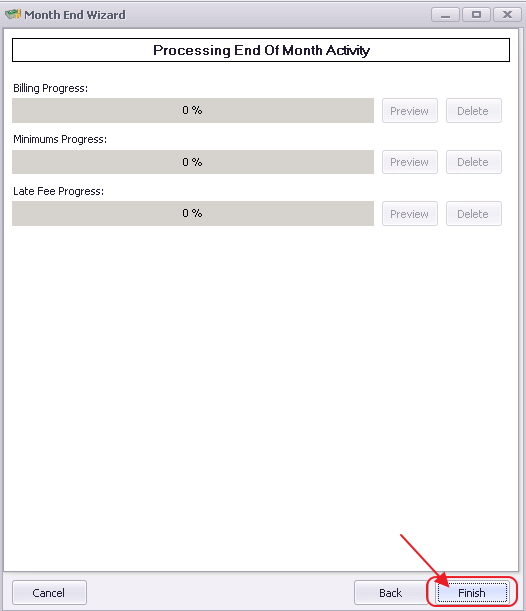
Following the individual summaries of the Month End processes selected for processing, the Process End of Month Activity screen will then appear. Click Finish to begin processing the billings displayed on the previous screens.
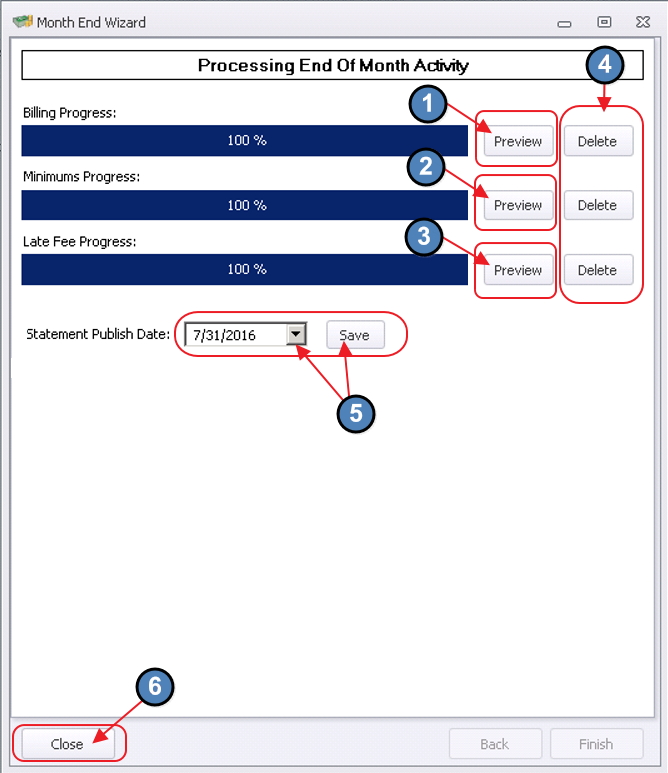
Once all billings have completed processing (100%), the batches are available for review and posting. On this screen, each of the batches now have a Preview and Delete button. Click Preview to review each of the billing batches, and if correct, post the batch. Click Delete to eliminate the batch prior to posting. Additionally, populate the new Statement Publish Date field, and click Save. This date should be set to the last date of the Month for the Current Statement period. When finished, click Close.
Note that the End of Month Wizard can be run as many times as necessary, as long as the generated batches have been deleted. Additionally, the Wizard may be closed, and the generated batches may be reviewed/posted at a later date.
Batch Editing/Deletion/Unposting/Posting
While previewing, posting, and deleting the batches are available options within the Wizard, once generated, the batches can also be accessed for editing/deletion/unposting/posting in the Membership, Approve Charge Batches tool.
Remove a Member’s Charge from the Billing (Unposted Batch)
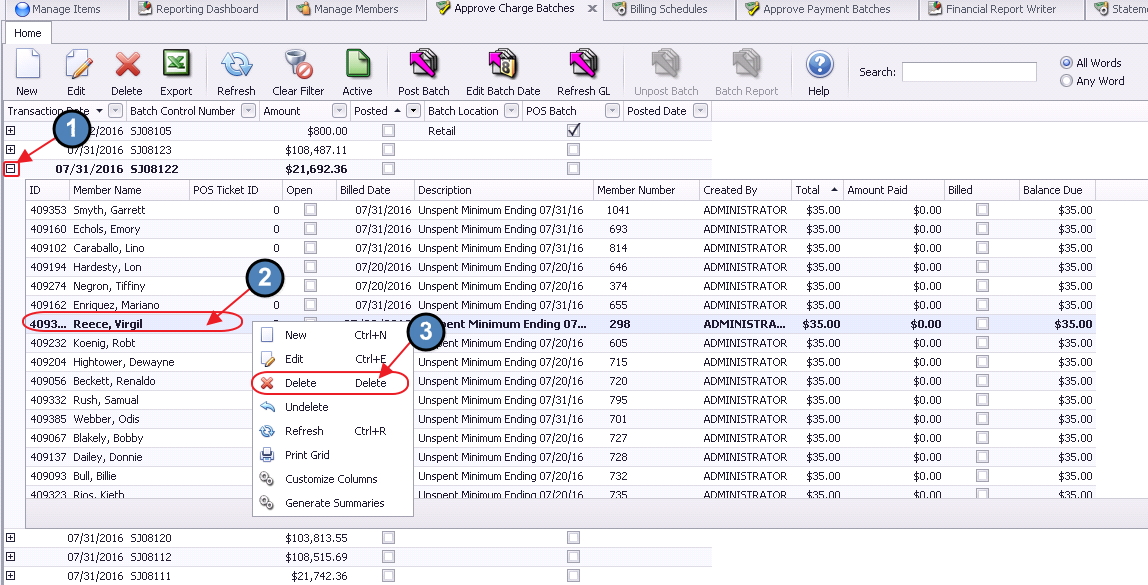
Once in Approve Charge Batches, find desired batch, click on the "+" icon next to the batch to expand it and show the different charges in the batch. Right-click on the name of the Member’s charge you want to remove. Select Delete from the shortcut menu to eliminate charge from batch.
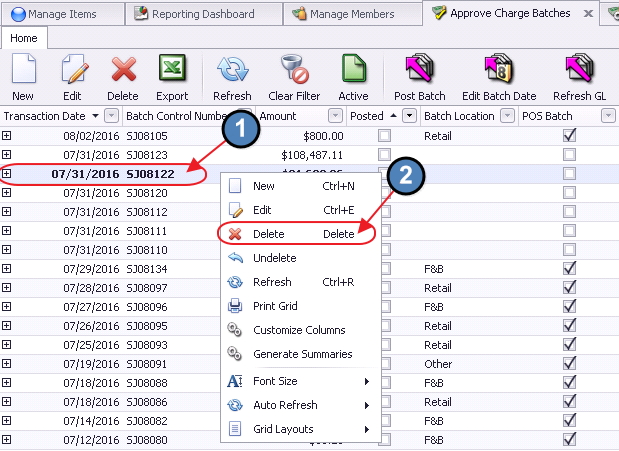
Delete a Batch (Unposted Batch)
Once in Approve Charge Batches, find desired batch, and right-click on it. Select Delete from the shortcut menu, and confirm deletion to eliminate unposted batch.
Unpost a Batch (Posted Batch)
Once in Approve Charge Batches, find desired batch, and highlight it. Then, select the Unpost Batch icon. Once unposted, the batch can then be deleted, or edited, and re-posted.

Post a Batch (Unposted Batch)
Once in Approve Charge Batches, find desired batch, and highlight it. Then, select the Post Batch icon to post the unposted batch.

Statement Date Population
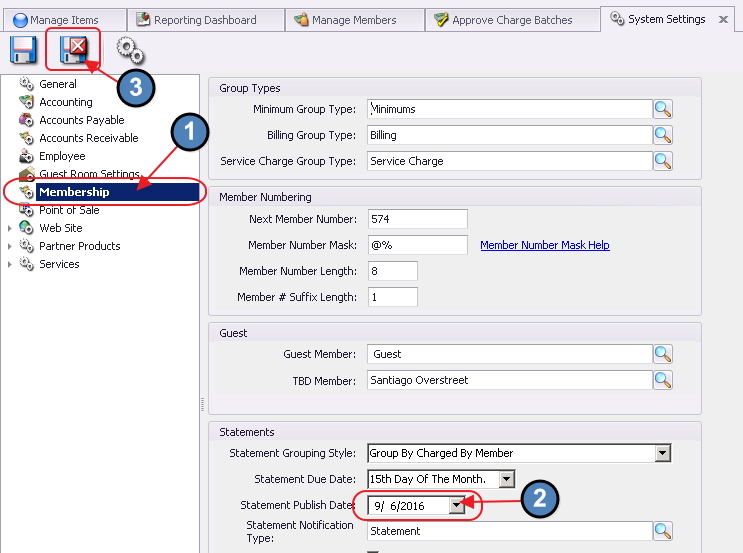
While populating the Statement date is an option within the Wizard, this date may also be entered by choosing System, and System Settings from the top menu.
Navigate to the Membership tab, populate the Statement Publish Date, and click Save and Close to continue. Remember this date should be set to the last date of the Month for the Current Statement period.
Distribute Member Statements
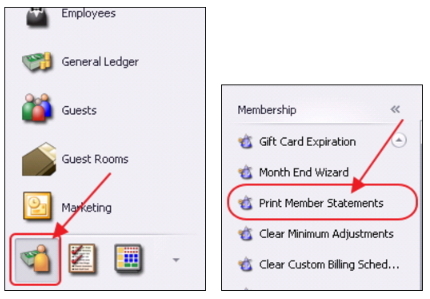
To print and/or email Member Statements, click on Membership, and then select Print Member Statements to launch the Member Statement Wizard.
To minimize processing time, it is recommended to Print Statements and Email Statements in separate processing batches. Oftentimes, Clubs print statements first, and then produce email statements while stuffing envelopes.
Printing Member Statements
Statement Settings
Once in the Wizard, enter the Month and Year, designate the Company (if more than one exists), and indicate whether or not the statements are a Memo Billing. Next, specify the Output settings to Print Statements. Click Next to continue.
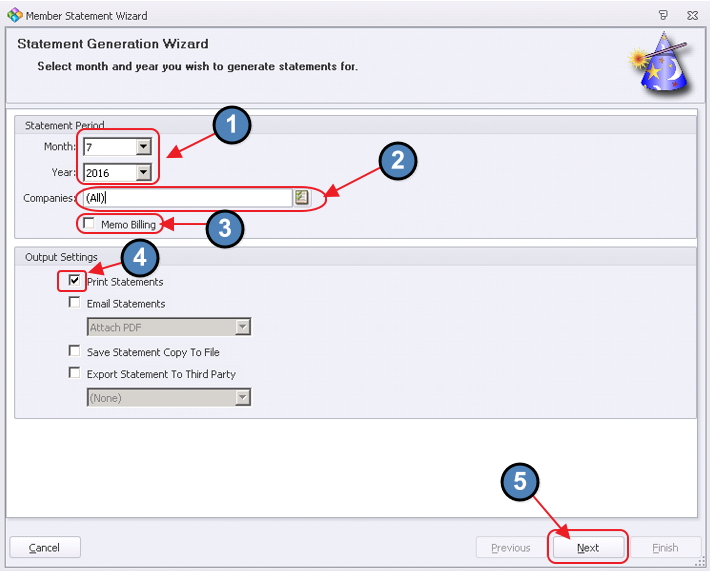
Note: The Memo Billing option shown above is often used in conjunction with a Billing Schedule flagged as such (see Billing Schedule screenshot below), and is used to provide an idea of what a billing would look like for informational purposes only. For example, a Club that bills Members annually in December, may generate a memo billing in September to give their Members an idea of what the December billing will look like.

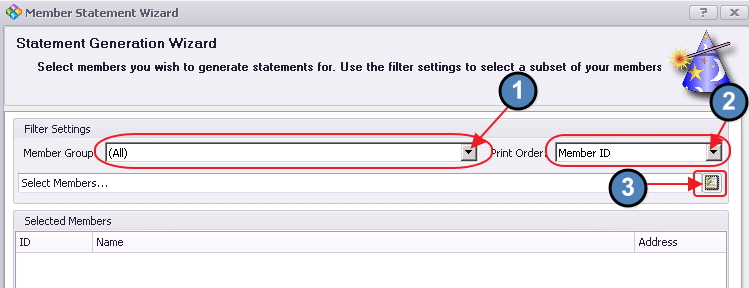
Member Selection
On the next screen in the Wizard, designate the Members for whom the Statements should be printed. The screen will default to the Member Group, All. Designate the Print Order (either by Member ID, or Last Name), and then add Members by clicking the Member Select button. Note: The Members that appear in the next screen are controlled by the Member Group selected.
The Member Lookup window will launch. The Has Statement Address column will be checked if the Member is configured to have a printed statement. To easily select all Member who are configured for a printed statement, filter the Has Statement Address column for checked, and then click, Select All. To add all selected Members to the list for statements, click Select.
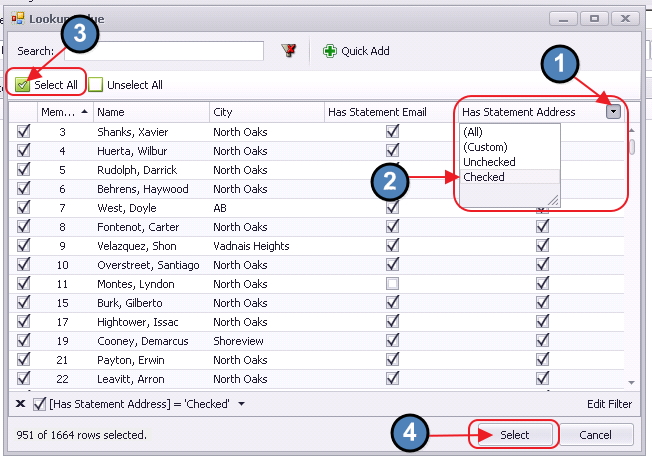
If a filter is not applied, all Members will be returned. Members listed in RED are not configured to receive a printed or emailed statement. Many Clubs and Members are choosing to go paperless, and access their Statements via the club Website. To remove a Member inadvertently added to the listing who is not set up for Statements, select the Member, and click Remove Selected.
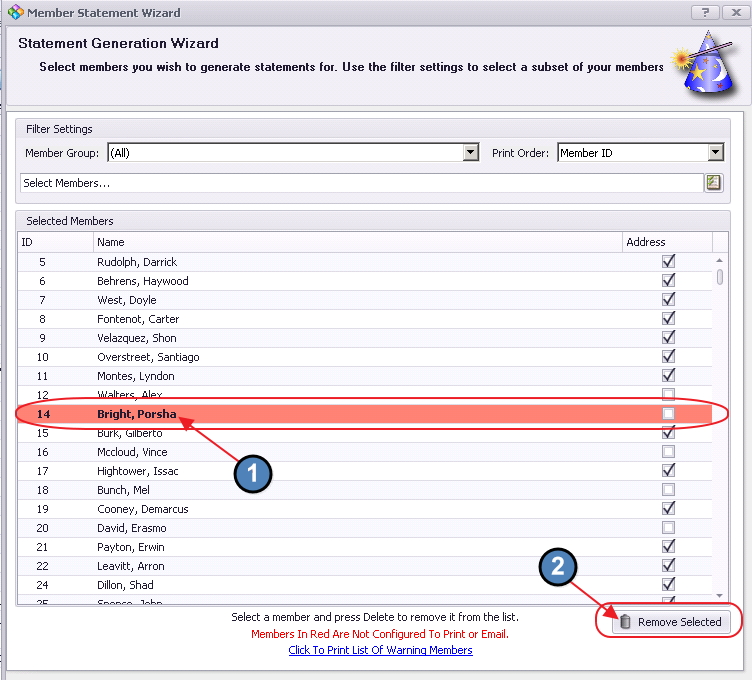
If a large number of Members appearing in RED have been added to the listing, click the Click to Print List of Warning Members option at the bottom. Review listing for accuracy. Click Next to proceed. (If listing is not accurate, make edits as necessary).
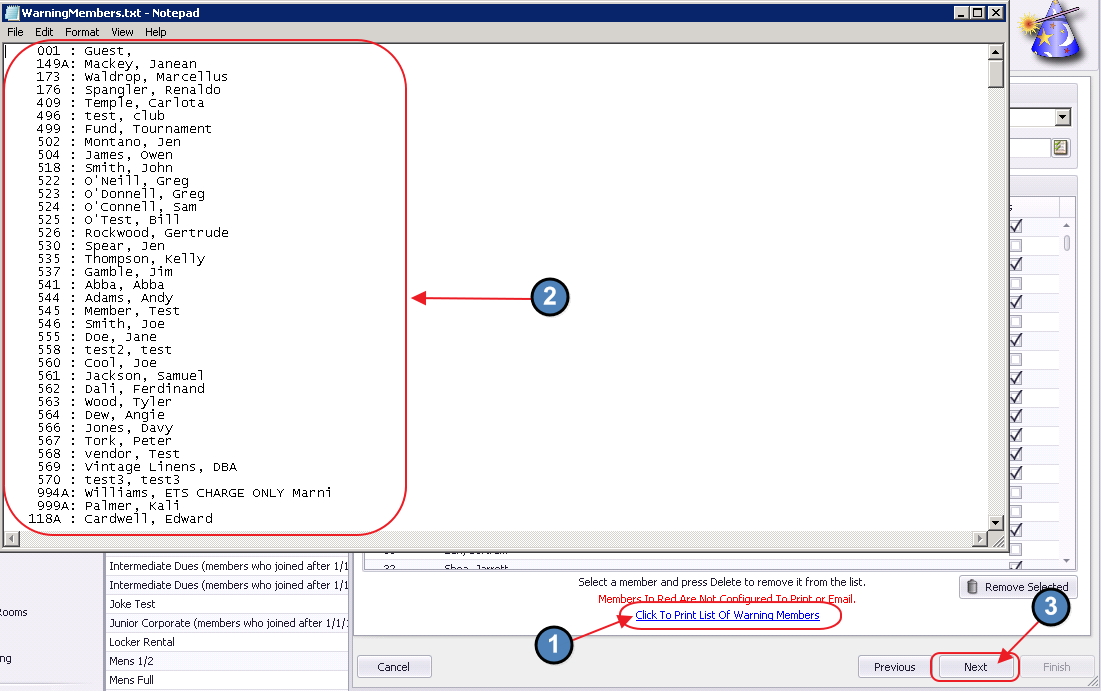
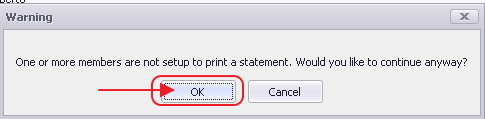
Click OK provided the above review has been performed and was accurate.
Printing Settings
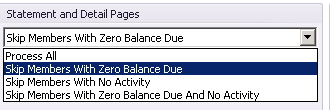
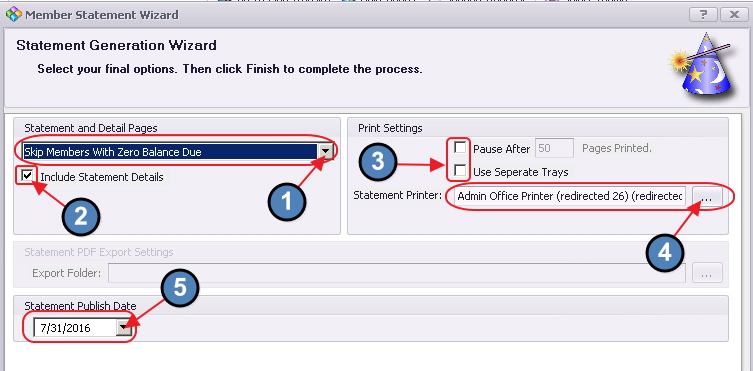
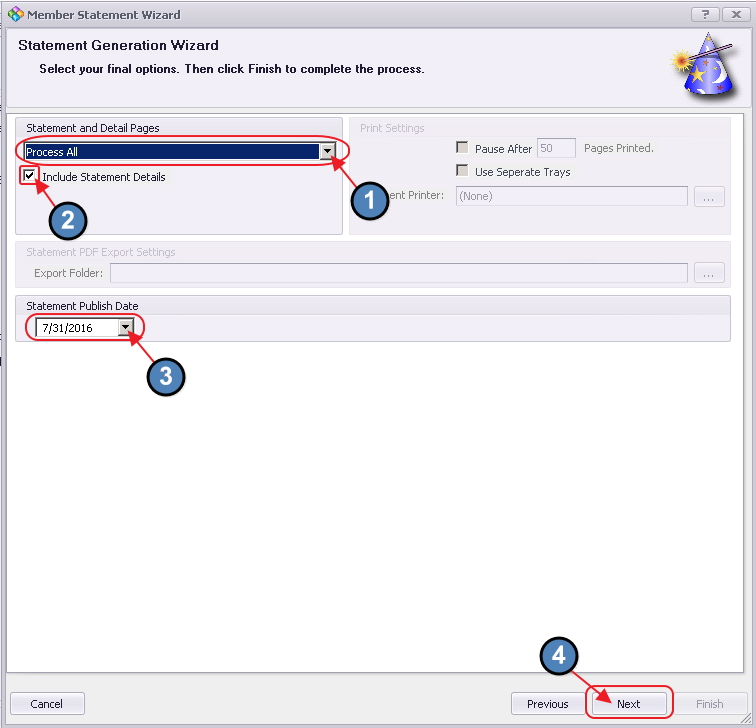
Next, define the final set of options. Begin by designating which statements to print from the available options.
Then, determine whether statement details should be included. This option (available only for Members who have “include statement details” checked in the Financial Information section of their Member profile) enables miniature copies of supporting tickets to be included with the summarized statement.
Next, define Print settings and the printer that should be utilized.
Use the Pause After feature to stop printing after a certain number of pages, so additional paper can be loaded in the printer. For example, if a Club has 350 Members (and statements are printed for all Members), but printer holds only 250 sheets, it is advisable to enable the Pause After feature and enter a number around 200, so more paper can be added prior to the tray emptying. If Printer holds enough paper to print all Statements, leave the feature unchecked.
When printing Statement Details, optionally check the Use Separate Trays feature to allow the statements to be printed to one specified printer, and the details to be printed to a second specified printer.
To specify a printer, click the three dots next to the Statement Printer name (and the Details Printer name if Separate Trays option has been selected), and select Printer from available list.
Populate the Statement Publish Date to the last day of the month of the current statement period. (Also available in Month End Wizard and System Settings, Membership, as previously shown).
Click Next to continue.

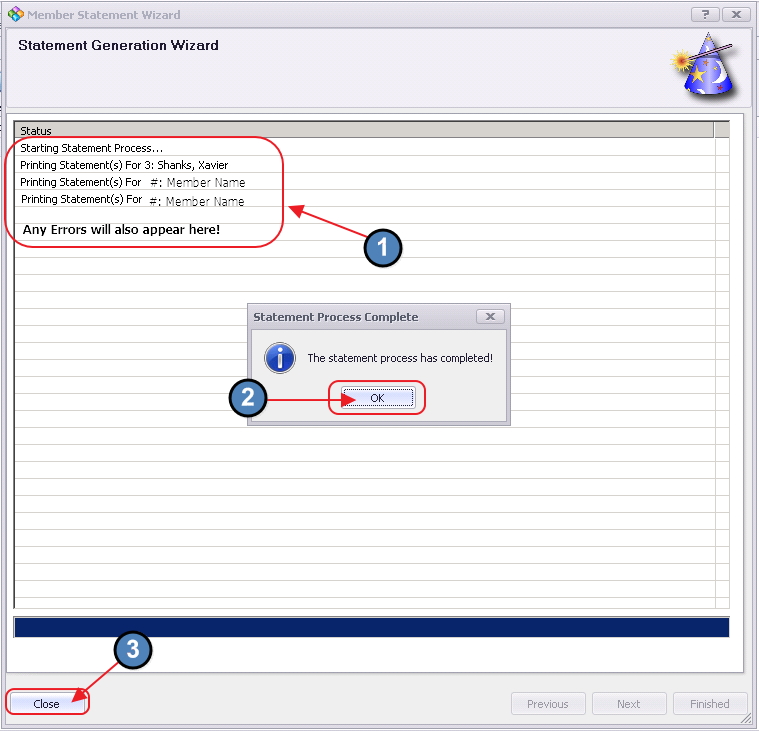
Click Finish to kick-off statement printing.
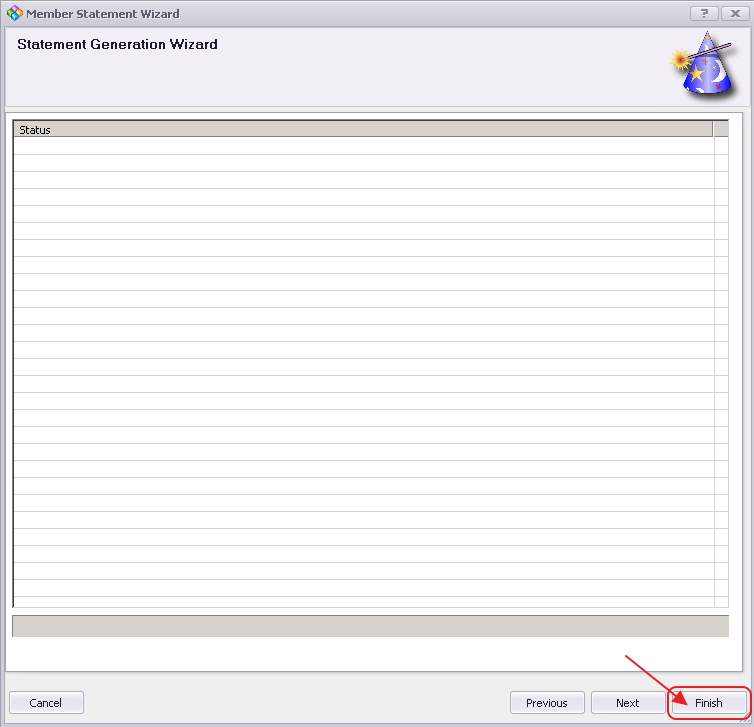
When finished (blue status bar at bottom complete), the screen will show Members that processed and will also list any errors in processing so further investigation can be done. Click OK to acknowledge statement completion, and click Close to exit wizard.
Emailing Member Statements
Statement Settings

Other less-widely used, more advanced options are available for Email Statements, including PDF (Rich document), Embedded HTML, and Custom Marketing Templates. The PDF Rich document allows a PDF document to be selected for attachment, rather than auto-generated by the system. The Embedded HTML sends the statement in the form of HTML, rather than a PDF, and the Custom Marketing Template allows Clubs to further customize their statement presentation.
Avoid the Save Statement Copy to File option, as the Statement details are already saved in the system, and do not need to be saved again in the form of a PDF attachment.
Member Selection
On the next screen in the Wizard, designate the Members for whom the Statements should be printed. The screen will default to the Member Group, All. Designate the Print Order (either by Member ID, or Last Name), and then add Members by clicking the Member Select button. Note: The Members that appear in the next screen are controlled by the Member Group selected.
The Member Lookup window will launch. The Has Statement Address column will be checked if the Member is configured to have a printed statement. To easily select all Member who are configured for a printed statement, filter the Has Statement Address column for checked, and then click, Select All. To add all selected Members to the list for statements, click Select.
If a filter is not applied, all Members will be returned. Members listed in RED are not configured to receive a printed or emailed statement. Many Clubs and Members are choosing to go paperless, and access their Statements via the club Website. To remove a Member inadvertently added to the listing who is not set up for Statements, select the Member, and click Remove Selected.
If a large number of Members appearing in RED have been added to the listing, click the Click to Print List of Warning Members option at the bottom. Review listing for accuracy. Click Next to proceed. (If listing is not accurate, make edits as necessary).
Click OK provided the above review has been performed and was accurate.
Additional Attachments
For more information on how to attach more than one document or image to the statement email, please see the article on Additional Attachments to Statement email.
Printing Settings
Next, define the final set of options. Begin by designating which statements to email from the available options.
Then, determine whether statement details should be included. This option (available only for Members who have “include statement details” checked in the Financial Information section of their Member profile) enables miniature copies of supporting tickets to be included with the summarized statement.
Populate the Statement Publish Date. (Also available in Month End Wizard and System Settings, Membership, as previously shown).
Click Next to continue.
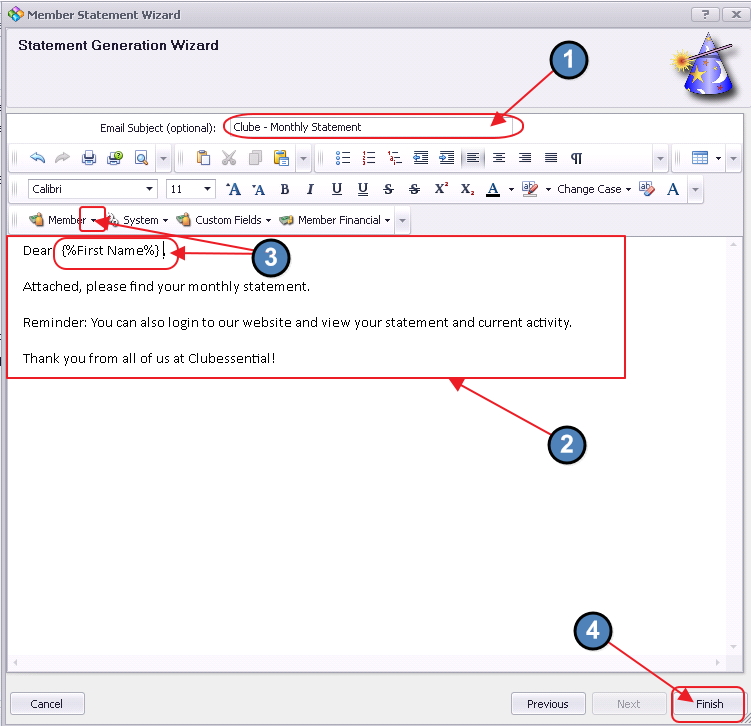
Next, create an email that will contain the PDF statement. Provide an Email Subject, and type the message. Use formatting tools as well as Snippets. Click on the drop-down arrows (next to Member, System, Custom Fields, and Member Financial) to access available snippets. When complete, click Finish.
When finished (blue status bar at bottom complete), the screen will show Members that processed and will also list any errors in processing so further investigation can be done. Click OK to acknowledge statement completion, and click Close to exit wizard.
Post Statement Generation
After generating, printing, and/or emailing the statements to Members, it is important to perform a few additional steps to ensure the Membership Module is properly handled for the end of the month.
Clear Minimum Adjustments
If adjustments to Member Account(s) were made, the adjustment remains in the Member’s file until cleared or removed.
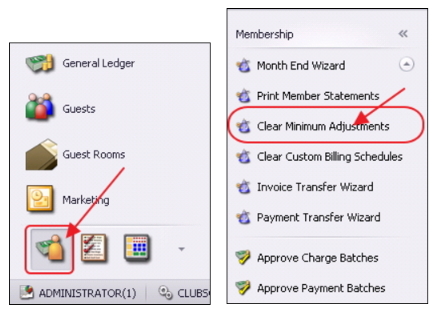
Minimum Group: To remove adjustments made to an entire minimum group, click on Membership, and select Clear Minimum Adjustments.
Check the box next to the Minimum Group to remove adjustments. Then, click Clear Selected.
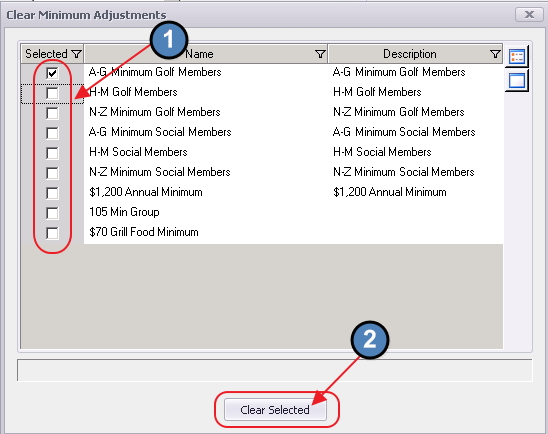
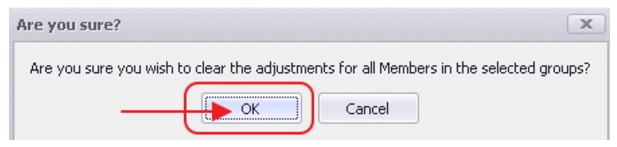
Confirm clearing by clicking OK.
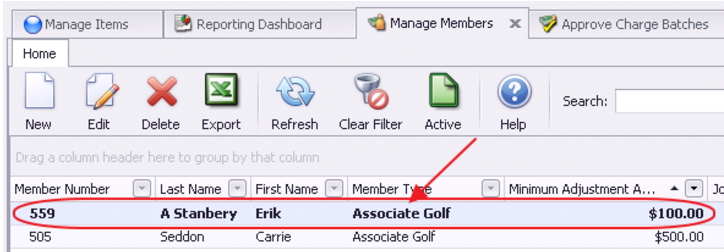
Individual/Few Members: To remove adjustments made to a Single Member, or a few Members, click on Membership, and select Manage Members.
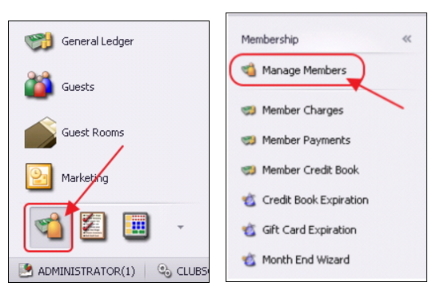
Double-click on the affected Member. (Set Filter for Minimum Adjustment Amount > 0 to see possible impacted Members.
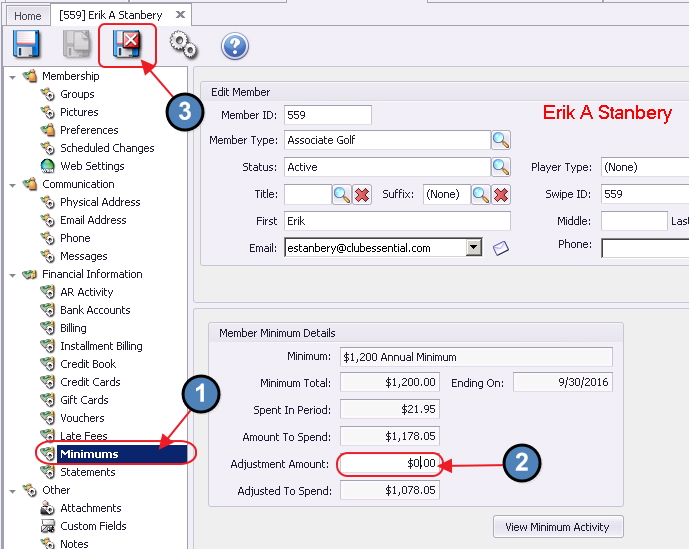
Click on the Minimums tab. Change Adjustment Amount to $0.00. Click Save and Close.
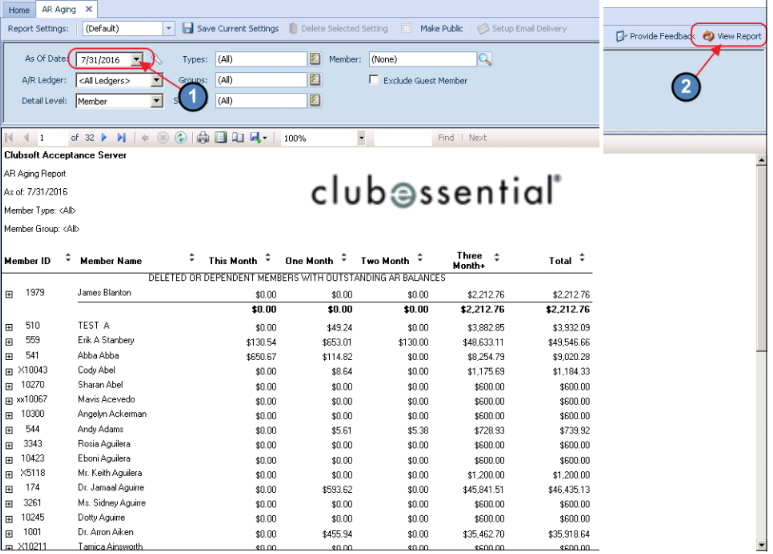
Print A/R Aging Report
Lastly, print out the A/R aging report to review Member balances, and tie totals on the report to the General Ledger balance. To print the report, navigate to Interactive Reports, Membership, and select AR Aging.
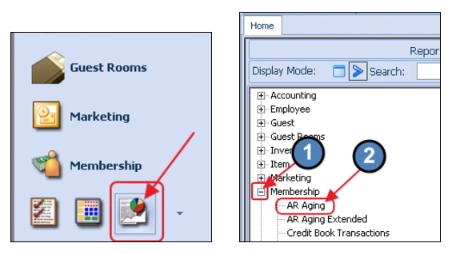
Then, enter the As of Date, and click View Report at the upper right-hand corner.
FAQs
Q. What if there is an error during statement printing?
A. If the printer becomes jammed, click Pause, fix the error (clear jam, etc), and when fixed, click Resume. Printing will commence where error occurred.
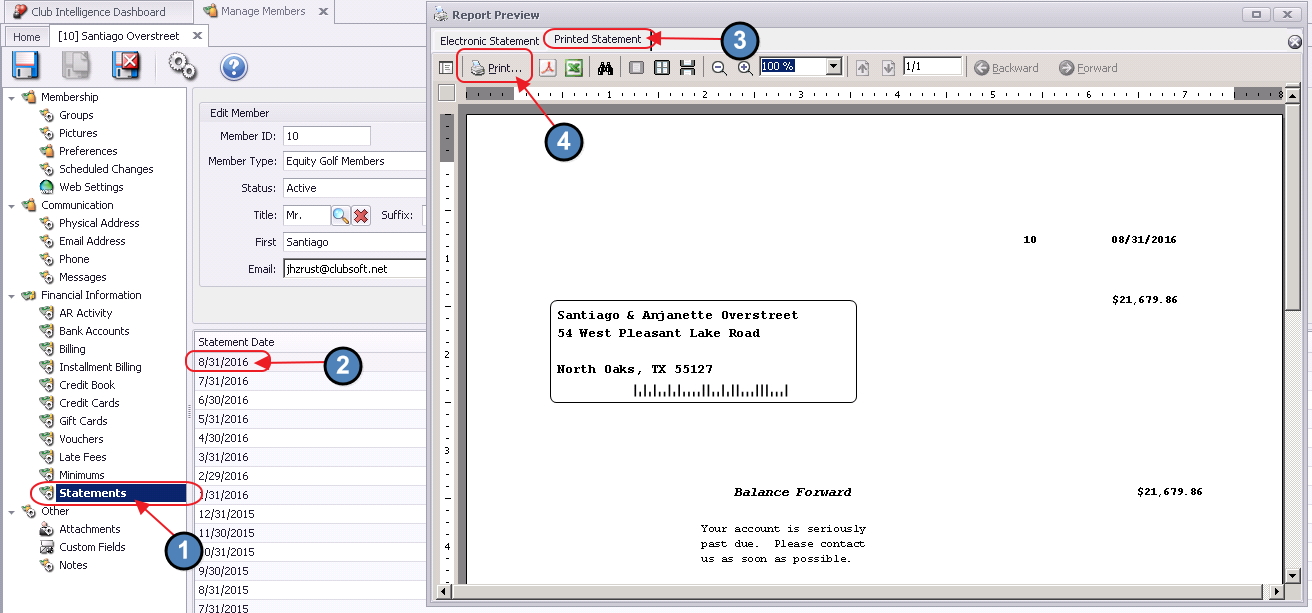
Q. What is the best way to re-print a statement for one Member?
A. The easiest way to re-print a statement for one Member, is to go to the Member’s profile. Click on the Statements tab (in the Financial Information section), double-click on the statement date to reprint, navigate to the Printed Statement tab, and then click Print.
Best Practices
- Post all period batches prior to generating statements.
- To minimize processing time, it is recommended to Print Statements and Email Statements in separate processing batches. Oftentimes, Clubs print statements first, and then produce email statements while stuffing envelopes.
-
For more information on how to attach more than one document or image to the statement email, please see the article on Additional Attachments to Statement email.
Downloadable Guide
Membership End of Month - Guide