Overview
This user guide will present an overview of the Banquets application as it relates to Navigation, Event Booking, and Event Lifecycles. Understanding these concepts is critical to successfully utilizing the Banquets toolset. Use Case(s) The Banquets Manager begins every day by reviewing the Home Page, which summarizes the most relevant information (Task, Events, and Leads) pertinent to the current day. They then navigate through the system effortlessly as they follow up on Leads, convert them to Events, and then move through the Event life cycle; skipping steps that may not be appropriate depending on the nature of the Event(s). |
Content
Home Page

- On the Home page, current and past due Tasks are displayed in the application workspace along with any Events occurring that day.
- The Navigation Bar is displayed on the left side; it contains configurable Icons that direct to different areas in the software.
- The global search field, located at the top of the Navigation Bar, can be used to find items in all areas of the application. Simply type in any string of information and click the Search button. All matching results will be delivered with underlined links to access.
Viewing the Event Calendar
To view the event calendar, click the Events icon in the Navigation Bar. There are four separate views of the event calendar: month, week, day and month by location. When first clicking on the Events (calendar) icon, the calendar will default to showing the current month for the user’s primary site. If a different site, view, or month is selected, the Events icon will default to that setting until the user logs out.

Use the arrows in the upper left-hand corner of the calendar to navigate to different dates. The single arrows will move forward or back a month; the double arrows will move forward or back by year.
The color of the Event corresponds to the Event’s current Event Status, or another option is to have the color correspond to the Event Type. In order to access the Event Details page, double click on the desired Event. Or, hover over the Event on the calendar for basic information.
Batch Generate Documents
Documents, such as Event Orders, can be Batch Generated from this page by clicking on the Batch Generate Documents button.

Filter and select your events and then select a document. Your batch will be sent to the bottom of your home page in the Background Activities section.

Calendar View
The Week View of the calendar initially displays the current week. The single arrow buttons can be used to move forward or back by week; the double arrows will move to the past year’s corresponding week or the following year’s corresponding week. The color of the event denotes it's current Event Status.

The Day View of the calendar will display the site’s locations along with any events taking place that day. The single arrow buttons can be used to move forward or back by day; the double arrows will move forward or back by year.
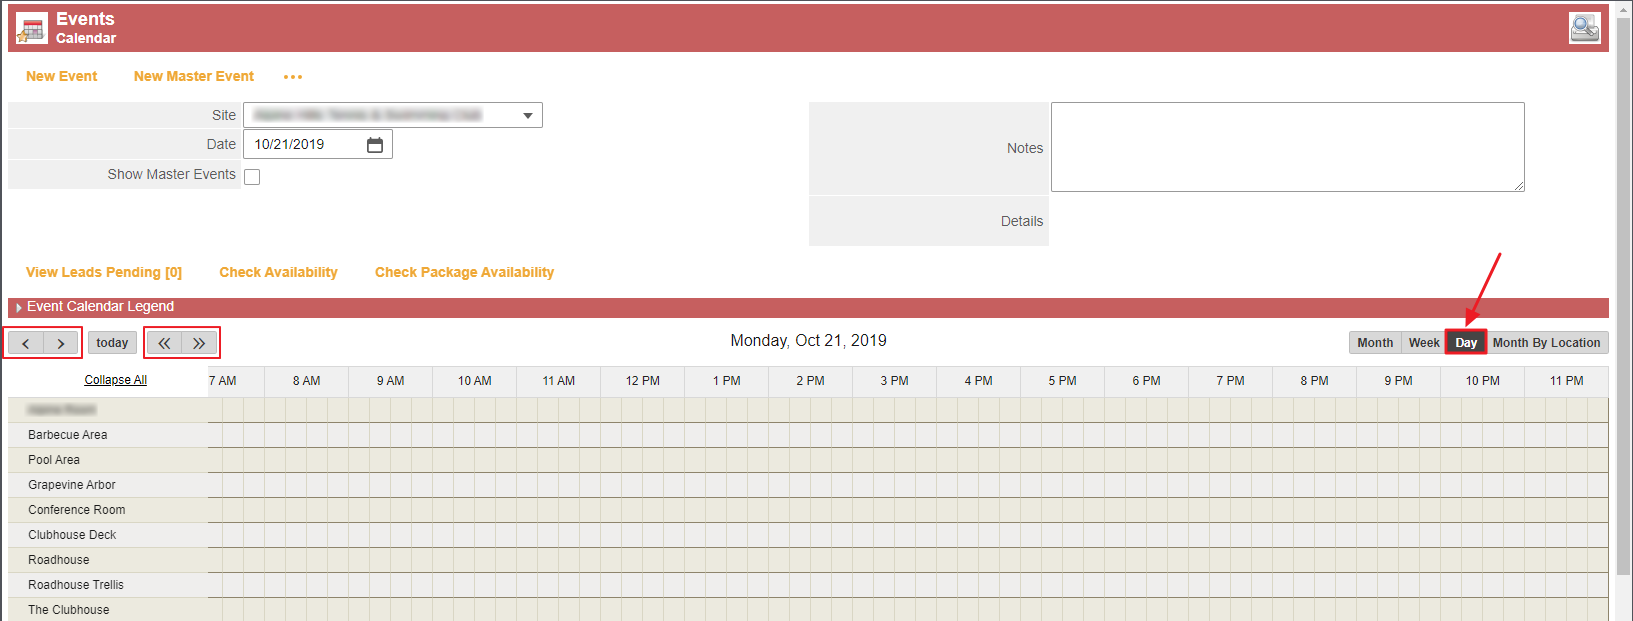
The color of the event denotes its current Event Status. The grey bars before and after the event indicate the setup and teardown times.
Booking an Event
There are different ways in Banquets to start new events depending on which calendar view has been selected.
Regardless of the current selected calendar view, a new event can always be started by clicking on the “New Event” button in the upper left corner of the screen.

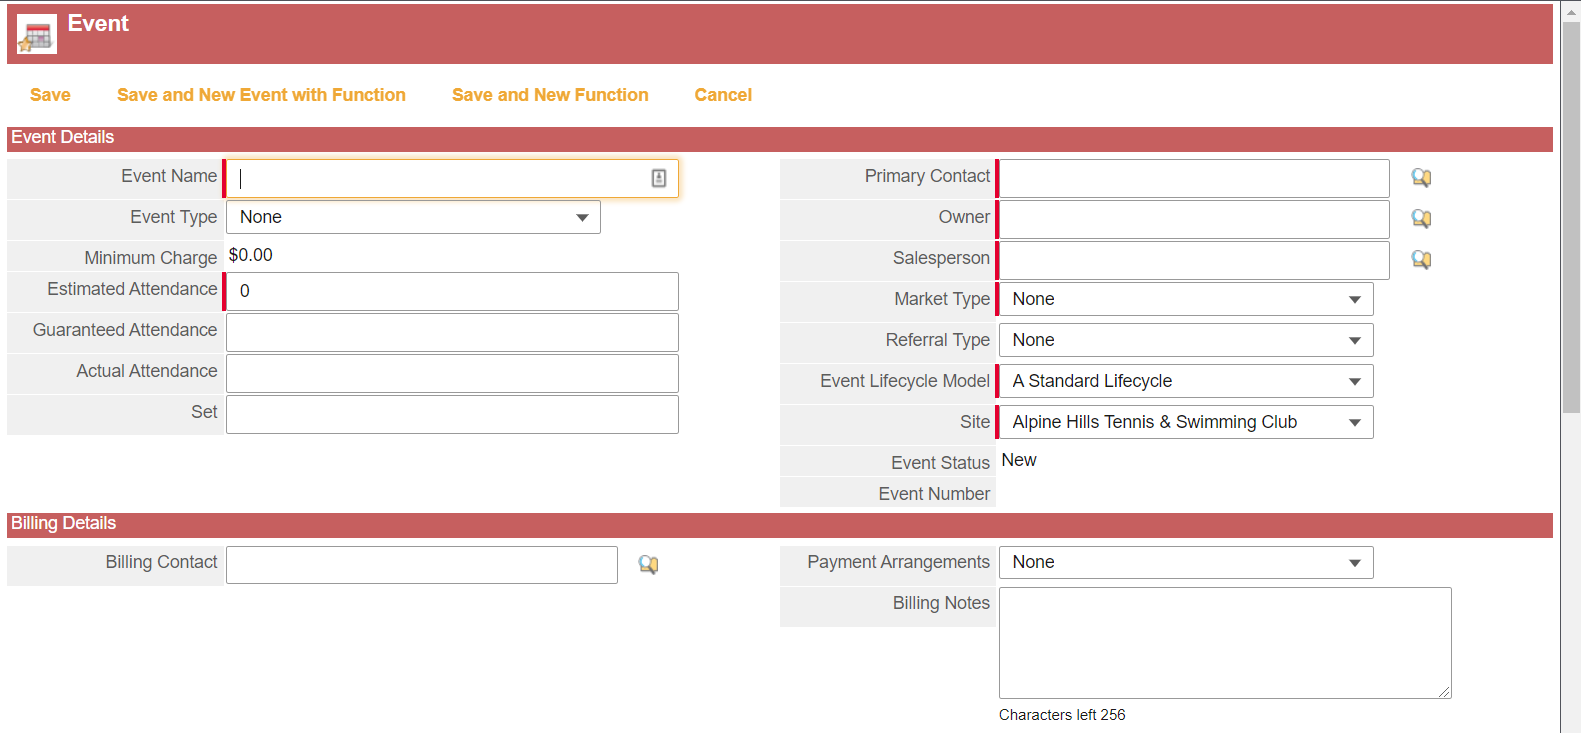
Clicking the “New Event” button will direct to the Event Details screen. The minimum required information for the Event and Function will need to be entered here which is indicated by the red vertical bars.
To book an event when using the Day View of the calendar, click and hold in the location at the desired start time. Drag the cursor to highlight the duration of the event and let go of the mouse or trackpad.

The Event Details page will populate with the information provided. It will contain Date, Site, Location, Start Time, and End Time. The minimum information will again be indicated with a red vertical bar.
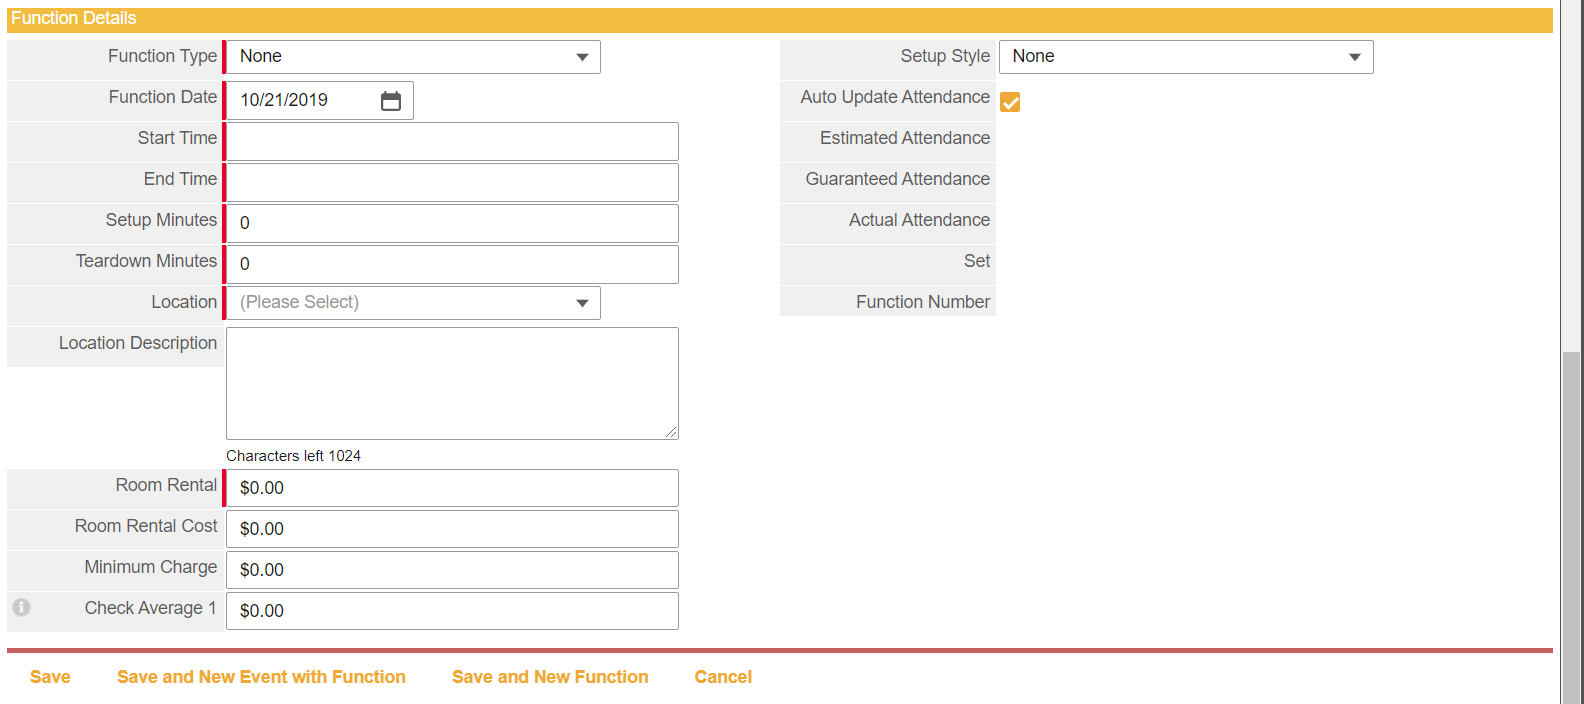
If an additional location needs to be added to the event, it can be selected from the Location dropdown under Function Details.

In order to book an event using the Week View of the calendar, click and hold on the date at the desired start time. Drag the cursor to include the time frame and let go of the mouse or trackpad when ready.

The Event and Function Detail page will auto populate with the information provided. It will contain Date, Site, Start Time, and End Time. The minimum information still required includes Location, Event Name, Event Type and Primary Contact.
In order to book an event using the Month View of the calendar, double click on the desired date.

Contacts can be found by clicking on the Contacts icon in the Navigation Bar or by using the global search field. When an event is booked from the contact’s page, the contact is added to the event as the primary contact. All other required fields must be entered.
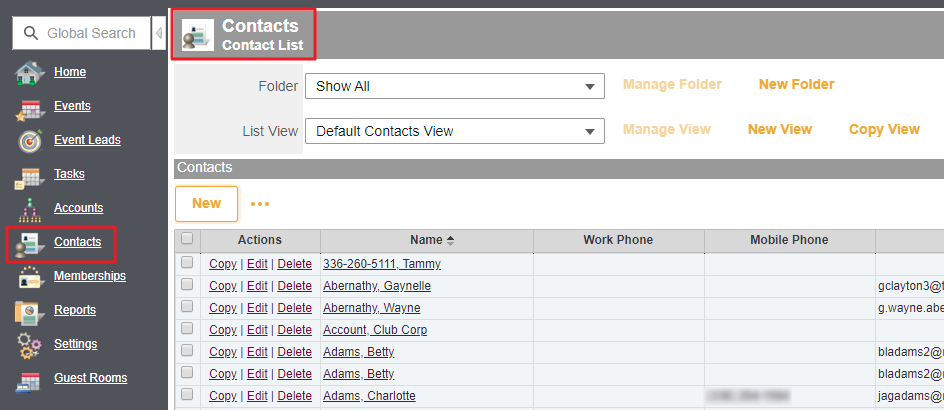
It is also possible to create a new event from a Contact’s page. This can be done by clicking the “New Event” button located as you scroll down the Contact’s page.

When an event is booked from the contact’s page, the contact is added to the event as the primary contact. All other required fields must be entered.
Event Details
Once the new event’s required information has been entered, click the “Save” button. There are two “Save” buttons located on the screen. There is one in the upper left corner and one in the lower left corner. Clicking the “Save” button will create the event/function and direct to the Event Details page of the event.

Save and New Function button is used only if additional Functions are needed that may be taking place in different locations within your site for a different time frame.
Save and New Event button is used only if you need to book an additional part of this event that will be taking place in a different site within your organization.
Save and Add Reservations is used only if you are utilizing our Reservations module and need to reserve assets.
Adding Services to a Function
Services can be added from the Function Details page. Scroll down to the the yellow Functions section header and Click the services link.

Within the Function Services page, click the “Add Menu” button.

Check the box to the left of the desired service menu name and click the “Add” button. Whether a menu has a package price or a dollar allocation is indicated under the Pricing Type column.

In order to add all items in the service menus, Click the “Check All Items” button. To add all items under a specific service type, check the top box under the service type header. To add selected items, check the boxes for each desired item. The “Save” buttons at the top and bottom of the page will add the items to the event and direct to the Function Services page.

From the Function Services page, items can be added, removed, or reordered. Items that are not part of the Service Menu can be added by using the “Add Items from Master List” button; custom items can be added by using the “Add Custom Items” button. To return to the Event Details screen, click the ‘Event’ breadcrumb above your title bar.

Use the Edit Menu button or link to edit prices, quantities and/or to add notes.
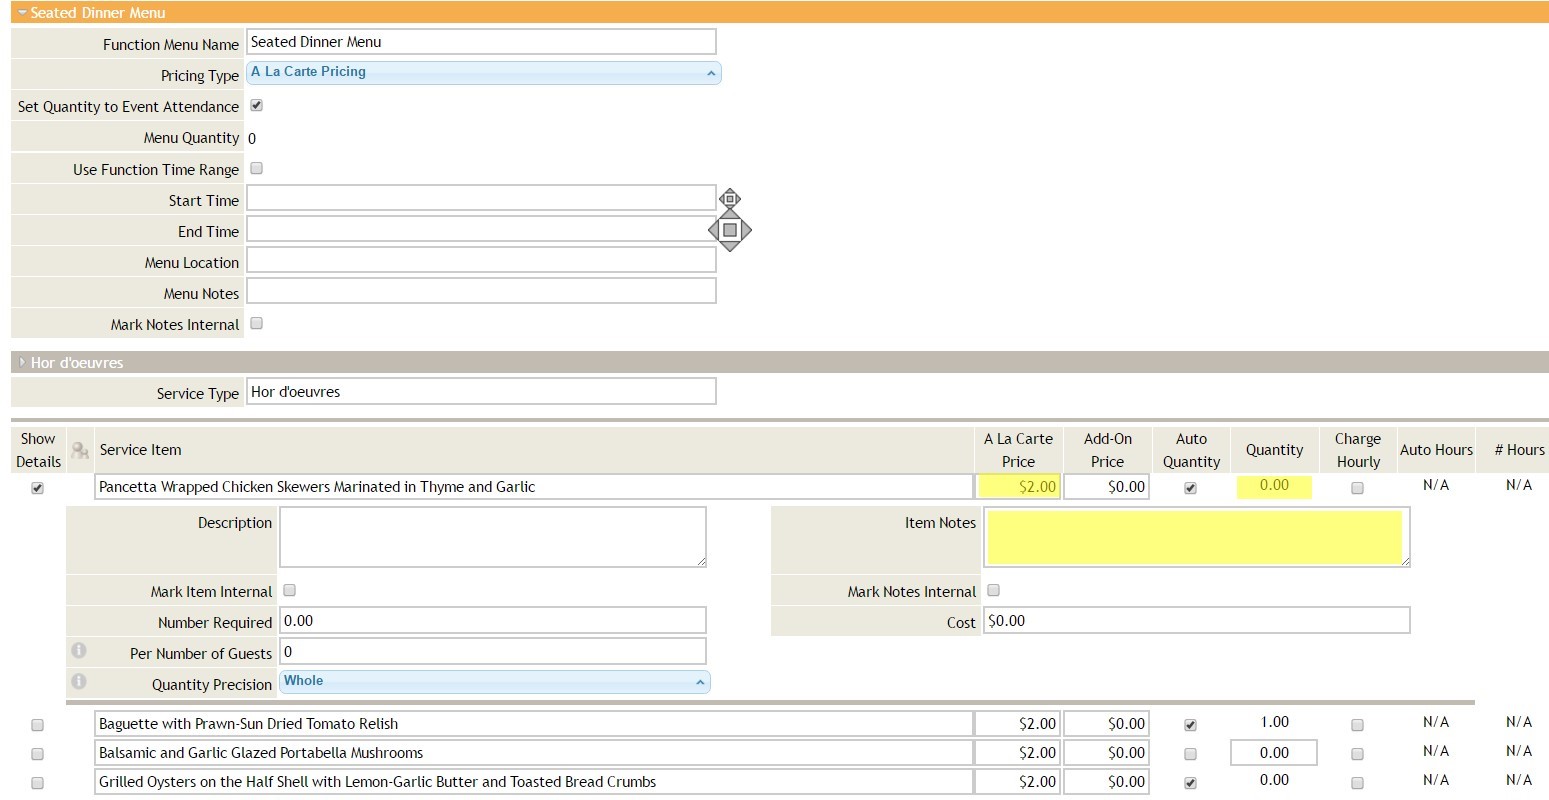
Click the Save button at the top or the bottom when edits are complete.

Generating Documents
In order to generate/preview a document from the Event or Function Details screen, scroll down to the Communication History section header. Click on the “Generate Event Document” button.

This will direct to the Generate Documents page. A list of available documents will display. Check the box to select the desired document and then click the “Generate Documents” button.

Your document will be available to view according to the way your browser works.
Send Email
To send an email, go the Communication History section and click on Send Event Email, then click Choose Email Template.
To attach a merge document, click Generate Document below the email content area to select the document you would like to generate and have added as an attachment.
Non-merge type documents can also be attached from the Document Center or from your computer.

Click Send Email when ready.
The email will be logged and the email status updated as it is delivered and opened.
View Financial Details
If changes need to be made to an event’s financial information, like adding a discount percentage, scheduling deposits, or recording payments, this can be accomplished under the Event Financial Details Screen. In order to access this screen, click on the “View Financial Details” button at the top of the screen under the Event title bar.

Dollar amount Adjustments, if needed, are added at the Function Level and can be accessed by clicking on the function name link, from within the Event Financial Details page, or from the Function Page by clicking the on View Financial Details button.

Event Lifecycle
Banquets is designed around the stages of a typical event’s lifecycle and allows you to automate your practices. The stages in the event’s lifecycle are listed on the Event Details page.

Inquiry - Process Inquiry when a Contact is “just shopping” for information but you’d like to put them on your calendar as an Inquiry, send out information, and follow up with them later. Contact is not quite ready to be sent a contract.
Proposal - Send Proposal after services have been added and you want to send out a document with the proposed services.
Tentative - Process Tentative when you want to get confirmation of an event by sending out a document requesting a deposit and/or signature.
Definite - Confirm the event when a deposit and/or a signed contract or confirmation letter has been received.
Complete Event Order - Complete Event Order when the service details of your event have been entered, such as food menus, beverage menus, and setup and service requirements, and you are ready to preview or send an Event Order to confirm these details with/to the contact or internal staff. (Changes are still possible after all steps!)
Guarantee - Guarantee your event when the guaranteed attendance figure has been received. This will update all of the quantities for your event. (May be dependent on ‘Auto Quantity’ being turned on for your specific menu(s).
Actualize - Actualize to enter actual attendance and consumption numbers, typically done with the event is over.
Send Thank You - Send a Thank You email or letter after the event has taken place.
Close - Close the event once it has been executed and all outstanding balances have been collected.
Lost Business - Used when the event has been canceled. Banquets will retain its information along with the reason it was canceled, but it will be removed from the Event Calendar.
Using the Event Lifecycle
Clicking an event Lifecycle button navigates to a screen that will allow input of relevant event information like recording payments, printing or e-mailing documents, assigning follow-up tasks, and verifying attendance counts. These automated tasks ensure that no information is accidentally forgotten, provide quick access to required information, and build consistent business practices among users.
The lifecycle steps do not have to be completed sequentially. To move ahead and skip stages, simply click on the desired Lifecycle button to perform the tasks associated with that stage in the Lifecycle. If desired, the Lifecycle can be customized to include fewer steps.
Banquets does not allow an event to move backward in the lifecycle. However, if an action associated with an earlier stage in the lifecycle needs to be completed, such as printing another document or recording a deposit, this can be done from other areas on the Event Details page, such as Communication History and View Financial Details.
Creating Leads
It is now possible to create “Leads” in Banquets. Leads are intended to be used as a tool to keep track of potential business when the contact might not have a set date. Leads can be created by clicking on the Lead icon from the Navigation Bar and then selecting the “New” button.

Leads can also be created from a contact’s page by clicking on the “New Lead” button under the Leads section header.
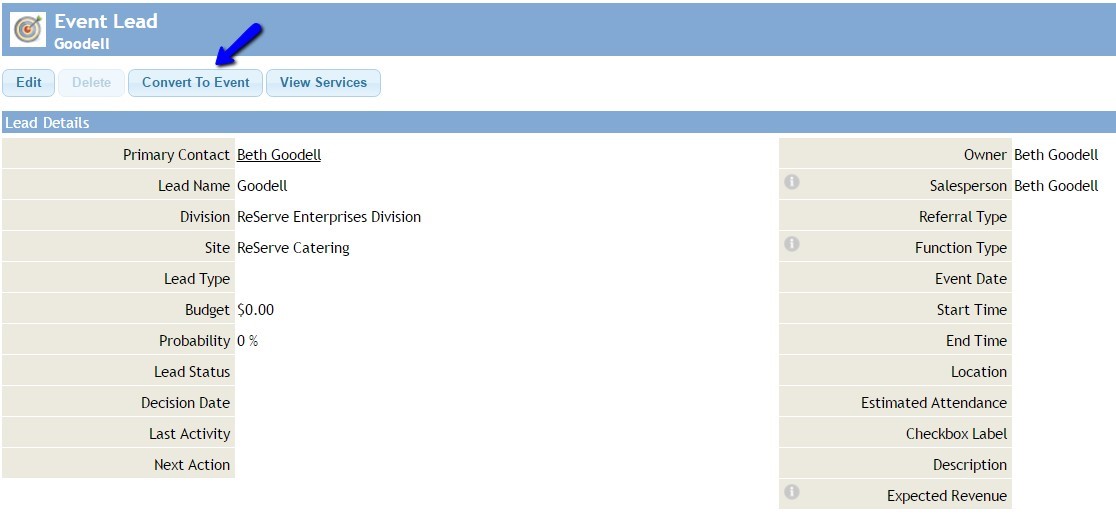
If a lead turns into a booked event, the “Convert to Event” button can be used to convert the lead to a new event.
FAQs
Q: How do I add all items at once in a menu?
A: In order to add all items in the service menus, click the “Check All Items” button.
Q: When using the Lifecycle do we have to follow the steps in order?
A: The lifecycle steps do not have to be completed sequentially.
Best Practices
Begin the day by reviewing pertinent information on the Home screen, to ensure you have addressed items that need timely attention. Utilize Navigation shortcuts, such as the Breadcrumb trail and the search feature to navigate quickly to desired information. Improve operational efficiencies by tracking leads, setting tasks, following up, and successfully tracking pertinent life cycle steps once the Leads are converted to Events.
Downloadable Guide
Banquets Events and Events Lifecycle - Written Guide
Next Lesson: Booking a New Event