Office - POS Rain Checks
Table of Contents
Overview
A rain check is a mechanism that enables a Club to issue a "credit" for a Tee Time paid for, but not yet played. It allows the Member to redeem the "credit" in the future. System generated Rain Checks can be issued and redeemed using the Office System. In this document, we will discuss how to issue and redeem a Rain Check.
Required Permissions
System>System Settings
Items Module
POS
Accessing the Tool
Rain Check Setup
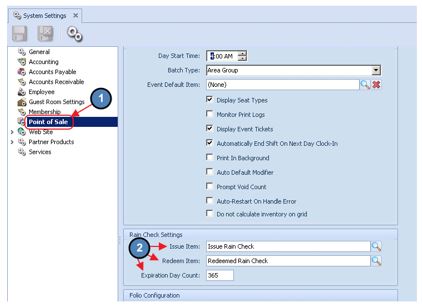
To utilize the rain check feature you must first create two Items; an item to Issue a rain check and an item to Redeem a rain check. These items are set up like any other Item in the Manage Items section of the Items Module. (See the Clubessential Items Manual for instructions on how to create an item.) Then, you must select these items in the Rain Check Settings of System Settings and enter a default expiration day count. Terminals are used to apply certain POS related rules to specified workstation(s).
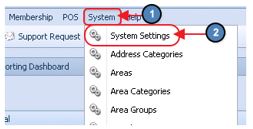
To access the Rain Check Settings, navigate to System across the top toolbar and select System Settings.
Select Point of Sale on the left pane and apply the Issue and Redeem Item under Rain Check Settings. Also enter a default expiration value in days in the Expiration Day Count field.
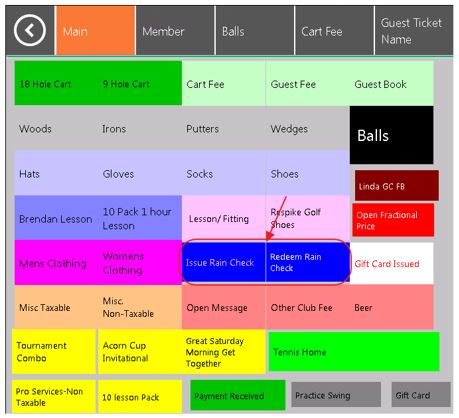
Most clients place buttons on their POS home screen for the two rain check items. This is optional as you can use the Look up Item Feature to look them up when necessary.
Issuing a Rain Check
To issue a Rain Check,
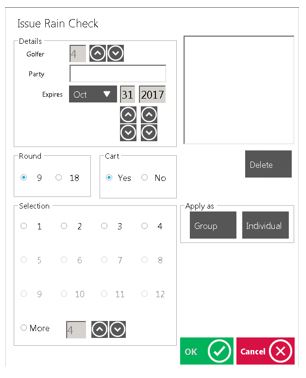
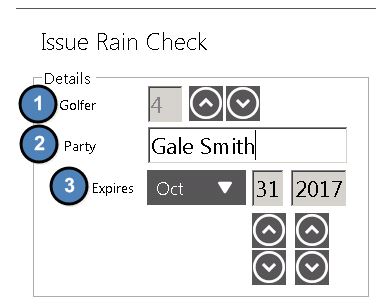
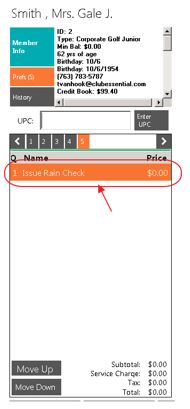
Open a ticket for the customer as you would normally, select the Issue Rain Check button (or look up the Issue Rain Check item using the Look up Item feature). The Issue Rain Check Window will display as shown in the image below.
Fill out the details of the Rain Check Form.
The Golfer Count will default to 4 but you will use the Up and Down arrows to select the number of Golfers.
Enter the Party Name.
Enter the Expiration date – The expiration date will default to the date as you determined in System Settings as the default number of days to expire. The expiration date may be overridden by simply using the Up and Down buttons to change the date.
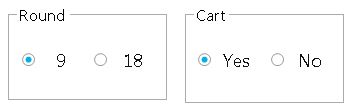
Select whether the Rain Check is for 9 or 18 Holes and if a Cart was used or not.
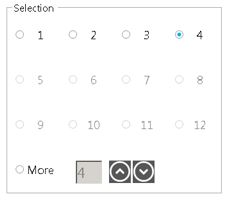
Select the number of Golfers the rain check is being issued for. (Notice that the system only allows a maximum selection of 4 because the Golfer Count in Step 2 is 4).
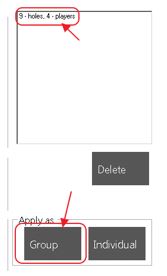
Select to apply the Rain Check as a Group or as Individual Rain Checks.
If Group is selected - The display window will appear as shown below. The user will have one, 9 Hole Rain Check for 4 players.
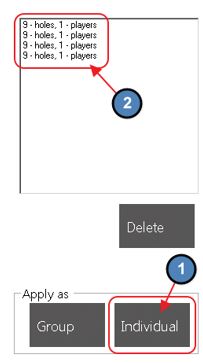
If Individual is selected – the display window will appear as shown below. The user will have four, 9 Hole Rain Checks for 1 player.
Once the rain check details form is filled out then click OK.
A $0 rain check item will display on the ticket and the user will close the ticket as normal.
Redeeming a Rain Check
To redeem a Rain Check,
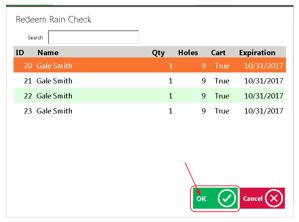
The user will open a ticket for the customer as usual, click the Redeem Rain Check button (or look up the Redeem Rain Check Item using the Lookup Item feature). The Redeem Rain Check window will open and any rain checks that have been issued will display as shown below. Select the Rain Check being redeemed and then click OK.
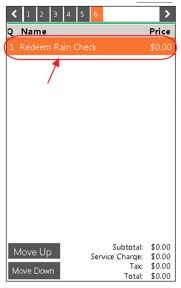
A $0 redeemed Rain Check Item will display on the ticket and the user will close the ticket as normal.
Best Practices
Set up buttons for both Rain Check Items (Issue, and Redemption) on the POS main screen for easy access.
FAQs
Q: Can I give a rain check a fixed expiration date, like 12/31/2017, rather than having it expire in 365 days?
A: Rain check settings established in the CMA will provide a default expiration date to populate upon issuance, however, the date may be overridden to a fixed date like 12/31/2017 upon issuance in the POS.
