Office - Inventory Physical Count Wizard
- Stacy Zak
- Benjamin Hacker
- Danielle Donley (Unlicensed)
Table of Contents
- 1 Overview
- 2 Required Permissions
- 3 Accessing the Tool
- 4 Best Practices
- 5 FAQs
Overview
The Inventory Count Wizard enables Users to perform a Book to Physical Reconciliation within the Office Product, and post the associated Inventory Adjustments related to the process. The tool has Count Sheets to assist with Physical counting, and online reconciliations to help finalize Inventory Adjustments. Managers at Clubs will want to perform physical counts of their inventory and book the related adjustments (overages/shortages) to ensure financial statements are properly stated, and to determine that financial controls and processes are effective.
Required Permissions
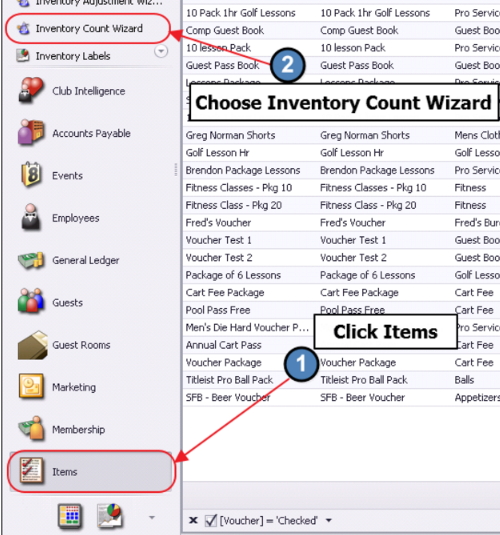
Items
Inventory Count Wizard
Post Inventory
Accessing the Tool
Within the Clubessential Office Product:
The Inventory Count Wizard will launch.
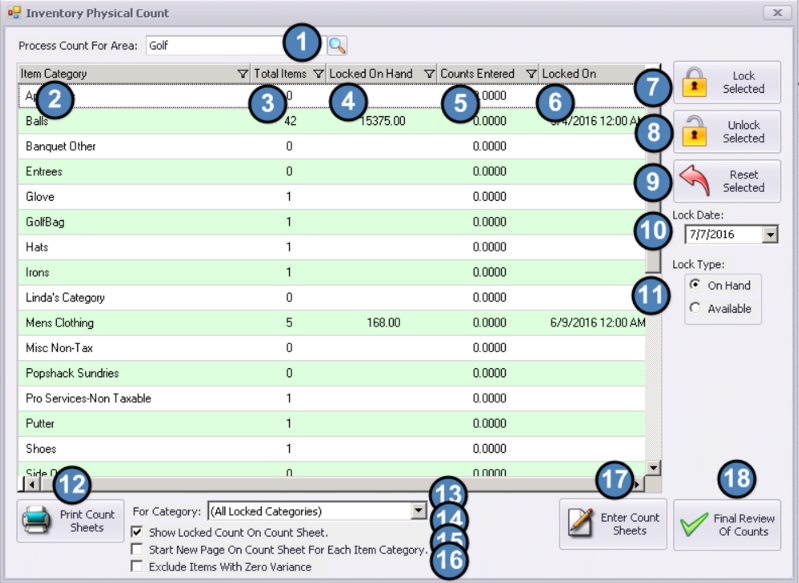
Screen Overview
Listed below are the options and settings for the Inventory Count Wizard:
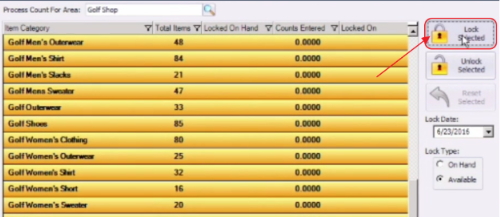
Process Count for Area - For Multi-Inventory Clubs, designates specific area to Inventory. Use lookup button to assist with area selection.
Item Category - This is a list of all Item Categories that are associated with Items that are marked as an Inventoried Item.
Total Items - This is the total number of Items that are marked as Inventoried Items and associated with the Item Category Listed.
Locked on Hand - This is current total count (quantity on hand per item) of all Items associated with the Item Category listed.
Counts Entered - This column will reflect the total Item count for the Item Category listed once item counts have been entered.
Locked On - This column displays the date the Item Category counts were locked.
Lock Selected - This button is used to lock the count in the Lock on Hand column to be used as a reference point in regard to the Counts Entered.
Unlock Selected - This button is used to Unlock Selected counts allowing the user to start over.
Reset Selected - This button allows the user to reset the Counts Entered column back to 0 after counts have been saved for that Item Category.
Lock Date – This is the date at which point the lock feature takes place.
Lock Type – This specifies whether the lock should look at posted or unposted batches. The cleanest and best process uses On Hand numbers and looks at posted batches. Available provides an option for Users to include quantities impacted by unposted batches.
Print Count Sheets – This button allows the user to print count sheets.
For Category – choose All, Selected or a specific Item Category
Show Locked Count on Count Sheet – if checked the locked count will print on the count sheet.
Start New Page On Count Sheet For Each Item Category – if checked the system will page break after each Item Category. (regardless of length)
Exclude Items with Zero Variance - if checked the system will only display records with variances; counted (physical) quantities do not match expected (book) quantities
Enter Count Sheets – This button is used to enter the item counts.
Final Review of Counts – This screen gives you an overview of everything that’s been done to that point, and allows you to complete the inventory count process.
Prepare for Inventory
Post Prior Batches
Prior to beginning the Inventory Count, ensure all open batches impacting current On-Hand Inventory are posted. The following Warning message will appear, and will serve as a reminder to handle these items.
Click, “OK” to proceed.
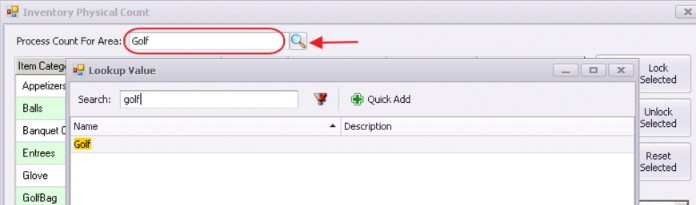
Select Area (For Clubs Using Multi-Inventory System)
For Clubs utilizing the Multi-Inventory System (Multiple Areas with Inventory), select area to be inventoried. Start typing or Utilize Look-Up Button for assistance.You need to be sure that accounting has posted all sales up to current day before you.
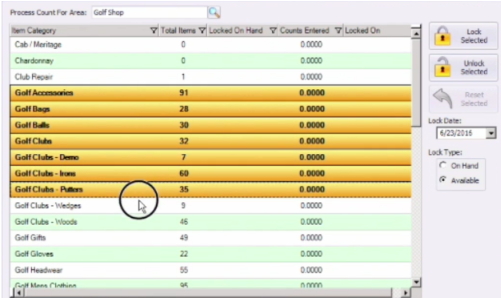
Select Categories
Select Categories for inclusion into Physical Inventory. Select with Mouse (for Range), or Control Select (hold CTRL and click with Mouse), for singular selections.
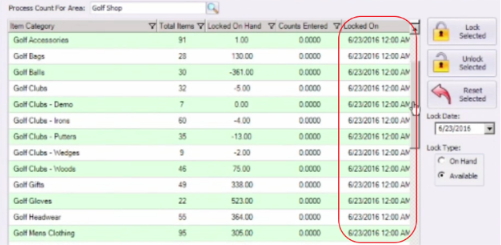
Lock Selected
Once Categories are selected, click the Lock Selected button. This will provide a snapshot in time of system (book) quantities.
Once Locked, the “LockedOn” quantity column will populate with the Lock Date. This may take a few minutes to appear.
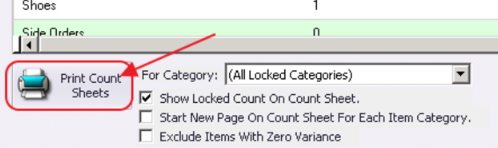
Print Count Sheets
To assist with the Physical Count Process, select, “Print Count Sheets.” Note that Printing options exist to Show All Locked Categories or a Selection, Show/Hide Locked Count on Count Sheet, and/or Paginate based on Category. The “Exclude Items with Zero Variance” will apply only after initial counts have been entered.
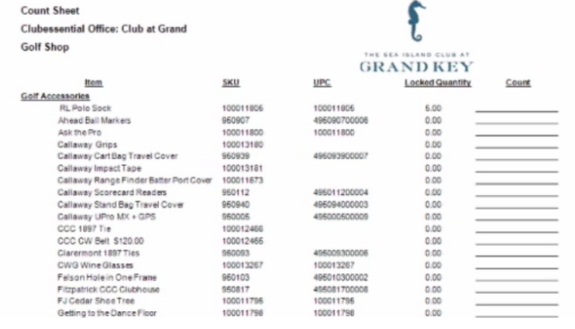
Example of Count Sheet
Once printed, physically count the Inventory (either by hand, or with a Scanning device).
Enter Counts
When physical counting is finished, click “Enter Count Sheets” to enter counts. Counts may be entered manually, or with the assistance of a *.csv file generated from a Scanning Device.
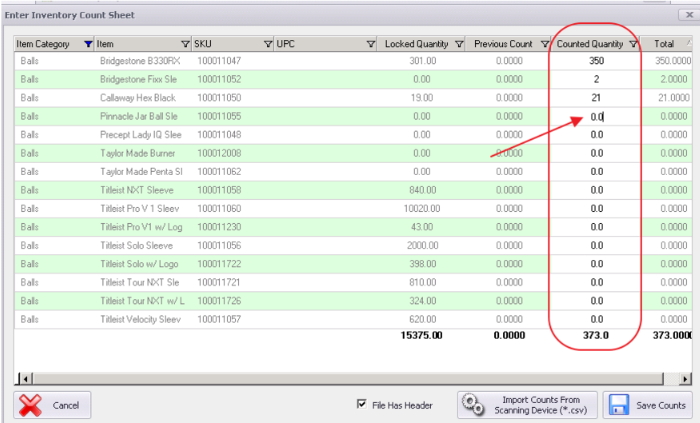
Enter Manual Counts
To enter manual counts, type the physically counted quantities in the “Counted Quantity” column.
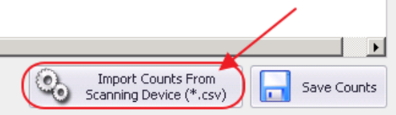
(Or) Enter Counts via *.CSV File
Instructions for converting the TXT file built by the inventory scanner into a CSV for upload are here
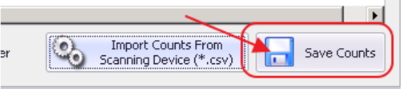
Export data from scanning device to a .csv file. Then, import data into system by clicking, “Import Counts from Scanning Device (*.csv).”
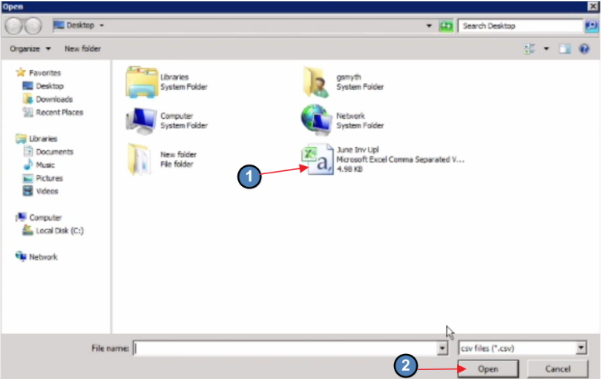
Next, select (count) *.csv file, and click, “Open.”
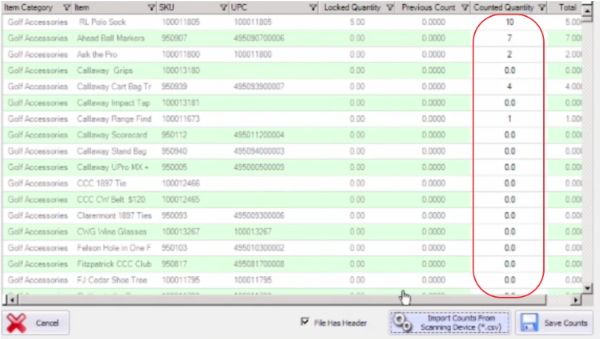
“Counted Quantity” column will populate with data from CSV file.
Save Counts
Once finished, click “Save Counts.”
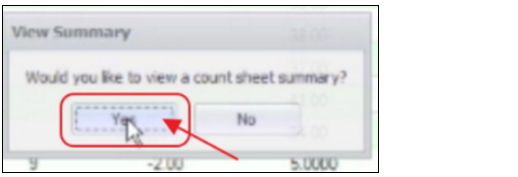
Review Variance Report
After clicking “Save Counts,” message will appear and will prompt user to review a variance report (Count Sheet Summary).
Click “Yes,” to launch Variance Report and view Differences between System Quantities (Book), and Physically Counted Quantities (Physical).
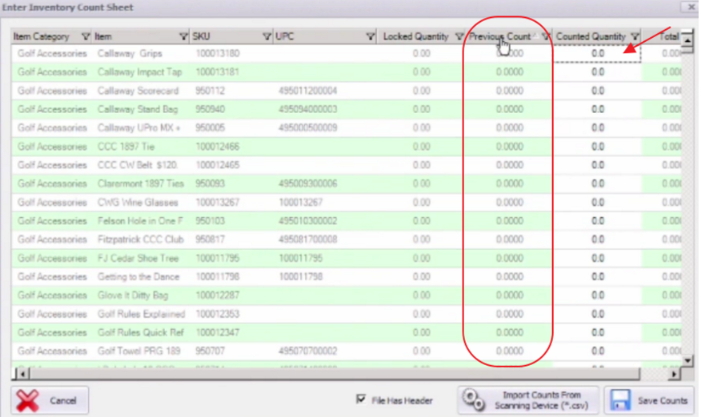
Adjust Counts
After revisiting the Variance report, differences may be investigated. Additional inventory may be found and/or counts verified again may yield a different result. To change quantities previously counted, click, “Enter Counts Sheets” again.
Note that a “Previous Count” column now exists. New counts may be entered in the “Counted Quantity Column.
“Total” column will reflect “Previous Count” + “Counted Quantity” Columns.
Example: To decrease previously counted quantity from 60 to 59, enter “-1” in the “Counted Quantity” column. Total will reflect new balance of 59. To increase previously counted quantity from 60 to 65, enter “5” in the “Counted Quantity” column. Total will reflect new balance of 65.
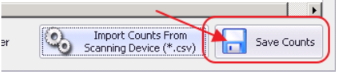
Once new counts are entered, click “Save Counts”.
Adjusting/entering counts may occur as many times as necessary.
Finalize Counts
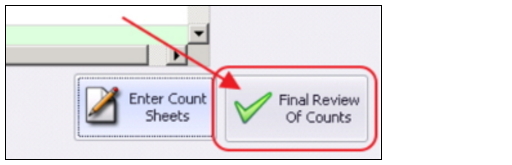
Once counts are reviewed and are deemed final, click the “Final Review of Counts” button.
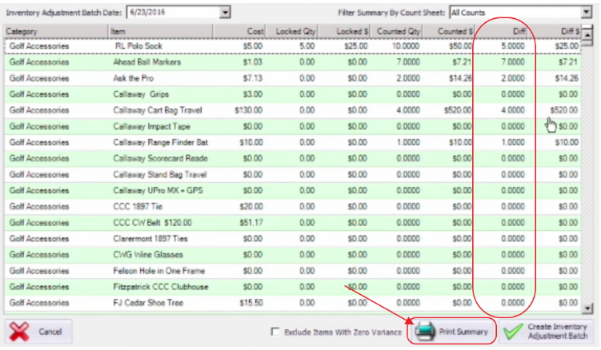
Final Variance “Diff” (difference/differential) will be shown.
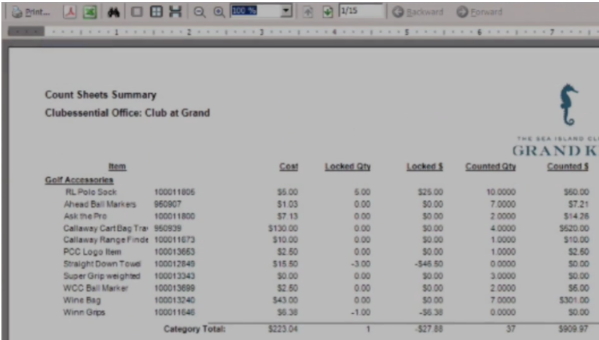
Click “Print Summary” to capture details associated with the finalization of this inventory.
Print or Save the finalized Count Summary.
Generate Inventory Adjustment Batch
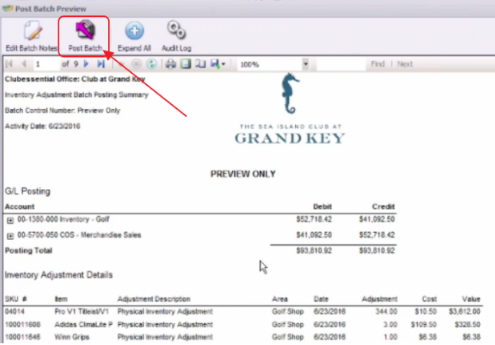
To finalize the Physical Inventory process, click the “Create Inventory Adjustment Batch,” to have system auto-generate the Inventory Adjustment that will be posted in conjunction with the variances identified within the Physical Inventory process.
After clicking to create the batch, a warning will appear asking for confirmation of the finalization process. Click “Yes” to continue.
System will generate batch and will appear for review. Click “Post Batch” to post to G/L.
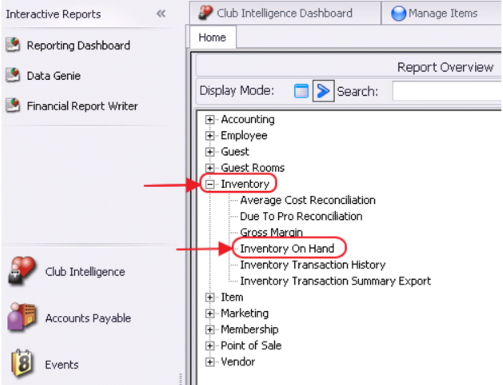
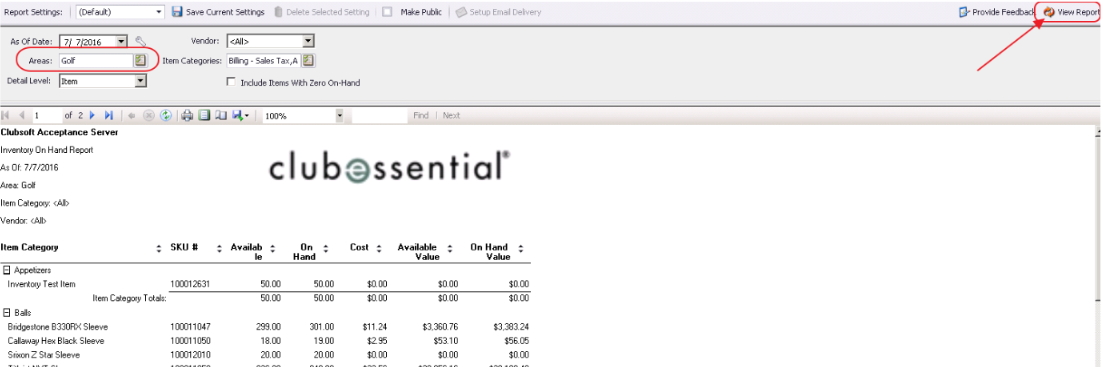
Reporting - Inventory On Hand
To generate an On-Hand Inventory Report, navigate to Interactive Reports.
Expand Inventory Option, and choose “Inventory On Hand”.
Designate appropriate Area, and “View Report.”
Best Practices
You can either count manually or via a scanning device that will produce a .CSV format file. We will only allow the .CSV to be in one of two formats, either is acceptable.
The first format, if we think in terms of Excel, a single column with the skus listed as many times as they were scanned in that single column. The second format can be a .CSV that contains two columns, the first containing the SKU and the second containing the count qty.
If importing the count from an inventory scanner and the device produces a .CSV with additional columns, you will need to delete those columns prior to importing the document into the Inventory Count Wizard.
FAQs
Q. Can I still ring in sales while doing my inventory process?
A. Yes. Once counts are locked, ensure sales that take place during the inventory process are not posted until after inventory is complete.
Ensure that the numbers have been taken into account in the manual count sheets (ie - quantities sold must be added back).
Q. How do I download the information out of my scanner?
A. It varies by brand of scanner. Reference the user’s manual for the scanner find info on Scanner Manufacturer's website.
Q. I accidentally input the wrong count for an item, and saved counts. How do I correct it?
A. Go back into Enter Count Sheets. Previous Count Column will display. Enter needed adjustment in the Counted Quantity column. Example: Previous count says 10 but it should be 5, to correct it put -5 in the Counted Quantity column. Previous count says 3 but it should be 5, to correct it put 2 in the Counted Quantity column.
Q. I clicked on the Reset Selected button with all rows highlighted and reset all my counts. How do I get them back?
A. Once Reset Selected button is pressed, all counts are removed and must be re-entered.
Q. I clicked on the Unlock Selected button by accident. How do I get it back?
A. Once Unlock Selected has been clicked, the inventory process has been undone, and must be started again.
