Spa Scheduling
- Joshua Morrison
- Emily Carlson
- Kim Saunders
Table of Contents
Overview
Used for the normal every day scheduling of appointments.
Required Permissions
Spa Admin
Scheduling
View/Edit Schedule
Overview
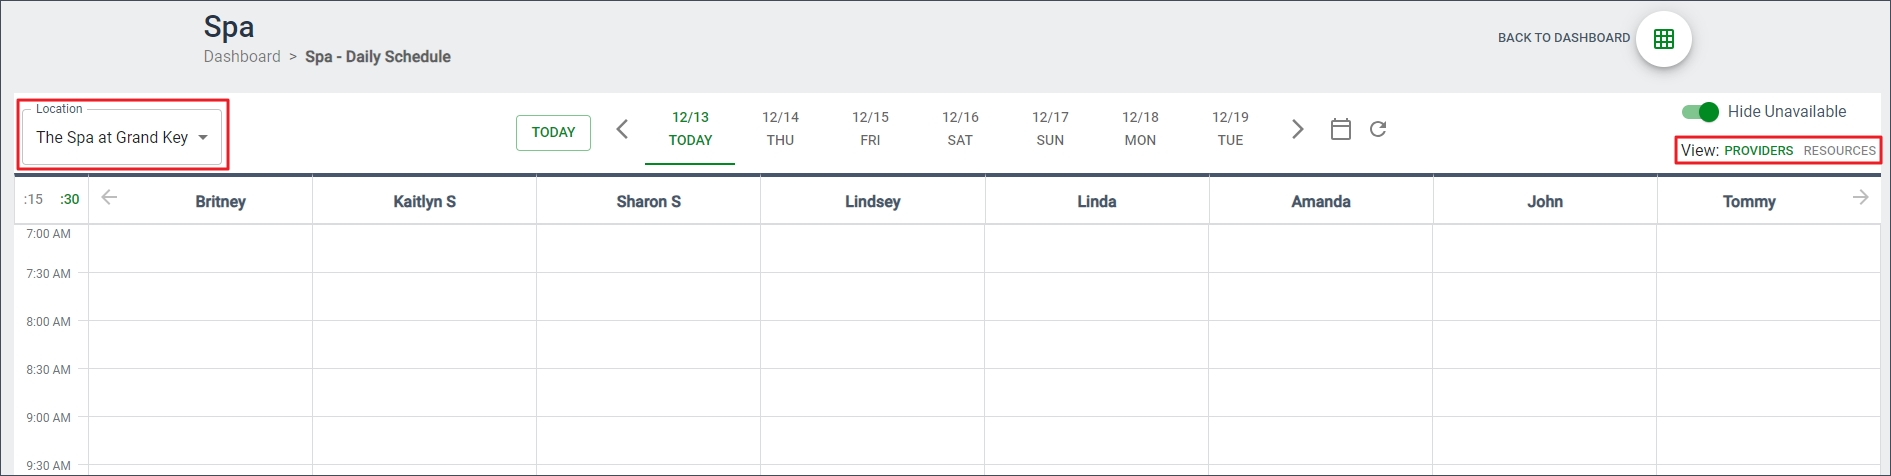
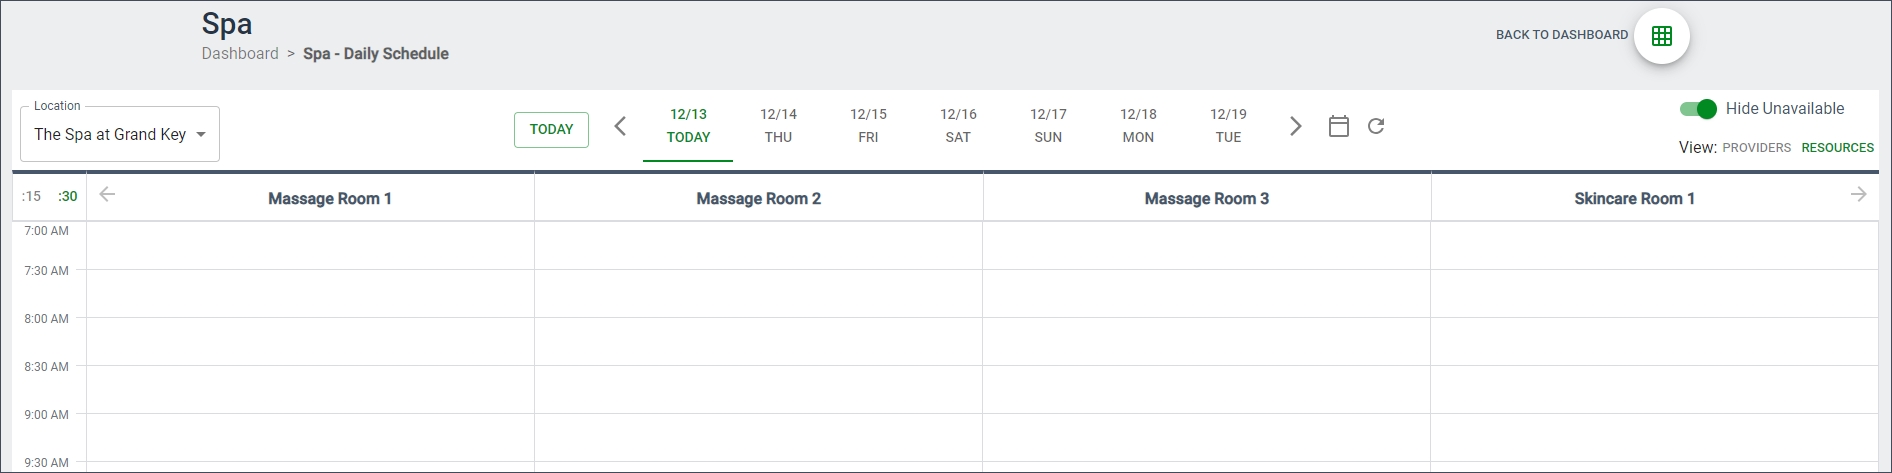
The View/Edit Schedule section is used for the normal every day scheduling of appointments. While viewing the Spa Dashboard, select View/Edit Schedule to open. The schedule will default to today’s date and will display any existing bookings. Existing Bookings on the schedule can be selected in order to confirm, check-in, edit, or cancel. If a booking has any notes/preferences attached, a notepad icon will be present for easy identification. If the club has multiple locations, use the Location Dropdown in the upper left hand corner to choose a different location than the one currently being viewed. On the right hand side, you can click to toggle two different schedule views:
The two views are:
Specialist/Provider: Each Specialist/Provider and their existing reservations are presented in separate columns. The rows of the schedule are represented by time slots from open to close. The time slots can be viewed in either 15 minute or 30 minute increments. Click the :15 or :30 links to expand or condense the schedule grid.
Use the Provider dropdown to select a provider to view their schedule in a week view.
Resources/Rooms: Each Resource/Room and the existing reservations are presented in separate columns. The rows of the schedule are represented by time slots from open to close. The time slots can be viewed in either 15 minute or 30 minute increments. Click the :15 or :30 links to expand or condense the schedule grid.
Adding a New Booking
Click on a date to change dates, or click the calendar icon to choose a date further in the future.
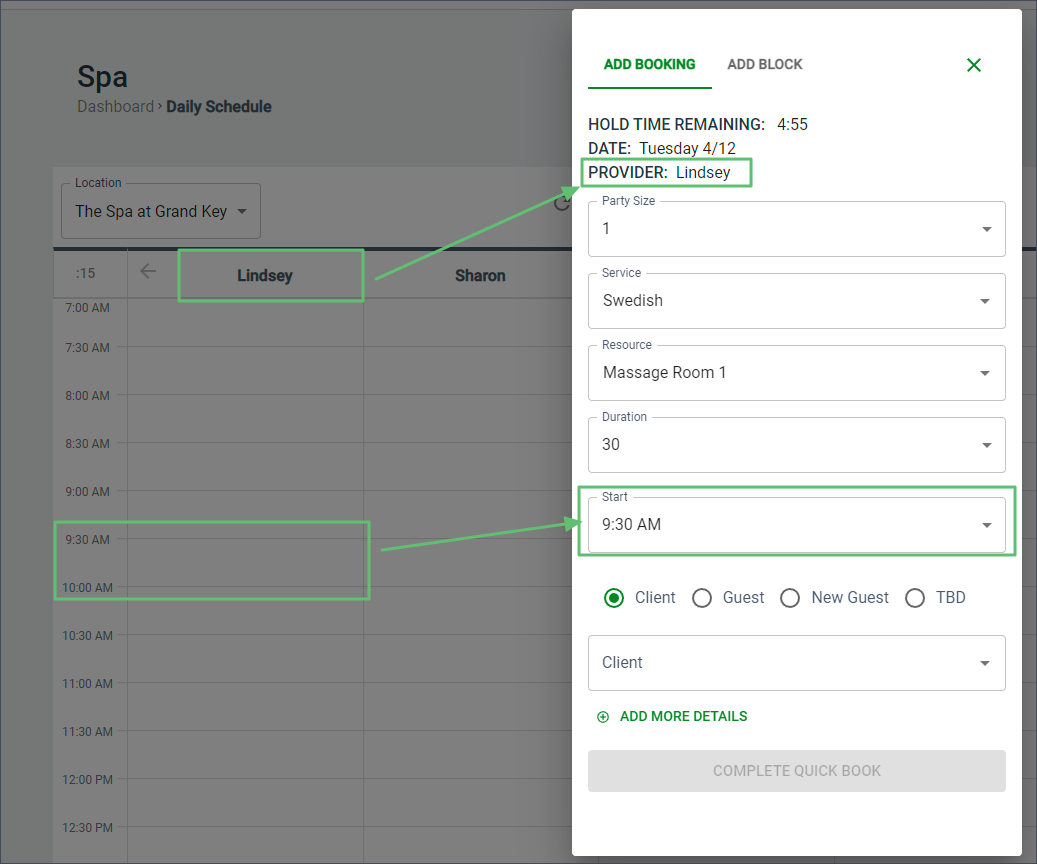
Click in time block within a specific provider or resource’s column to open the booking window
The booking window will have a hold on time depending on the booking rules previously set.
The booking window contains the following settings:
Lock to Provider - use this to lock a provider to a client to indicate that the client does not want to be moved to another provider.
Party Size - How many people the booking is for. The maximum number of people allowed is based on your system settings and the specified service.
Service - Use the dropdown to choose the service desired. The options displayed are the only ones available for the chosen Provider or Resource.
Resource - Select a treatment room if required. If required, the dropdown should default to the first available treatment room associated with the service, but this can be adjusted in the dropdown. If a resource/room is not required, it will default to None but you can select an optional room/resource if necessary.
Provider - If making a booking from the Resources/Rooms view, use the dropdown to select which provider to provide the selected service.
Duration - Select the duration of the service. If there are multiple durations available for the chosen service, use the dropdown to select.
Add-ons - If the service selected has an add-on available, there will be checkboxes to select desired add-ons.
Start time - This is when the booking will begin. The time initially displayed depends on which time slot was clicked. The start time can be updated if the initial click was not accurate. Spa Admins will be able to book times that say they are Unavailable should they decide to override. They will also see a warning message as to why the start time for the appointment is Unavailable.
Next, select who the booking is for. There are four options available:
Member - These are member accounts on the website. Select the radio button next to Member. Then, use the dropdown to choose which member the booking is being made for. You can search by either first name, last name, or member number.
Guest - Select Guest and then use the dropdown to choose an existing guest (non-member) to book for. These are guests that have been previously entered into your Guest Manager database on the website.
New Guest - If booking for a guest who is not in the system already, use the New Guest option. After selecting the radio button, four fields will appear:
First Name (Required)
Last Name (Required)
Email (could be optional or required based on your system settings)
Phone (could be optional or required based on your system settings)
TBD - This option can be used if it is unknown who the booking is being made for or to hold an appointment and enter the name at a later date.
Send Confirmation - toggle this off if you wish to not send a notification to the member.
Select ADD MORE DETAILS to open the full booking window where additional details such as preferences, notes, and recurring appointments. The following options are available for recurring bookings.
Make Recurring - Use this to make a booking recur on a regular basis
Repeat Every - Use the dropdown to select how many days/weeks/months you want to pass before the next occurrence of the booking
On - Select the day of the week you would like the booking to occur
Ends - Select a date you would like to the booking to end or select No End Date
When completing the booking on the Add More Details screen, you will receive a confirmation screen. Click SEE IN SCHEDULE in the upper left hand corner to return back to the schedule to view your reservation that was completed.
Click Complete Quick Book to finish if you have entered the required information and do not need to proceed to the Add More Details screen. You will receive a confirmation screen and can click either the X or the Return to Schedule button to return to the schedule view.
The booking will now appear on the schedule. The following information will be displayed on each booking:
Name of the service
Duration of the service
The person who the booking is for
The resource/room where the service will take place, if applicable
If there are notes on the reservation, a page icon will be present within the booking block to indicate there are notes. Click on the appointment to view the notes.
Once an appointment has been confirmed, a checkmark icon will be present
When an appointment has been marked as “Checked In”, the appointment block will turn green on the schedule view.
Adding a Block
Just like when creating a new booking, click within a specific time block and provider/resource column. Once the quick book window appears, at the top of the window select ADD BLOCK. The following options are available when adding a block:
From - Use the dropdown to select the start of the block
To - Use the dropdown to select the end of the block
Description - Add a description of the blocked time if desired. Example: Lunch.
Color - Select a color you would like the block to appear in on the schedule.
Make Recurring - Use this to make a block recur on a regular basis
Repeat Every - Use the dropdown to select how many days/weeks/months you want to pass before the next occurrence of the block
On - Select the day of the week you would like the block to occur
Ends - Select a date you would like to the block to end or select No End Date
Once the Recurrence Details have been filled out, click Check Availability
The Block will show as grayed out on the schedule and will display the Description title as well.
To delete a block, click on the block, and select delete. If it is a recurring block, you will then have the options to delete the entire series or the one instance.
Edit Existing Booking
Existing reservations on the schedule can be three different colors:
Gray - Reservations that are gray have already occurred.
White - Bookings that are upcoming and the attendee(s) have NOT been checked in will appear in white.
Green - Upcoming reservations where the attendee(s) have been checked in will appear in green.
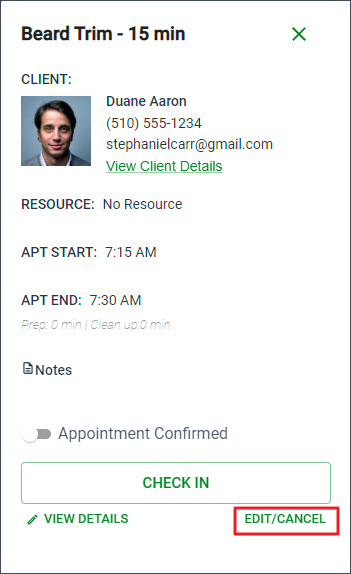
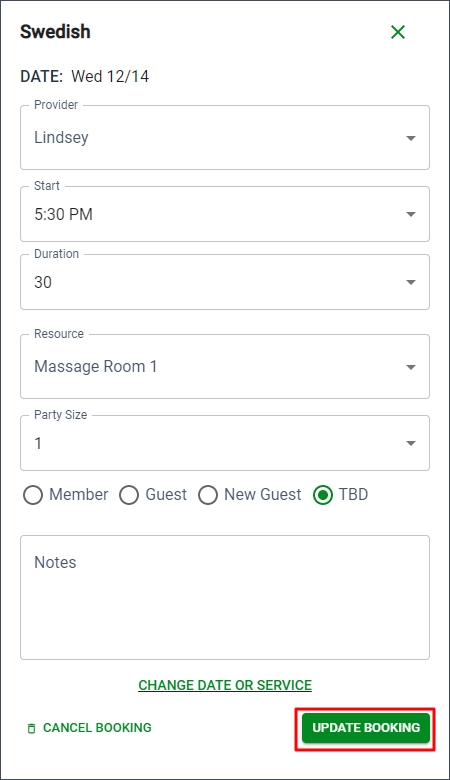
Click a reservation to view details of the reservation including any notes written. Appointments can be confirmed by checking the box next to Confirm Appointment. If you need to mark the appointment as no longer confirmed, click the radio button again. Once the attendee has arrived for the appointment, select the CHECK IN button to mark that they have arrived. Reservations can be deleted by selecting the CANCEL BOOKING link. If any changes need to be made, select EDIT/CANCEL. If editing a one-time appointment, this will take you back through the Search process where availability can be checked and any necessary changes can be made. If editing a recurring appointment, this will allow you to edit the day and frequency of the recurring schedule.
Additionally, from within the View/Edit Schedule view, you can drag and drop one-time appointments to quickly reschedule. Once you have dragged the one-time appointment to a new time, the Update Booking window will appear and you will need to click Update Booking to confirm the changes.
Edit Provider’s Schedule for Single Day
A provider’s scheduled availability can be changed for one-off days using the Schedule View.
From within the Schedule View, use the Date Picker to navigate to the date of the schedule change.
Click on the Provider’s Schedule.
Click Edit Schedule.
Modify the Start and Stop time to reflect updated hours of additional availability.
Click Save Schedule.
Best Practices
FAQs
