Creating Special Events on the Tee Sheet
- Emily Latham
- Joshua Morrison
- Ali Duncan
Overview
Tee Times Special Events allows you to create events within the Tee Times Calendar and on any regular Club Calendar. This tool should be used to schedule upcoming events like tournaments that require registration and that’s open to all members. You can then use the regular club calendars to help promote the event outside of the Tee Times Calendar.
Required Permissions
Tee Times Admin
Accessing the Tool
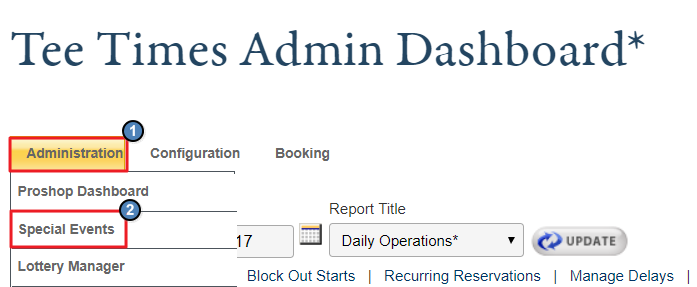
To get started, access the Tee Times Admin Dashboard. Hover over Administration and click on Special Events. The Special Events tool will list all events that fall within the Start Date and End Date fields. It will default to the current day in the Start Date and the End Date will default to 6 months out.
To view events in the past, set back the Start Date so that your event falls within the time range.
If you have multiple courses, you may use the Select Course filter.
There is a listing of buttons on the right hand side. They perform the following actions...
Add an event: Create a brand new event.
Edit an event: Modify the selected event.
Add registrations to the event: Create a reservation for the selected event.
View registrants of events: View a list of all the reservations for the event.
Assign starts for the event: If the Proshop will assign starting times for participants? setting is checked for your event, you will want to use this tool to confirm the event requests.
To select an event you will need to click on its name in the listing, this will darken the line of the event
Adding a Special Event
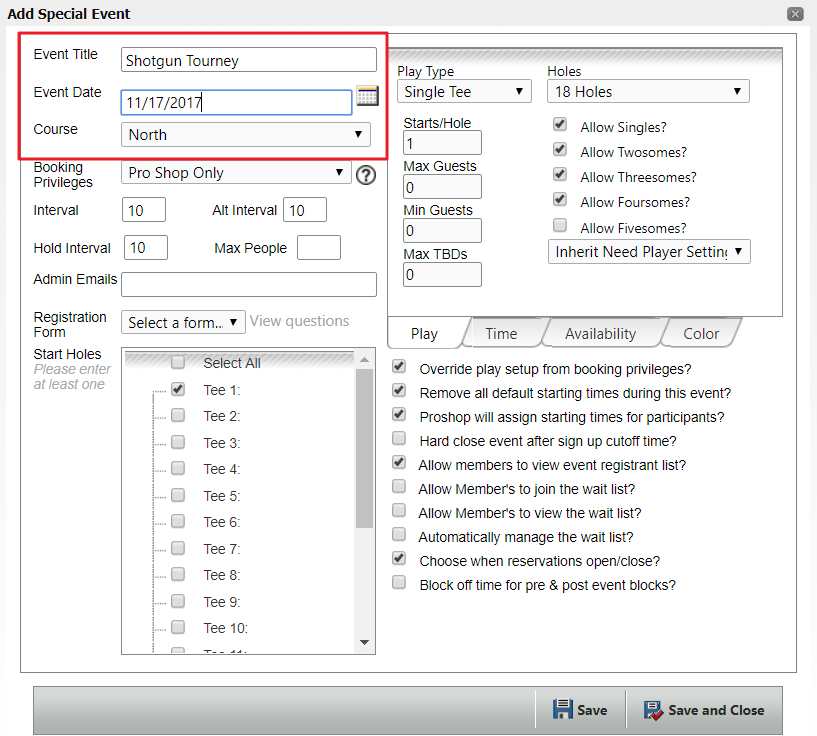
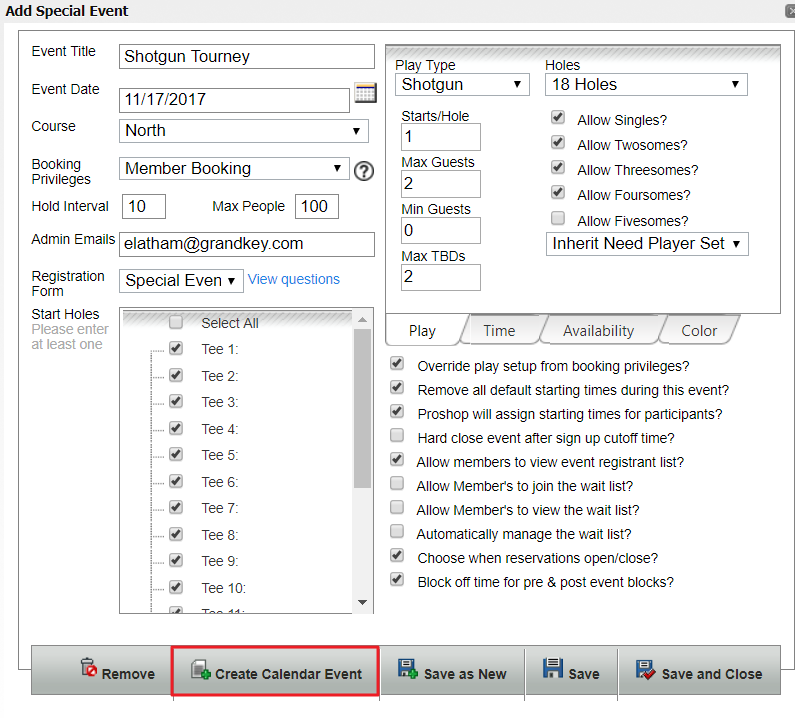
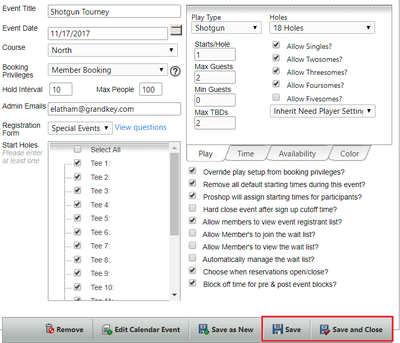
To add a new Special Event, click the Add Event button. Then type in the Event Title, select an Event Date, and you will need to choose a Course (if applicable).
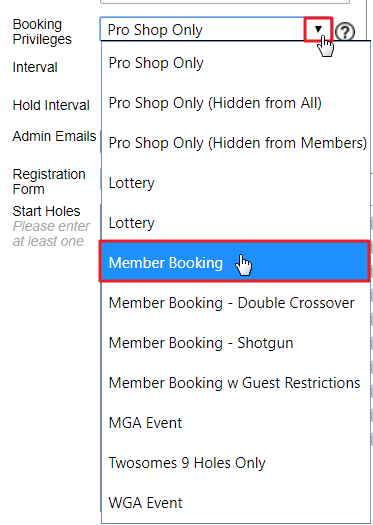
You will need to set the Booking Privileges for your event. Select Member Booking if you would like for members to create their own reservations. If you would like to only permit your staff to create reservations, select ProShop Only.
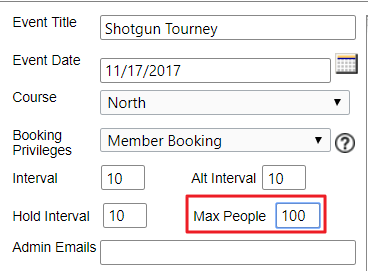
Next, enter the Max People for the event by typing in the total individuals until the event is at capacity.
Enable Allow Members to join the wait list? to allow further requests but on the Wait List.
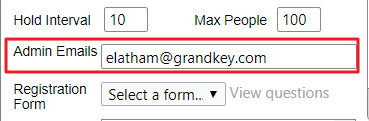
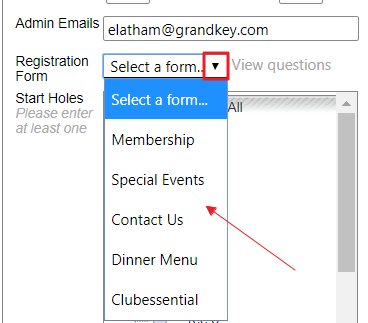
Enter an Admin Email for the event to receive notifications for when members register, edit, or cancel their event. You may enter multiple emails using a semicolon to separate them with no spaces.
Beneath the Admin email, you may designate a Registration Form for the event. This dropdown will list any forms created by the Support Team for Events. If you should need a new form created, please contact Support
Type of Event
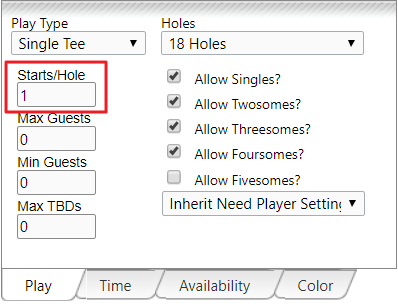
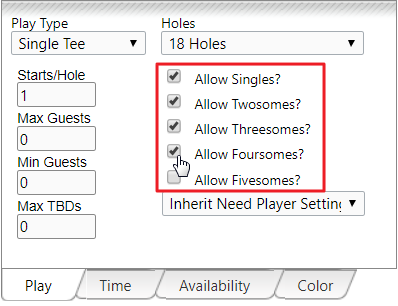
On the right side of the screen, you can define the Play Type of the event. Using the dropdown, choose if your event is a Single tee, Double tee, or Shotgun. The event window will refresh and update various options for the type of play you choose.
The Starts/Hole field will allow you to define how many reservations are permitted on each tee.
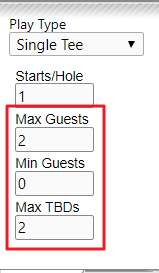
Use the Max Number of Guests, Minimum Number of Guests and Max Number of TBDs fields to restrict or require guests.
Define the party sizes that are available using the checkboxes to the right. Unchecked party sizes will not be available when booking. Five is the largest possible party size for a single reservation in the Tee Time system.
Event Settings
You will determine more event settings for the event by using the time and availability tabs to determine the time of your event and when reservations open up and close for members, respectively.
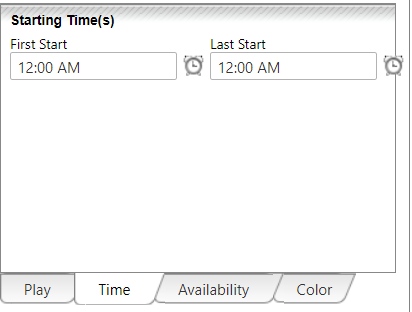
Click on the Time tab to set up when the first start will begin and when the last start will begin.
You can click on the clock icons to choose a time. 30 minute intervals will display there but you are also free to type out a more specific time in the First and Last Start fields. If you type out a time please note that it will read it as military time if no AM or PM is listed.
The Pre & Post Event Blocks setting allows you to block off times surrounding the event. This allows for a buffer to allow for ample time before and after the event. This setting can adversely affect registration for nearby events, always ensure that the times listed here do not overlap a nearby event. Also note that the Pre-Block must be at the first event time or earlier and the Post-Block must be at the last event time or later.
If you have pre-existing reservations or a block at the same time as your event it will give you a warning message when you go to save the event. You will want to remove those before creating your event. Feel free to open a new tab or window and remove or edit them so you don't have to start from the beginning.
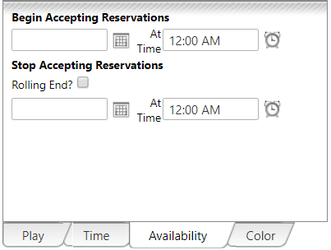
Use the Availability tab to define the time frame for when the event will begin accepting reservations and when reservations will close down.
Use the calendar icon to determine the day that the reservations will begin and using the clock icon to choose the exact time the event will open on the day selected.
Follow the same for when reservations will end, or click Rolling End to set the reservations to close a number of hours prior to the event time.
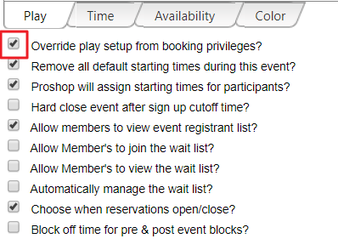
Beneath the various tabs, there is a listing of checkboxes that modify the event in a variety of ways. You are free to uncheck or check them as necessary.
The most commonly used checkboxes will already be checked off here.
Typically, the only other addition club staff make is to enable the Allow Member's to join the wait list? setting
To learn more about each setting, hover over the setting for detailed information.
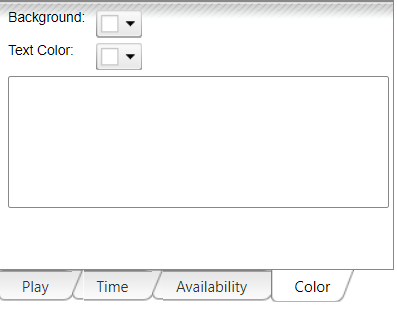
If you are interested, you can define the color of your event in the color tab. If you choose a color for the event it will display on the member and admin side when the event is open for registration.
Using the background and text dropdowns, choose a color to display.
The final step is to click Save.
Creating a Calendar Event
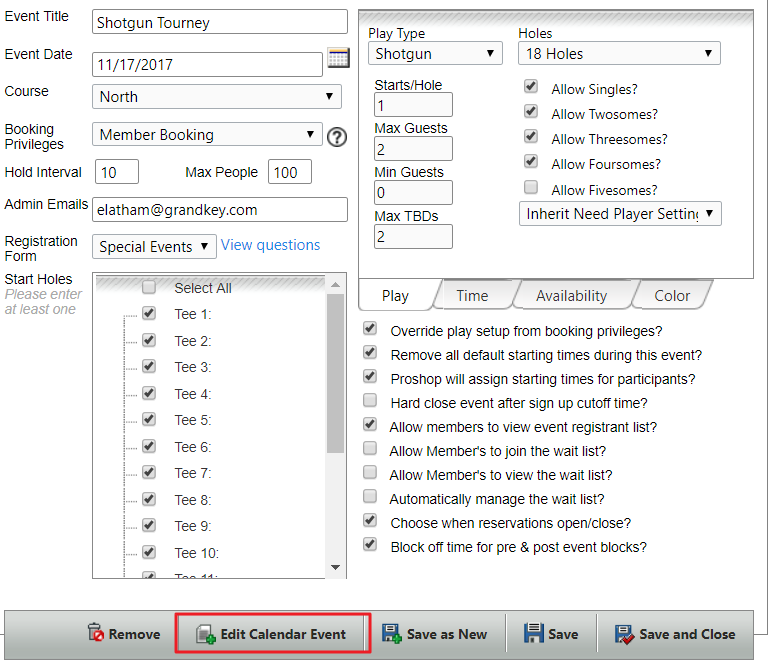
To add the event to a regular Club Calendar, click on Create Calendar Event from the Add Special Event window.
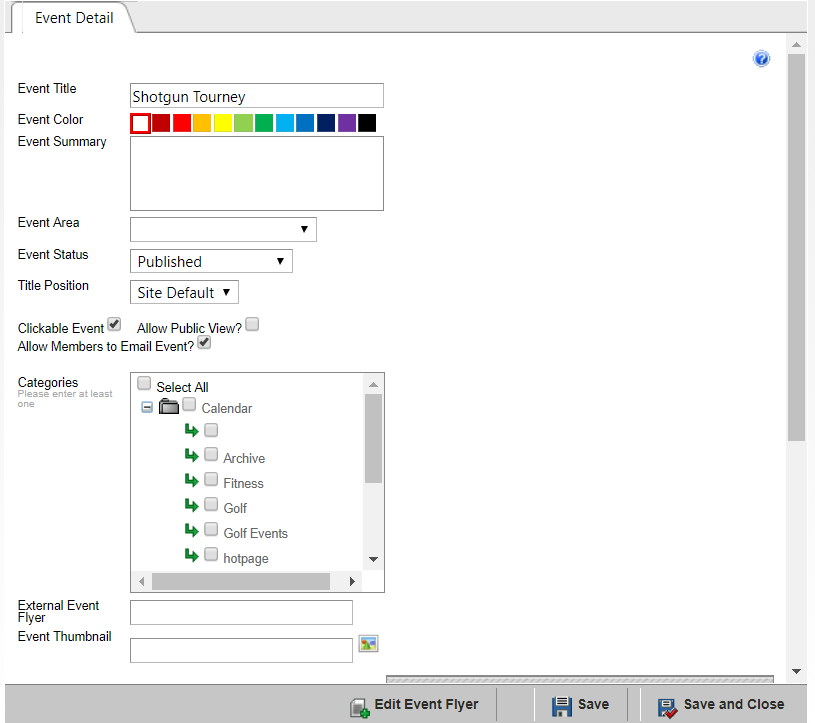
Click OK on the warning pop-up that is verifying you wish to create a calendar event.
All event settings will transfer to the Calendar Event, so you will not need to set up registration criteria again. For the calendar event, you will be setting a design and adding extra information on the event if needed.
Choose an Event Color to display on the Calendar Event. This may be a different color than what was chosen for the Tee Times Event display.
Under Event Summary, add a short summary if desired. This will show on the event details.
Event Status should be set to published which will allow members to see the event.
Clickable Event should be checked as this will allow members to open event details and access the Registration button which will open the Tee Times registration window.
Under categories, checkmark calendars you wish the event to publish on like the Golf Calendar, and/or the Member Home Page Calendar.
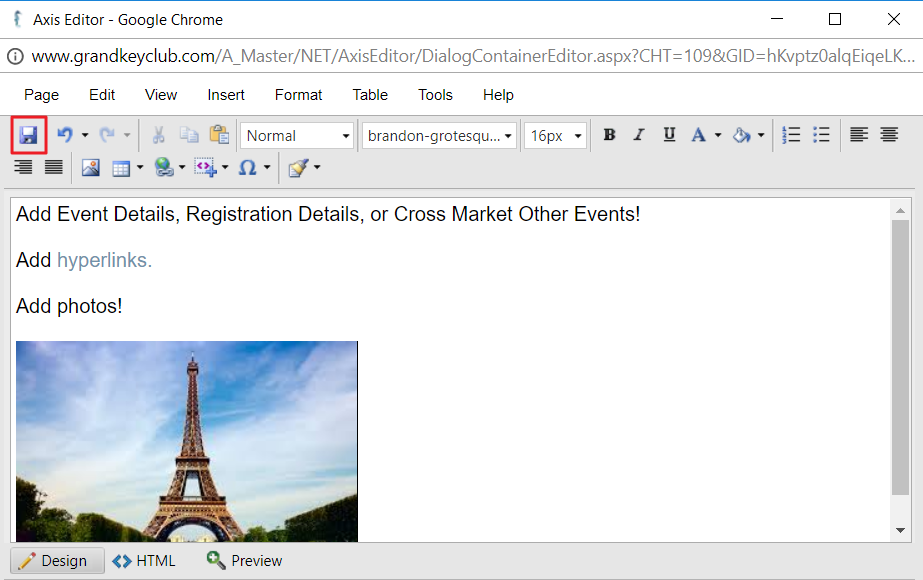
Next, click Edit Event Flyer to launch the website Editor. Within the Editor, you may add text, imagery, and hyperlinks. This is a great place to add a lengthy description on the event or to cross market other upcoming events.
Once you have finished adding text within the Editor, click Save.
Click Save and Close to save the event to the designated calendars.
Editing & Deleting Special Events/Calendar Events
Once you have added your Special Event to the Tee Times Calendar, and Club Calendars, you can easily edit and delete these events directly from the Special Events manager.
Click the event within the Special Events manager so it is highlighted in gray.
Editing Tee Times Calendar Event
Make edits within the Special Event tool as needed.
Once edits are made, click Save or Save and Close.
You may also use the Save as New button to duplicate your event settings.
If you would like to duplicate your event be sure to follow these exact steps or you risk moving reservations in the event: First make the change to a pre-existing event (such as changing the date) and after making your change click Save as New.
Do not click Save as New before making your changes.
Editing Calendar Events
To edit the calendar event, click Edit Calendar Event and make edits as necessary.
Deleting Tee Times Calendar Events/Club Calendars
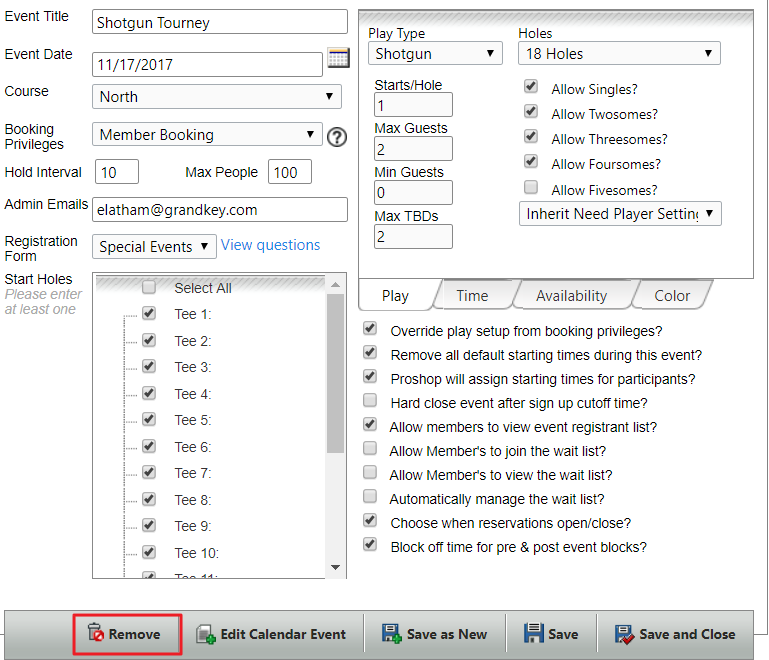
To delete the event, click Remove. This will also delete the event from any Club Calendars that this event was assigned to.
Best Practices
FAQs
