Adding an Event
- Kelsie Livingston
- Emily Carlson
Table of Contents
- 1 Overview
- 2 Required Permissions
- 3 Adding an Event
- 3.1 Accessing the Toolset
- 3.2 Event Details - Basic
- 3.3 Additional Event Options/Registration
- 3.3.1 Add New Time - Create Multiple Seatings
- 3.3.2 Registration Tab
- 3.3.3 Registration Setup
- 3.3.4 Email Notification
- 3.3.5 Custom Questions
- 3.3.6 Event Options
- 3.3.7 Save Registration
- 3.4 Final Event Details - Billing and Notification Tabs
- 3.5 Save and Close Event
- 4 Best Practices
- 5 FAQs
Overview
The Calendar and the Event Manager provide the ability to announce upcoming events throughout the website, take online registration, and manage registration all from your Clubessential website. The Calendar is a repository for all events and activities, while the Event Manager is an Administrative tool that works in conjunction with the Calendar.
Required Permissions
Admin
Editors
Adding an Event
Accessing the Toolset
Navigate to the Full View of the calendar, which is usually located in the main navigation. If the website does not have a link to the Full View calendar in the navigation, you can access the calendar in different ways depending on your access role.
Admins: Hover over Admin bar in the left hand corner of the screen, select Week | Month | Year.
Editors: Hover over Admin in the main navigation, select Main Tools, and then Calendar.
Click the Add Single Day Event Button in the calendar interface. This will launch the Add Event Interface to begin adding criteria for the event.
Event Details - Basic
To set up an event, begin by completing the basic event details contained on this screen.
Name: this is the title of the event and will show on the full calendar or on the calendar Quickview as the Event Title.
Event Color: you may select a color to set as the Event Color. This will change the color of the title on the full calendar view.
Event Summary: this will show on the calendar quick view. This is intended for a quick description of the event. Detailed information will be added in a later option.
Event Status:
Published: if this is selected, the event will post immediately.
Unpublished: is used to prepare the event for the calendar, but it is not visible to members. This will only allow it to be viewed by Administrators.
Hidden Registration: this posts the event, but the club will use the Event Manager to capture attendees rather than members registering via the calendar.
Title Position: determines the location of the Event Title on the page. This may be placed above or below the flyer.
Clickable Event: by default, this is always checked. This will allow members to click the Event Title for more information on the event. This must be kept checked if the event is one that a member may register for. Uses for a non-clickable event may be for a calendar notification such as: Club Closed on Mondays.
Allow Public View: To make the event visible to the Public (rather than just the Private Member side), click this option.
Allow Members to Email Event: To allow Members to send an email to the Event. When checked, option will display for Members to email link to Event from Event detail view.
Categories: Check the appropriate boxes/filters to designate where the event will distribute through the website. For instance, if you’re using a Golf Calendar under the golf section - clicking the Golf Calendar filter will allow this to populate on the Golf Calendar. An Interest Area must be chosen in order to save and continue. Check Select All option to place event in all categories.
Event Thumbnail: If the event will be displayed within a calendar plugin such as one located on the home page, make sure to add a Thumbnail. First Select the image icon next to Event Thumbnail. This will open the image explorer. Find the image you would like displayed and double-click the image to add.
Note: Not only will the thumbnail appear within the calendar plugin on the home page, it will also be used within the Featured Events section of the Clubessential Next Gen App.
Time and Date of the Event: Moving to the top right of the Event Detail screen, we can then designate the time and date of the event.
Set Time: If applicable, designate whether the Event is an All day Event, or if it Has an End Time (in addition to a start time).
Set Date: Click on day of Calendar to specify date of the event. (Note: Use arrows next to Month to navigate forward or backward.)
Next, click Save and Continue to continue setting up the event.
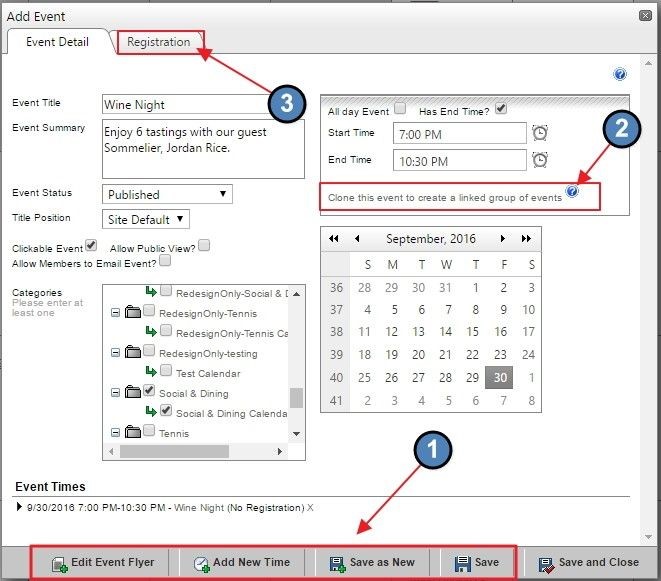
Additional Event Options/Registration
Once Save and Continue is selected, the following changes are noticeable:
New options are now available at the bottom of the screen to continue setting up the event including: Edit Event Flyer, Add New (Event) Time, Save as New, and Save (was previously Save and Continue).
A new feature, Clone this Event, is available on the current tab.
A new tab, Registration is also now available.
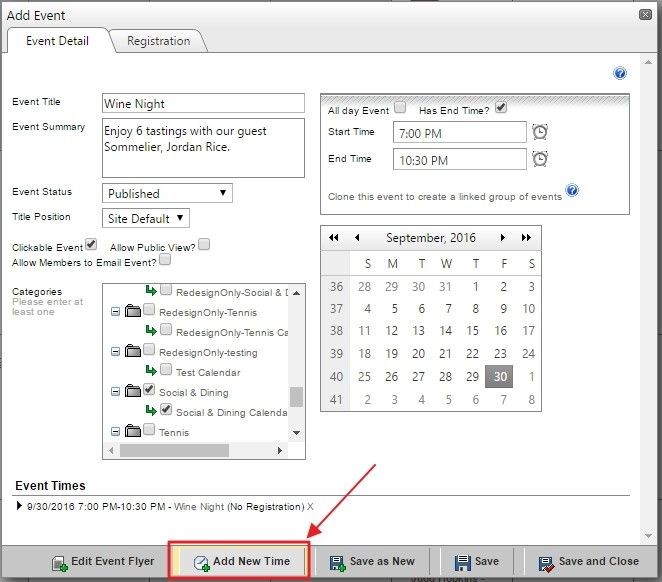
Add New Time - Create Multiple Seatings
For events that have multiple seatings or start times (such as an Easter Brunch that takes place from 11am-2pm, but attendees must choose to show up at separate event times: 11am, Noon, and 1pm for instance), use the Add New Time option to add additional event times to the event.
To add an additional time to the event, click Add New Time.
Then, click the Time Picker to select the additional time to be added. Click Add New Time once the new time has been selected.
Save as New - Copy the Event -The Save as New option copies the original event but does not link the event, so changes in the original event will not be changed if changes occur in the save as new event. This option is useful when creating a new event that is similar to a previously established event.
Save - The Save option saves the event at the current moment in time, and allows you to continue editing the Event.
Clone This Event - Create a Recurring Event (Please Note: Cloning an event will create a series of single-day recurring events on the days selected from the calendar. When an event is Cloned, Members can then register for each event that fits their schedule individually, instead of being automatically signed up for every occurrence of the event.)
The Clone This Event to Create a Linked Group of Events allows you to set up recurring events. From here, you may add additional event days. All event information will be carried over to each new event day. These are still Single Day Events where attendees must sign up for each event individually.
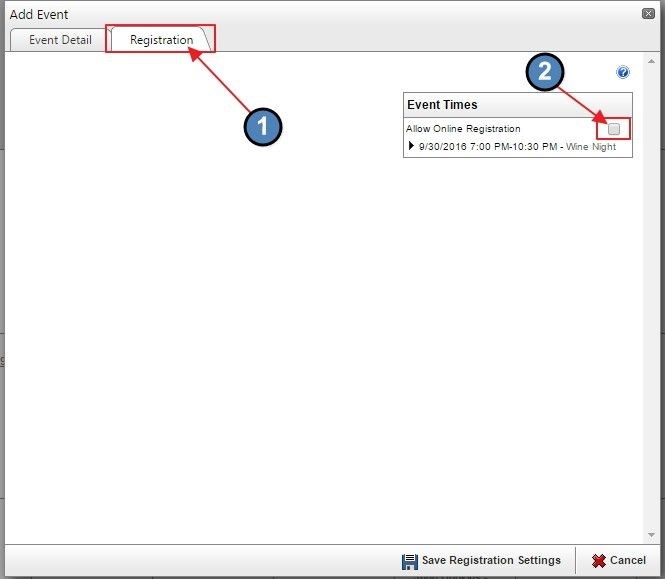
Registration Tab
The Calendar allows for online registration for attendees. This works seamlessly alongside the Event Manager, so that all event management can be done on your Clubessential website. Online Registration is convenient and easy for members who can register at any time of day without assistance from the Club.
Note: for Recurring Events, this screen will have an additional option where you can specify whether you would like to Edit This Event Only, or Edit All Event Dates.
Once the Allow Online Registration option has been checked, the sections appear for editing.
Registration Setup
The Registration Position changes where the Registration Button will be placed in the event details. The button may be placed above the event flyer, below the event flyer, or both above and below the event flyer. Use the drop down to choose between Above Flyer, Below Flyer, or Both.
Max Number of People sets how many registrations are available for the event. (example 100 total attendees).
Max Party Size sets the max number of people allowed in a party registration (example: 5 people max per party).
Reservations Begins sets the day and the time that a person may sign up for an event. Click the Date Picker to select a day. Click the Time Picker to select a time.
Reservations Ends sets the day and the time that reservations must be made by before registration closes. Use the date and time picker options previously demonstrated to select options.
Cancellation Cutoff: sets the day that cancellations may no longer made. This will also use the date and time picker to select options Note: some clubs prefer to post a cancellation policy rather than using this method.
Allow Registration After Event Starts: allows users to sign up while the event is occurring.
Allow Party Size Change After Cutoff: enables attendees to alter their party size at any time.
Custom Confirmation Page: allows for custom notification (simple message with text pop-up) once the attendee registers. First, click edit. Add the desired verbiage, and click save in the editor to update.
Email Notification
The Email Notification Field must be populated to save and continue. This email will receive notifications when attendees register, change registration, or cancel their registration.
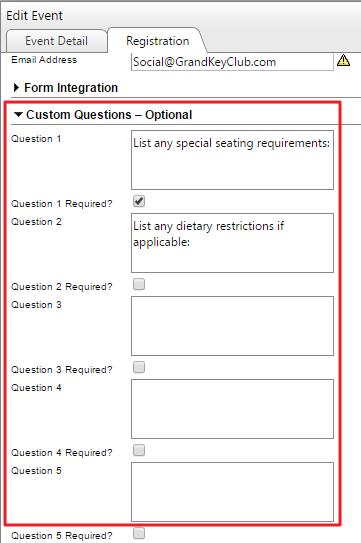
Custom Questions
The Custom Questions - Optional section allows for up to 5 custom questions that may be used for specific needs for event. Examples include special seating arrangements, dietary restrictions, etc. Questions may be designated as required by clicking the Question # Required field, or can be optionally answered by leaving these fields blank.
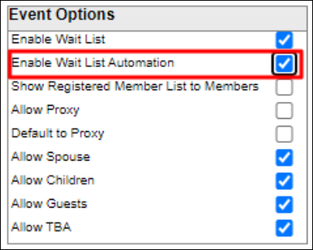
Event Options
Additional parameters may be specified in the Event Options section.
Enable Wait List: if the event if full, this will allow members to be added to a wait list.
Enable Wait List Automation: This option will appear once Enable Wait List has been checked. This will allow the waitlist to auto fill registration spots as they open up. It will choose members on a first come, first serve basis. Meaning that within the Wait List, whomever registered first will be the first to fill the active openings. It will not automatically move members if there are not enough spots for the next-in-line party. Example: The next-in-line party in the Wait List is a party of 4 and 2 spots open up. The two spots will NOT be filled until two more spots were to open up. During this time, club administrators may still update the Wait List manually.
Show Registered Member List to Members: allows members to see other members who are attending.
Allow Proxy: member make reservations for other people, but the original member making the registration does not necessarily need to attend.
Default to Proxy: every reservation made will be by proxy if this is enabled. Most frequently used for children’s camps where the guardian is enrolling a child.
Allow Spouse, Children, Guest: allows an attendee to register for others that may include a spouse, child, or guest.
Allow TBA: a member may hold a reservation without the club knowing who the other attendee is.
Save Registration
Once complete, click Save Registration Settings to finalize the registration tab.
Final Event Details - Billing and Notification Tabs
Once Save Registration Settings is selected, two new additional tabs appear.
Billing Tab: Used by Clients also using Clubessential’s Office Product. (Will not be covered in this document - for more information, please refer to Unification - Events found within the Clubessential Knowledge Base.)
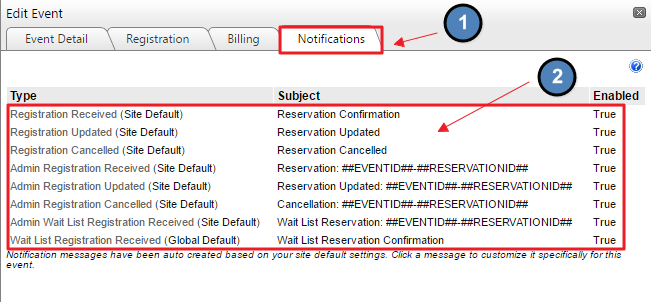
Notification Tab: Used to create notifications for Events.
Notification Tab - Creating Notifications for Events
Notifications (in the form of email) may be added for attendees and administrators of the event, so that when certain actions relative to the event occur (registration is received, registration is updated, registration is cancelled, etc), an email notification is sent.
There are two types of notifications (1) Default, and (2) Custom. Default Notifications are listed on this tab, and contain standard language for use. When, enabled, these notifications will be utilized without need for intervention.
While customization of the default notifications is not required, Custom notifications may be helpful, for they allow for additional registration or cancellation information to be included, and also offer an opportunity to Cross Market other events.
There are four types of default notifications that may be customized: Received, Changed, Cancelled, Wait List. Click the type of notification to edit.
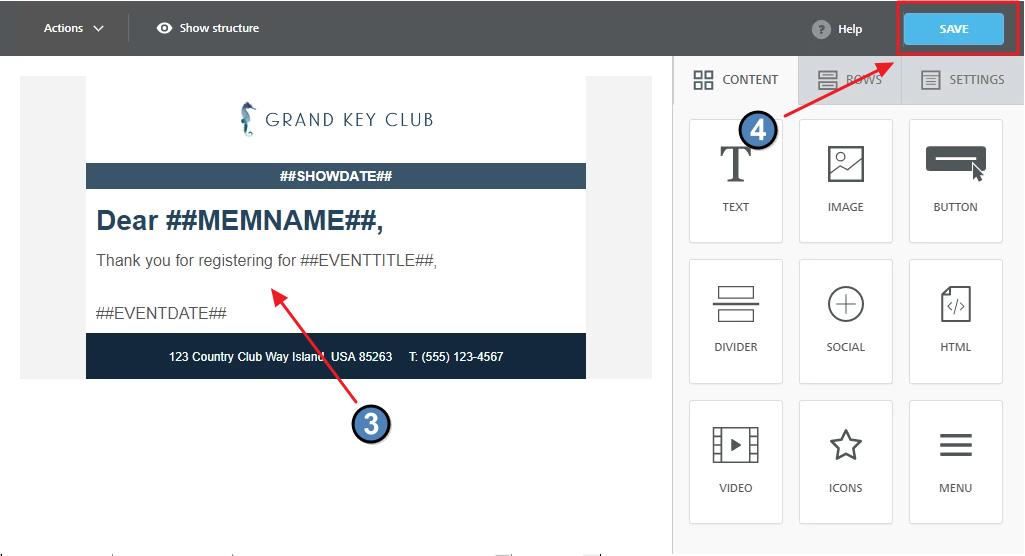
Edit Default Event Notifications by opening the Click to Edit to open the legacy editor. Select CLICK TO EDIT - NEW to utilize the new editor.
Each Notification will open the Editor where the message may be customized using snippets and text. Save in the editor once complete.
To edit a text SMS message, type in the SMS Version field.
Last, click Create Notification or Update Notification to save in the Notifications tab.
Save and Close Event
Once all information has been populated for the event, navigate to the Event Detail tab, and click Save and Close.
Best Practices
If an event is a recurring event, remember to use the Single Day Event but make this a Cloned Linked Group of Events. If the event is added as a Multi-Day Event, then the attendee must go to ALL events.
Cloning an event will create a series of single-day recurring events on the days selected from the calendar. When an event is Cloned, Members can then register for each event that fits their schedule individually, instead of being automatically signed up for every occurrence of the event.
Customizing notifications on events is a great place to add cross-marketing. This also allows for notifications to be customizable using Snippets or to add additional information that attendees may need to know.
FAQs
I need to create a recurring event, but the event I have created lists all days on the single event.
A: You have probably created a Multi-Day Event by which attendees must attend to ALL event days / times. Instead, create a Single Day Event and add information for the first event. Once you save to continue, the Clone Linked Events option will appear where you may add additional days for the event to occur on.