Event Manager
- Kelsie Livingston
- Emily Carlson
Table of Contents
Overview
The Event Manager allows for management of events that members can register for. Here, you may email event attendees, manage registrations and the wait list. Information on attendees may also be exported for further management offline. The Event Manager allows for one point of entry for all registrations, so there is no need to keep a separate book for registration details.
Required Permissions
Admin
Event Manager
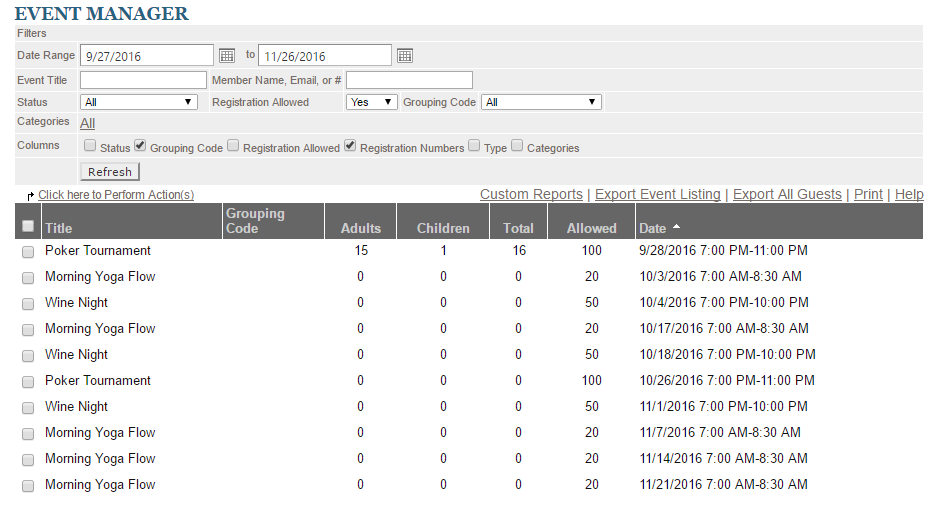
Only Admins may access the Event Manager by hovering over Admin in the left hand corner of the screen > Event Manager. This will launch the Event Manager interface. The Event Manager provides a list of all upcoming events.
Event Details
Event details allows action on each event and communication with registrants. Click on the Event Title in the Event Manager to perform actions on a particular event. This will launch the Event Details for that particular event. The top toolbar offer various tools for interacting with the event.
Edit Event: goes back to the calendar interface so event details may be edited.
Event Notifications: opens the Event Notifications to edit or add custom notifications. Same interface that is used when first setting up the event and using the Notifications Tab.
View Event: shows the event in the calendar
Email Registrants: allows direct communication with registrants via email.
Send Voice Message: this is an add-on service for an additional fee. This is mostly used for cases of emergency.
Print: prints Event Details page
Registration Menu Bar: allows additions of registration by administrators. Admins may make registrations for club members directly by using this tool.
Add Registration: register Member(s) for an Event
Export Reservation Listing: export the listing to a CSV file which shows: registrants, attendees, and notes by registrant. One row for each registration received, listed by registration owner.
Export Attendee Listing: export the listing to a CSV file which shows: each attendee on a row. You may add which fields show on this export.
Export Guests: export the listing of Guests to a CSV file.
Add Attendees to Group: manually add attendees to the event.
View in Custom Report: launches the export interface, but allows you to choose fields to export.
View: may choose which information is shown in the Event Manager for: active, cancelled and Wait List.
Show More Info: displays notes entered by the member or the admin.
Click Here to Perform Actions: allows the admin to change the reservation. This is used to move registrants from the wait list to active, or to cancel a reservation.
Search by Name, Email, or Mem#: search for existing reservations by Name, Email, or Member number.
Add Registration: Help Member(s) Register for an Event
In the event a Member calls in or stops by, and would like help registering for an Event, utilize the Event Manager to help get them registered for the event.
First, scroll to find the appropriate event.
Then, click on the Event to launch the Admin Registration window.
Next, click Add Registration to launch the Registration screen.
Begin by designating Party Size. For this example, let’s assume the party size is two, and that the member will be bringing their spouse.
Next, select Member(s) from the right side of the screen by double-clicking on them. Click +spouse to indicate Member will be bringing their spouse. Note that Child, or Guest could also be clicked to populate second attendee.
Once attendees have been specified, populate additional fields, such as Registration Owner Email and preferred Table Number if appropriate. If email address is already on file in Member’s profile, email will auto-populate.
Once complete click Save Registration at the bottom of the screen. The registration will then appear in the Event details.
Managing the Wait List
The Wait List can easily be managed within the Event Manager, or Wait List Automation can be set up within the Event Editor. Once attendees cancel their reservation and spaces are available, click the event title to view the Event Details. From here, we can manage moving those on the Wait List to an active registration.
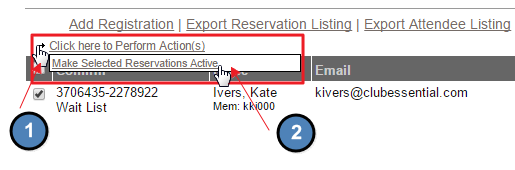
Click the dropdown on the View Interface, and change to Wait List. This will show all members on the current Wait List. Check the box next to the member’s name.
Next, click the Click here to Perform Actions link then Make Selected Reservations Active. This will then allow the member to be on the active registration list. Note: you will need to email the wait listed attendee to notify that they are now on active reservation.
Best Practices
Using online registration and the Event Manager is an easy way to keep all reservation information in one place. There is no need for offline management when using the system in place on the website. It is also easy to communicate with attendees by using the blast email system on the website.
FAQs

.