Creating Special Events in the Dining System
- Emily Latham
- Emily Carlson
- Joshua Morrison
Table of Contents
Overview
Events that involve a la carte style reservations should be set up as a “Special Event” through the Administration menu on the Dining Admin Dashboard page.
Required Permissions
Dining Administrator
Accessing the Tool
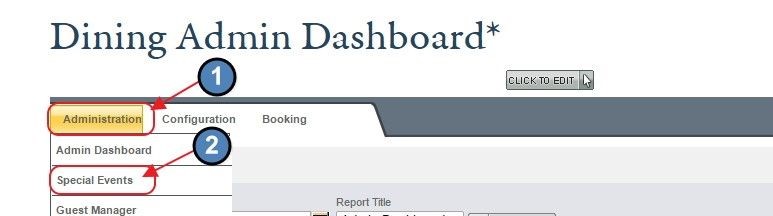
From the Dining Admin Dashboard, click Administration, and select Special Events.
The Dining Special Events page will load.
Adding a Special Event
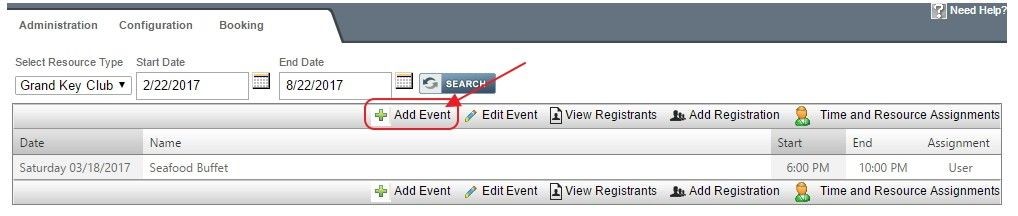
Within the Dining Special Events page, click the Add Event button. The Add Special Event window will launch.
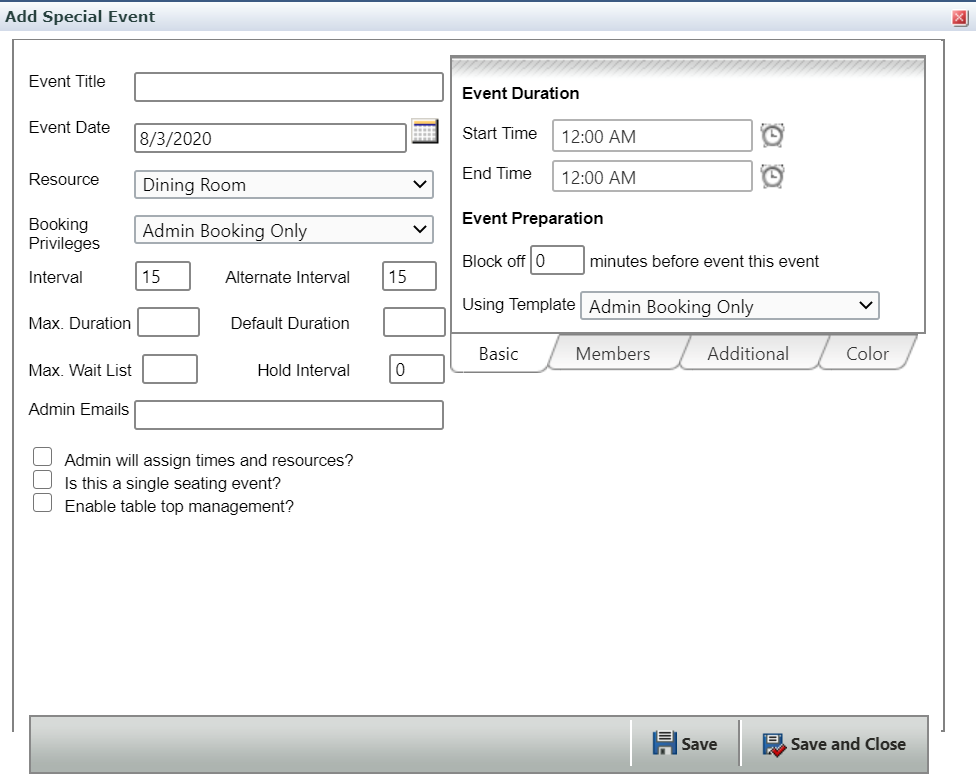
Populate the Add Special Event form as follows:
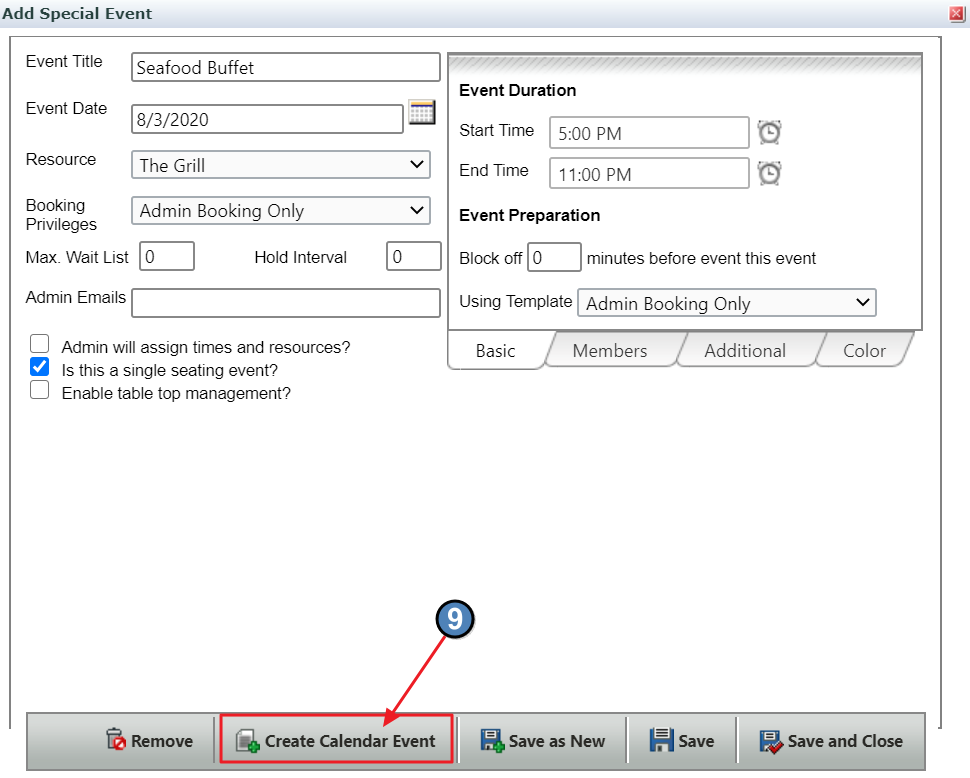
Enter the Event Title, the Event Date, and select the Resource (Dining Room) where the event will be held, and then enter the booking rules for the event by selecting the desired Template.
For events held in other areas than the standard Dining Room(s), choose Events in the Resource field.
If Members should be allowed to book for the event, make sure Member Booking (or Member Booking- Dinner or Member Booking-Lunch, depending on the time of the event) is selected in the Template drop-down. If you leave the event as Admin Only, only administrators will be able to register members for the event.
If applicable, add the event Intervals. For example, if you would like seatings every 15 minutes, enter 15 and 15 for the interval and alternate interval. If every 30 minutes, enter 30 minutes for both. Leave the max duration, default duration and hold interval blank. Note: this section will not apply for a single seating event (see below).
If you would like a waitlist for the event, enter the # of members you can take on the waitlist in the Max Wait List field.
Additional Event Options (one or more may be selected):
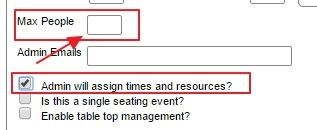
If this event uses a lottery for seating times and reservations, check Admin will assign times and resources. Once clicked, the Max People field opens for population.
If the event is a single seating event, check the option for single seating event. If checked, Interval, Alternative Interval, and Max Duration fields disappear as they no longer apply.
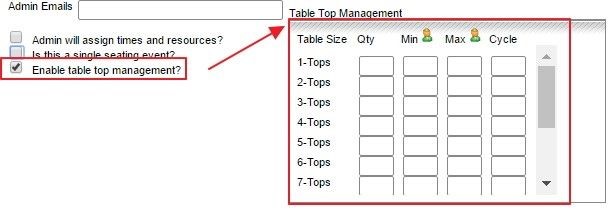
When checked, the enable table top management option allows you to enter the # of tables that you have and the turn times associated if necessary.
On the right hand side, enter the Start Time and End Time of the event. If you would like to block reservations prior to the event, enter the number of minutes prior to the event that you would like to block and keep the block template as Admin Booking Only.
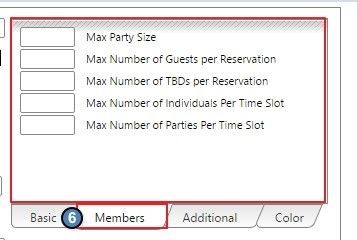
Click the Members tab and enter any of the information regarding capacity. If you leave any of these fields blank, the system defaults to utilizing your normal capacity rules as if it was a normal lunch or dinner service.
Click the Additional tab if you would like for reservations to open for booking further in advance than your normal dinner reservations.
Click Save.
If you would like to populate the event to the club calendar, click Create Calendar Event. This allows for members to click on the event from the Club calendar and takes them to the a la carte reservations booking window for this event. Fill in the fields, and when finished, click Save and Close.
Best Practices
Add Member Special Events to the Club Calendar to allow for easy Member registration and other Website feature integration.
Use an Event Flyer to advertise the Special Event, and cross-market the event in areas such as Statements, and/or other reservation confirmation emails.
FAQs
How do I ensure the location of the event is blocked off an hour before the event so there is time to set up?
On the right hand side of the Add Special Event screen, in the Event Preparation section, enter the minutes prior to the event that the designated space should be blocked. In the case of an hour, enter 60 minutes.
How do I edit an event after it is saved?
Once event is saved, event will be listed on the main Special Events page. To edit the event, highlight the event, and click the Edit Event option to re-open the Special Event details. Edit as necessary, and then Save and Close when finished.
