Photo Albums
- Kelsie Livingston
- Emily Carlson
Table of Contents
Overview
Photos and Photo Albums are managed completely through the Image Explorer. This article will review how to upload and manage the Image Explorer, access Stock Images, how to crop and resize images, and how to manage Photo Albums.
Required Permissions
Admin
Editor
Photo Albums
Most websites use the Photo Album plugin, which allows for various types of slideshow imagery. Clubessential can help assist to set up Photo Albums on pages, along with determining the right style. Managing Photo Albums are simple, by using the folders within the Image Explorer.
Managing Images in Albums
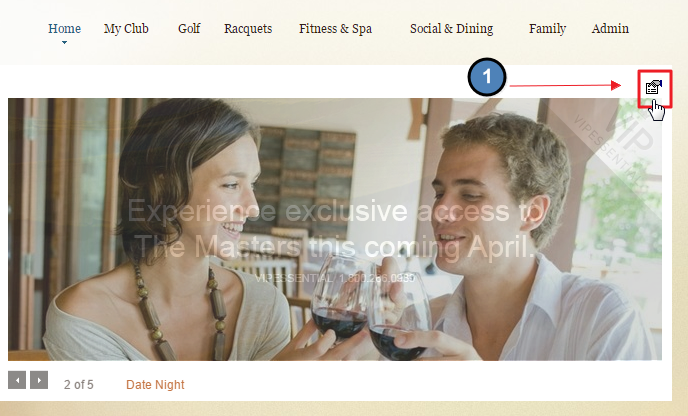
Before the Photo Album can be managed, we first must know what folder is assigned to the album. First, navigate to the Photo Album and then click on the Photo Album Properties icon.
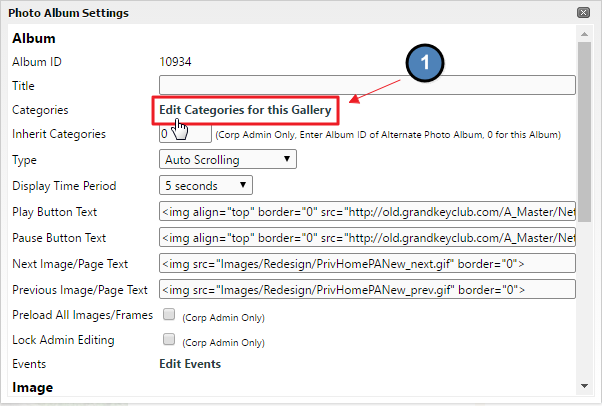
Click Categories, which will pull up the Image Explorer Folder Structure. Scroll to find the folder that has a check mark next to its name. This is the Folder that the Photo Album is assigned to. Note: multiple folders may be assigned to a Photo Album.
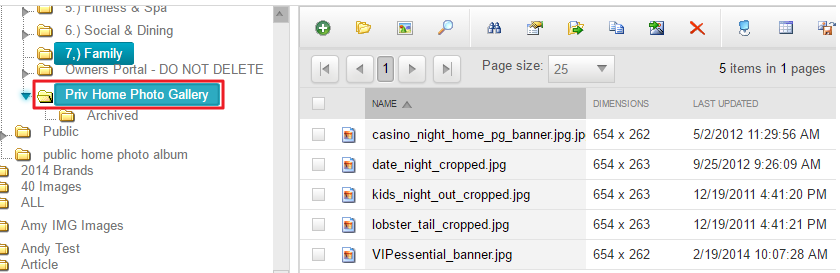
To manage a Photo Album, navigate to the Image Explorer.
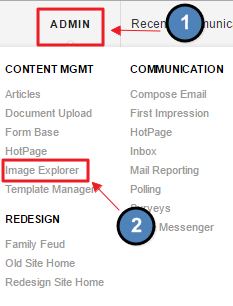
Admins: Hover over Admin bar in the left hand corner of the screen, select Image Explorer.
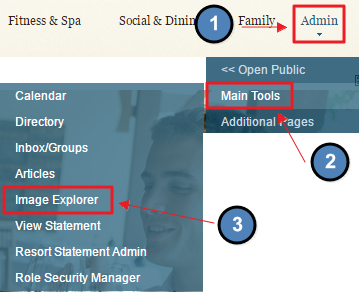
Editors: Hover over Admin in the main navigation, select Main Tools, and then Image Explorer.
Navigate to the folder in which the Photo Album is tied to. From here, images can be added, moved, or removed.
To Add: click the green plus button sign.
To Move: right click on the image and click move.
To Remove: click on the image in the folder and click the red X in the toolbar.
Adding Text and Hyperlinks to Photos
Depending on the type of Photo Album, there may be text and hyperlinks associated with the imagery. This is mostly the case on Member Home Page Photo Albums.
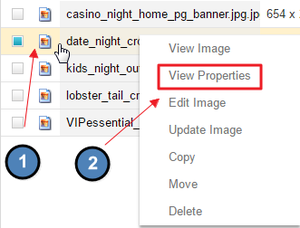
To edit the information, navigate to the Folder associated with the Photo Album.
Right Click on the image, and choose View Properties.
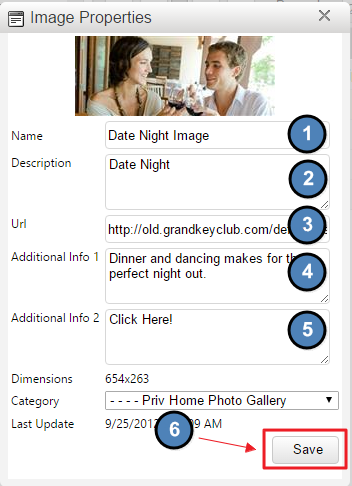
From here, a name, description, URL, and Additional Info may be added.
Name: this is the title of the image. This will not show up in the Photo Album, but the name will show when one hovers over the image.
Description: typically, this is used for the Title seen by members. It is most common to add the name of the event, or marketing piece here.
URL: place the URL of where the slide should be linked to. Change the name of the link text in Additional Info 2.
Additional Info 1: this is not always used, but if the album has a space for a long description this is where the long description can be added.
Additional Info 2: this is the link text for the URL.
Save once complete for changes to publish to the Photo Album.
Best Practices
Name imagery something descriptive so images are easy to locate within the folders.
FAQs
Why is the image I added to the Photo Album not showing up right away? A: It can take a few minutes for the image to show in the Photo Album. This is due to caching. To refresh the Photo Album, open the Album settings and click save at the bottom of the Album interface. This should refresh the album, so you can see the image right away.
