Banquets - Event Lifecycle
- Kelsie Livingston
- Benjamin Hacker
Table of Contents
Overview
This user guide will present an overview of the Banquets application as it relates to Event Lifecycles. Understanding these concepts is critical to successfully utilizing the Banquets toolset.
Required Permissions
Admin Access
Level 1
Level 2
Level 3
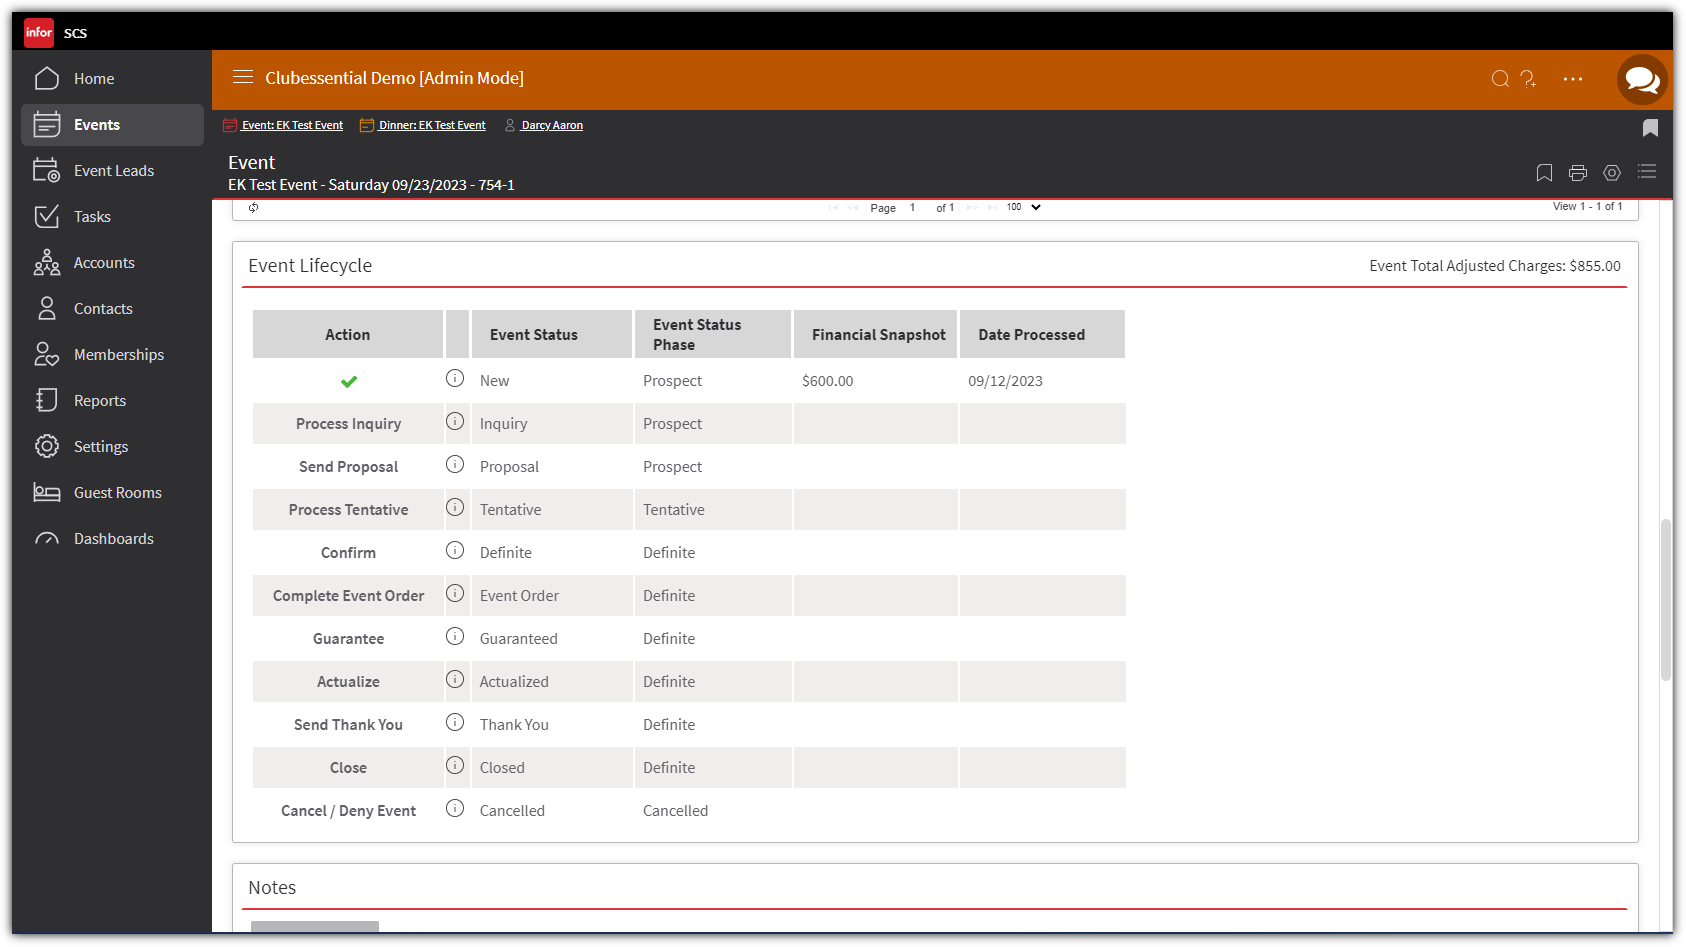
Event Lifecycle
Banquets is designed around the stages of a typical event’s lifecycle and allows you to automate your practices. The status in the event’s lifecycle are listed on the Event Details page.
Inquiry - Process Inquiry when a Contact is “just shopping” for information but you’d like to put them on your calendar as an Inquiry, send out information, and follow up with them later. Contact is not quite ready to be sent a contract.
Proposal - Send Proposal after services have been added and you want to send out a document with the proposed services.
Tentative - Process Tentative when you want to get confirmation of an event by sending out a document requesting a deposit and/or signature.
Definite - Confirm the event when a deposit and/or a signed contract or confirmation letter has been received.
Complete Event Order - Complete Event Order when the service details of your event have been entered, such as food menus, beverage menus, and setup and service requirements, and you are ready to preview or send an Event Order to confirm these details with/to the contact or internal staff. (Changes are still possible after all steps!)
Guarantee - Guarantee your event when the guaranteed attendance figure has been received. This will update all of the quantities for your event. (May be dependent on ‘Auto Quantity’ being turned on for your specific menu(s).
Actualize - Actualize to enter actual attendance and consumption numbers, typically done with the event is over.
Send Thank You - Send a Thank You email or letter after the event has taken place.
Close - Close the event once it has been executed and all outstanding balances have been collected.
Cancel/Deny Event - Used when the event has been canceled. Banquets will retain its information along with the reason it was canceled, but it will be removed from the Event Calendar.
Using the Event Lifecycle
Clicking an event Lifecycle button navigates to a screen that will allow input of relevant event information like recording payments, printing or e-mailing documents, assigning follow-up tasks, and verifying attendance counts. These automated tasks ensure that no information is accidentally forgotten, provide quick access to required information, and build consistent business practices among users.
The lifecycle steps do not have to be completed sequentially. To move ahead and skip stages, simply click on the desired Lifecycle button to perform the tasks associated with that stage in the Lifecycle. If desired, the Lifecycle can be customized to include fewer steps.
Banquets does not allow an event to move backward in the lifecycle. However, if an action associated with an earlier stage in the lifecycle needs to be completed, such as printing another document or recording a deposit, this can be done from other areas on the Event Details page, such as Communication History and View Financial Details.
Additional Resources
Best Practices
Begin the day by reviewing pertinent information on the Home screen, to ensure you have addressed items that need timely attention. Utilize Navigation shortcuts, such as the Breadcrumb trail and the search feature to navigate quickly to desired information. Improve operational efficiencies by tracking leads, setting tasks, following up, and successfully tracking pertinent life cycle steps once the Leads are converted to Events.
FAQs
When using the Lifecycle do we have to follow the steps in order?
The lifecycle steps do not have to be completed sequentially.
