Office - POS Batch Processing
- Stacy Zak
- Benjamin Hacker
- Danielle Donley (Unlicensed)
Table of Contents
- 1 Overview
- 2 Required Permissions
- 3 Accessing the Tool
- 3.1 Approve Charge Batches Grid
- 3.2 POS Batch Grouping
- 3.3 Ticket Drill Down
- 3.4 Edit POS Tickets
- 3.4.1 Delete Ticket
- 3.4.2 Edit Invoice in POS
- 3.4.3 Additional Details
- 3.4.4 Invoice Details
- 3.4.5 Ticket Details
- 3.4.6 Tax & Service Charge Details
- 3.4.7 Settlement Details
- 3.4.8 Export Image/Print POS Ticket
- 3.5 Posting POS Batches
- 3.5.1 G/L Posting
- 3.5.2 Ticket Details
- 3.5.3 Deleted Tickets/Voided Items
- 3.5.4 Settlement Summary
- 3.5.5 Adjust Cash
- 3.5.6 Post the Batch
- 3.5.6.1 Print/Export Batch Report
- 3.6 Unpost POS Batch
- 3.7 Edit Batch Date
- 4 Best Practices
- 5 FAQs
Overview
Each morning, Batches of Point of Sale transactions from the previous day need to be posted to the General Ledger, as well the Club’s respective Membership Accounts. In this guide, we will discuss how to properly review and post these daily Point of Sale Batches, as well as how to Edit POS Tickets within a Batch.
Required Permissions
Membership
Approve Charge Batches
Add/Edit/Delete
Accessing the Tool
Point of Sale Batches are posted and edited via Approve Charge Batches.
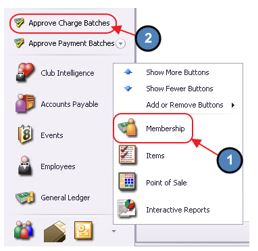
To access Approve Charge Batches:
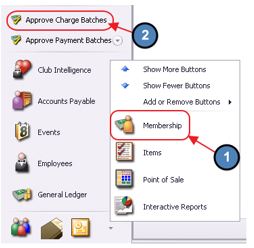
Navigate to the Membership menu and select Approve Charge Batches.
The Approve Charge Batches Grid will launch.
Approve Charge Batches Grid
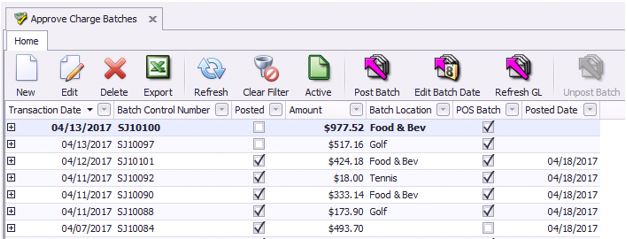
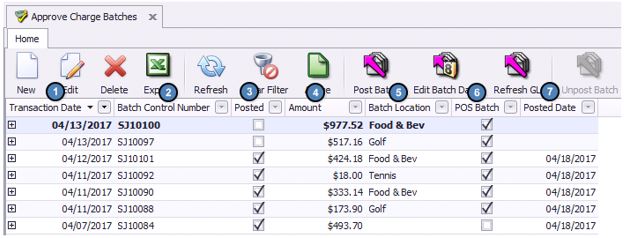
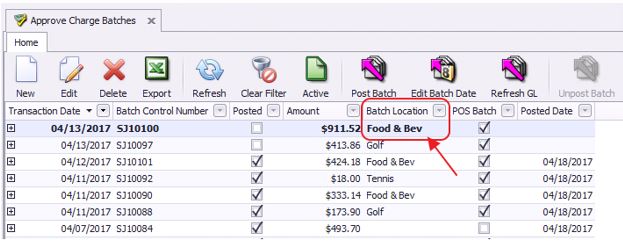
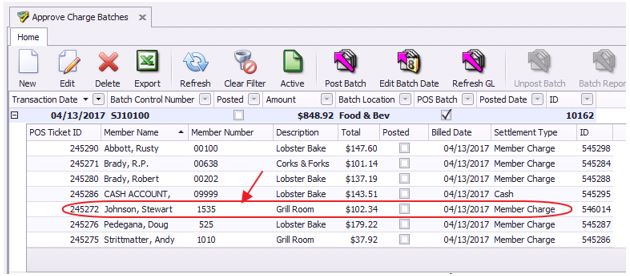
The Approve Charge Batches Grid can be customized and filtered in the same manner as any Grid within the Office System. The most commonly used Column Headers are shown in the screenshot above. They include:
Transaction Date - Date in which transactions in the Batch occurred.
Batch Control Number - Used as a reporting tool to reference the Batch of transactions for a specific day.
Posted - If checked, the Batch has been posted to the General Ledger. If unchecked, the Batch still needs to be posted.
Amount - The Total Sales comprised of each transaction within the Batch.
Batch Location - Location at the Club in which the transaction occurred. Please see the POS Batch Grouping section of this document for more information on how Batches are grouped.
POS Batch - If checked, the Batch originated from the Point of Sale. If unchecked, the charge was entered via the Member Charge Wizard or Month End Billing. For more information on the Member Charge Wizard, please see our Member Charges guide. In addition, for more information on Month End Billing, please see our Month End guide.
Posted Date - Date the Batch was posted.
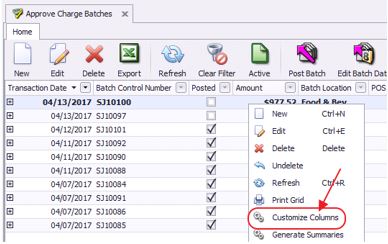
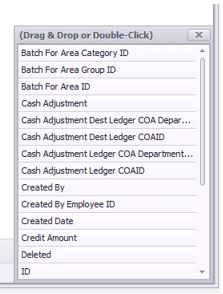
If these Columns are not currently present on the Grid, right-click and select Customize Columns.
A window will populate with available Columns on the bottom right corner of the screen.
Double-click or Drag and Drop to add Columns to the Grid.
For more information on filtering and sorting Grids, please see our Grids guide.
POS Batch Grouping
The System can separate Point of Sale transactions in a number of different ways. Depending on your preference, the System can be setup to group all transactions into a single batch each day, or separate transactions into 2 or more Batches.
For some people, separating each days Food and Beverage transactions from other types of sales, such as Golf Shop sales, makes the daily process of reconciling the transactions easier.
By default, the system is setup to group Point of Sale transactions by Area Group. This keeps POS Batch Reporting clean and easy to track. For instance, by creating a Food & Beverage Area Group that is linked to all F&B Areas, the user will only have one batch of Food and Beverage transactions to post at the end of the day, rather than numerous Batches. As you will see, the Area Group shows as the Batch Location within the Approve Charge Batches Grid.
Area Groups are configured during Implementation, however for more information on Area Groups, please see our Area Groups guide.
Ticket Drill Down
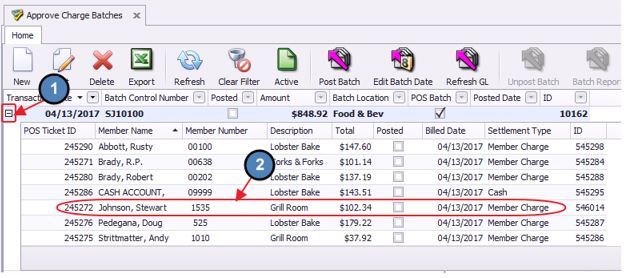
To view a list of POS transactions within a specific Batch, select the (+) sign to the left of the Batch to expand its details.
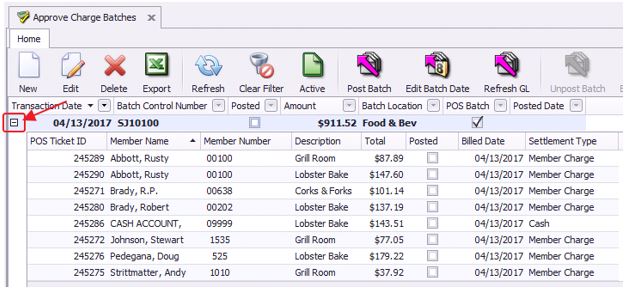
A Batch’s expanded view opens a second Grid that can also be customized and filtered in the same manner as all Grids within the Office System. Simply right click and select Customize Columns to add your preferred columns.
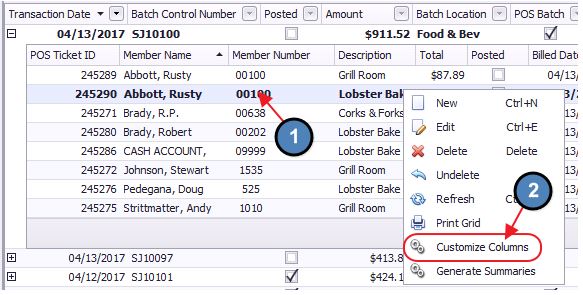
Edit POS Tickets
In this section, we will discuss how to Edit Point of Sale transactions directly from a Batch’s expanded view.
Important: Please note that only Tickets within an Unposted Batch can be edited in this manner. If a Ticket within a Posted Batch needs to be edited, the user will need to Unpost the Batch. Please see the Unpost POS Batch section of this document for more information on Unposting Batches.
Delete Ticket
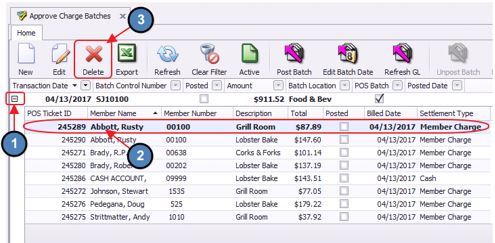
To delete a Ticket from a Batch:
Expand the appropriate Batch, click to select the Ticket, and select the Delete icon on the toolbar.
Note: Please note that Credit Card Tickets cannot be deleted from a Batch’s expanded view. Tickets settled to Credit Card can only be deleted from the Point of Sale. For more information on Credit Card Transactions, please see Credit Card Transactions guide.
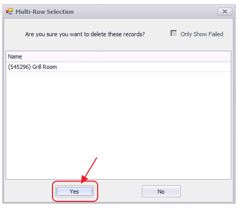
Select Yes, on the confirmation prompt.
Edit Invoice in POS
In many cases, during Batch review a Point of Sale Transaction needs to be edited.
Note: Please note that Credit Card Tickets cannot be edited from a Batch’s expanded view. Tickets settled to Credit Card can only be edited from the Point of Sale. For more information on Credit Card Transactions, please see Credit Card Transactions guide.
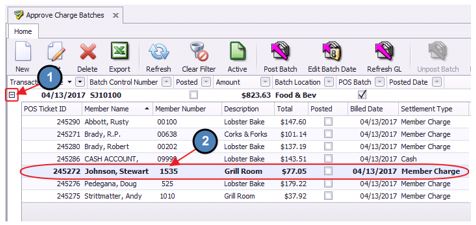
To edit a Point of Sale Transaction from a Batch’s expanded view:
Expand the Batch and double-click the appropriate Ticket.
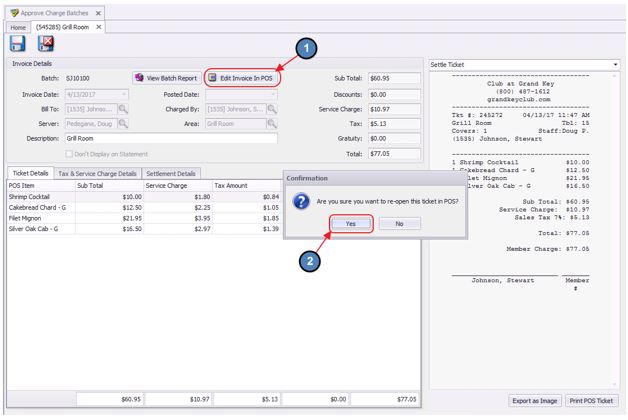
A window will populate with additional details about the transaction. Select Edit Invoice in POS and choose Yes to the confirmation prompt.
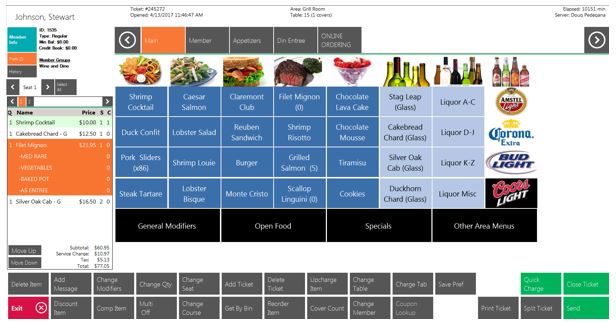
The Ticket opens directly in Point of Sale. Thus, the user has the ability to make any of the necessary adjustments needed. Once adjustments have been made, close the transaction as normal. For a full overview of the Point of Sale, please see either our F&B POS Manual, or our Retail POS Manual depending on the Ticket’s Batch Location.
Once the transaction is closed, the user is brought back to the Batch with the changes to the transaction applied.
Additional Details
As mentioned, the user can expand a Batch and double click on a particular Ticket to view additional details about the transaction.
Below is a description of each available detail:
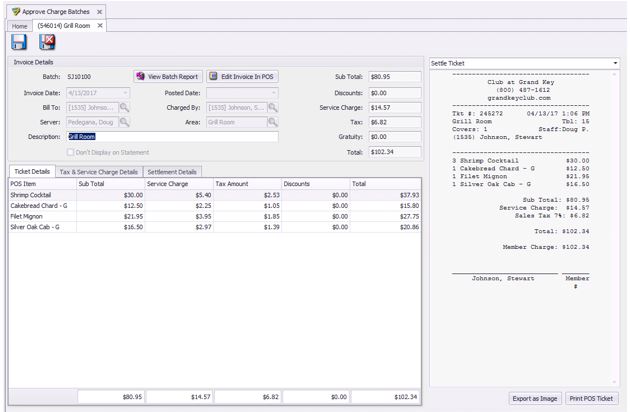
Invoice Details
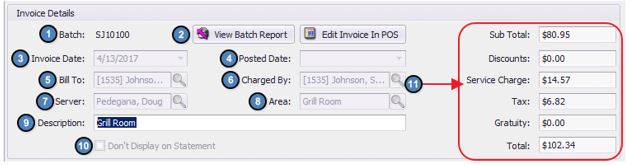
Batch - This is the Batch number in which the transaction resides.
View Batch Report - Select this to view the Batch Report of the Charge Batch associated with this transaction.
Invoice Date - The date of the Invoice
Posted Date - The date the Batch was posted (This field will be blank until posted).
Bill To - The Member the transaction will be billed to.
Charged By - The Member who made the charge. This is used to reference Dependent Members who charge to a Primary Member’s Account.
Server - The Employee who entered the Transaction.
Area - Area at the Club where the transaction occurred.
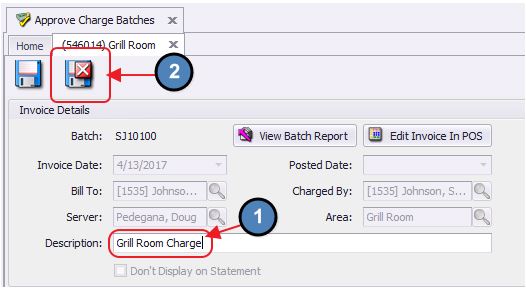
Description - This is the Description that will show on the Member’s Statement. If necessary, the Description here can still be edited. Be sure to select Save & Close after adjusting the Description.
Don’t Display on Statement - For more information on hiding transactions from a Member’s statement, please see our Member Charges guide.
Totals - To the right of the Invoice Details is a snapshot of the Subtotal, Discounts, Service Charge, Tax, Gratuity, and Total of the transaction.
Ticket Details
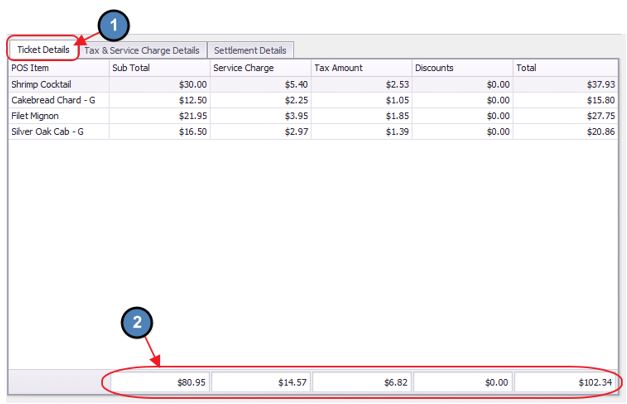
Ticket Details provides the user with a summary view of the POS Items charged on a particular transaction. This tab also includes the Subtotal, Service Charge, Tax Amount, and Discounts associated with each Item.
In addition, a Totals Row for each of these columns is present at the bottom of the screen.
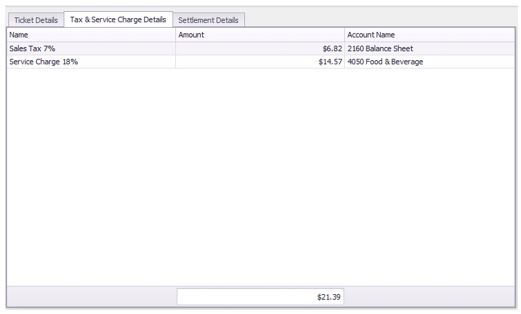
Tax & Service Charge Details
The Tax & Service Charge Details tab displays a list of the Tax Code Items, the Tax/Service Charge Amount, as well as the GL Account being hit by the Tax Code Items.
For more information on Tax Code Items, please view our Tax and Service Charge guide.
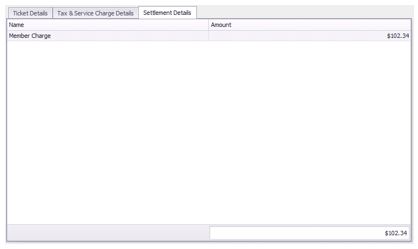
Settlement Details
The Settlement Details tab displays a list of the Settlement Types used to settle the transaction.
For more information on Settlement Types, please view our Charge Settlement Types guide.
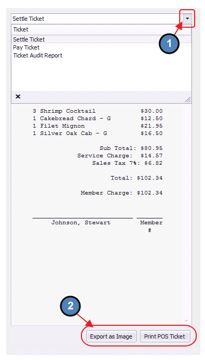
Export Image/Print POS Ticket
If necessary, the transaction’s Settle Ticket, Pay Ticket, and Ticket Audit Report (will show the user everything that happened to a Ticket from the time it was opened until it was closed) can be Exported as an Image or printed as a POS Ticket.
Posting POS Batches
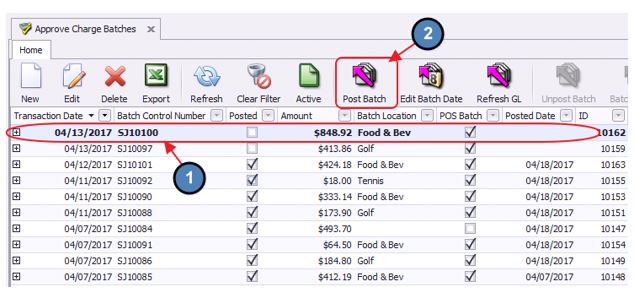
To Post a Batch of Point of Sale Transactions:
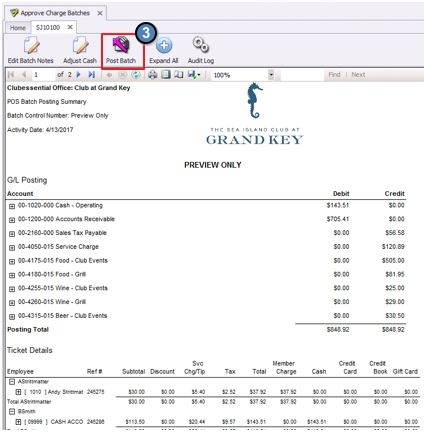
Select the applicable Batch from the Approve Charge Batches Grid and select Post Batch.
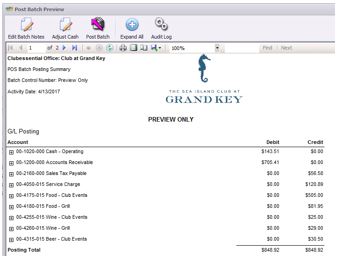
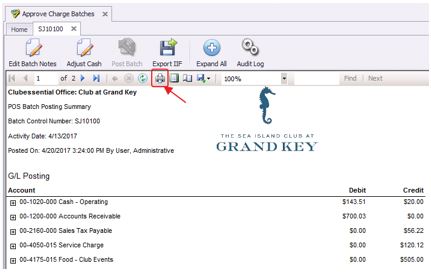
A Batch Preview will populate.
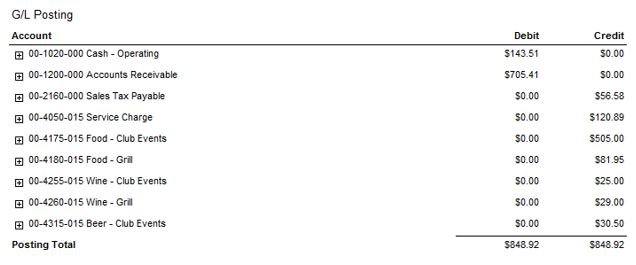
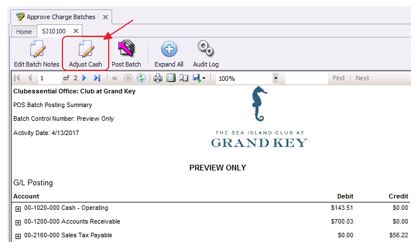
G/L Posting
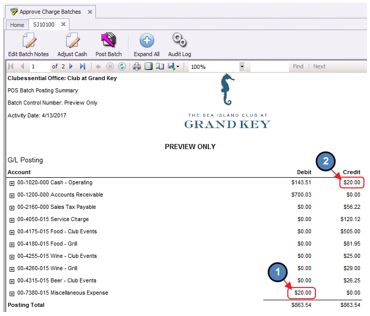
The top portion of the report shows a summary listing of the Debits and Credits about to be made to the General Ledger.
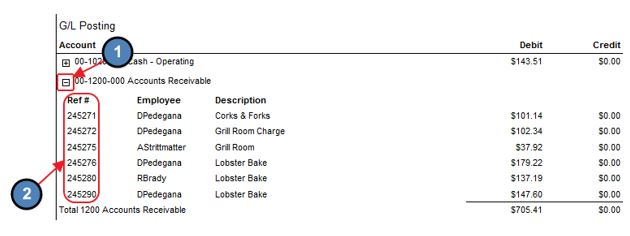
Use the (+) to the left of the General Ledger Account to drill down to the specific transactions hitting these Accounts.
The Ref #, refers to the Ticket Number of the transaction hitting the account.
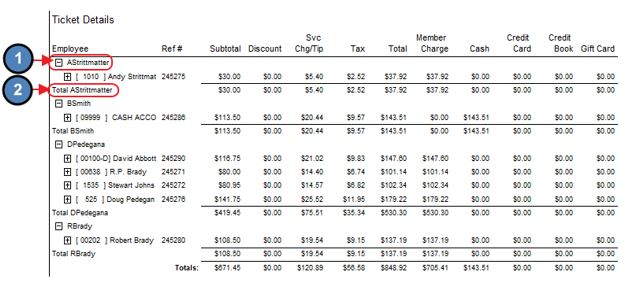
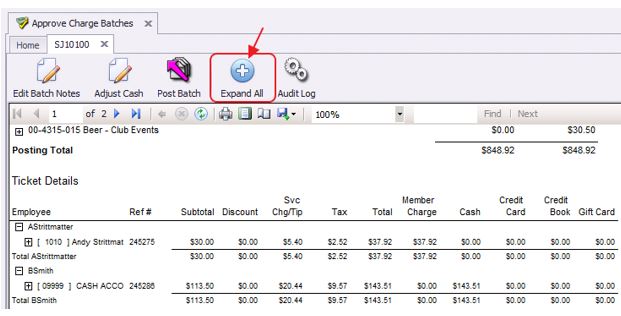
Ticket Details
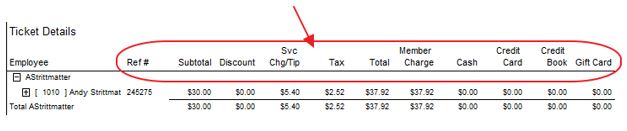
The bottom portion of the report, displays a list of transactions Member by Member that are included in the Batch. These details are separated by Employee with each Employee’s Tickets subtotaled.
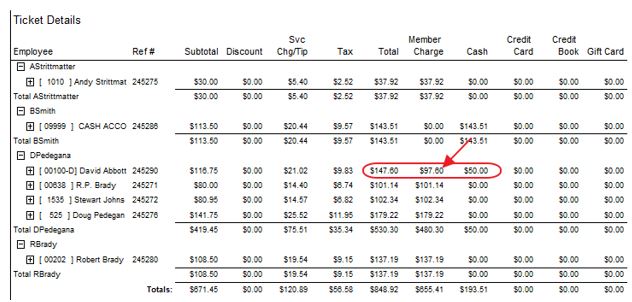
Each Ticket will display the Ref/Ticket #, Subtotal, Discount, Service Charge/Tip, Tax, Total, and Settlement Type(s) used to settle the transaction.
Note: If multiple Settlement Types were used on a single Ticket, the report will display the amount settled to each type. The total of these Settlement Types will equal the Total of the transaction.
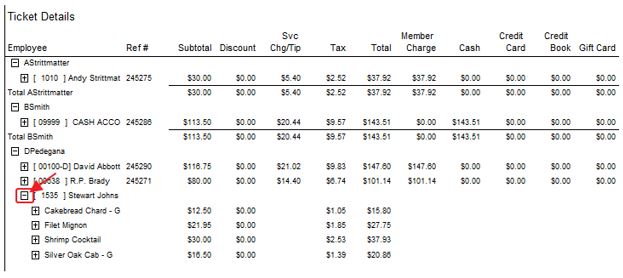
Use the (+) to the left of the Member Number to drill down to the specific Items that are being charged to each Member.
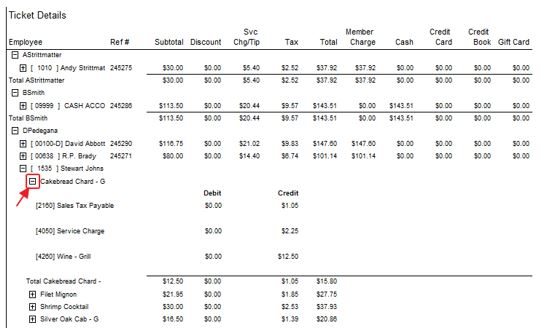
Use the (+) to the left of the Item to drill down even further to the GL Posting associated with the specific Item.
Use Expand All to expand all Ticket Details at once. This will drill all the way down to the GL Posting associated with each Item within the Batch.
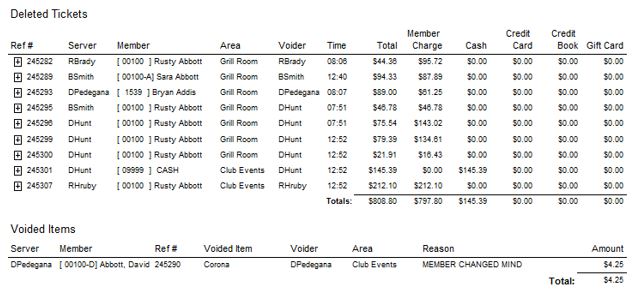
Deleted Tickets/Voided Items
Below Ticket Details is a list of Deleted Tickets and Voided Items for the day. Remember, this is in reference to the specific Batch Location of the particular Batch.
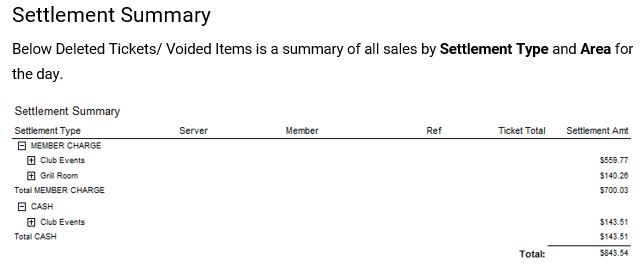
Settlement Summary
Below Deleted Tickets/Voided Items is a summary of all sales by Settlement Type and Area for the day.
Adjust Cash
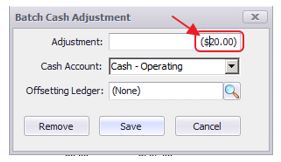
The Adjust Cash feature is used in the event there is a Cash Shortage/Overage for a particular day.
Select Adjust Cash.
Enter the amount of the Shortage/Overage. For Shortages, please enter a negative amount, and for Overages, please enter a positive amount. The Club’s Cash Account will populate by default.
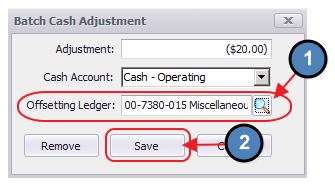
Select the appropriate GL Account to offset the Cash Account. Click Save when finished.
The Batch is automatically updated.
Post the Batch
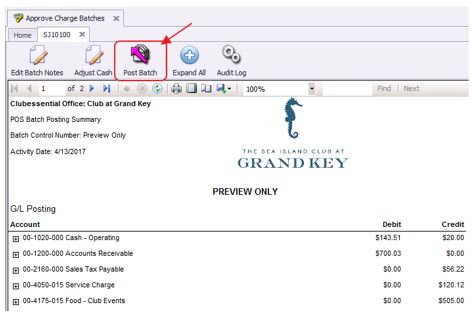
After verifying the GL Posting is correct, select Post Batch. This will post the charge to the Member’s Account and the General Ledger.
Print/Export Batch Report
If necessary, select the Printer Icon to print a paper copy of the Batch Report
To export the Batch Report, select the Disk Icon and select the desired exporting method.
Unpost POS Batch
All POS Batches can be Unposted unless they are flagged within a bank rec, in which case the system will not let the user Unpost the Batch.
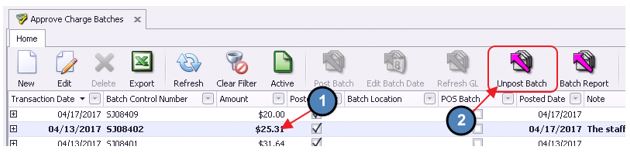
To Unpost a Charge Batch, please:
Navigate to the Membership menu.
Select Approve Charge Batches.
Click to select the Batch that needs Unposted and choose Unpost Batch.
Edit Batch Date
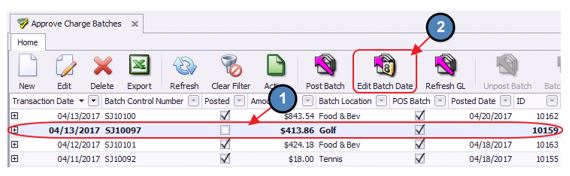
To edit the Transaction Date of a particular Batch of Point of Sale Transactions:
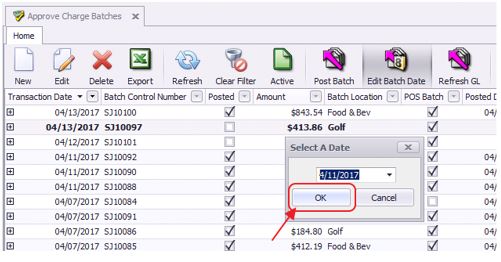
Click to select the appropriate Batch and select Edit Batch Date.
Select the correct date in which the transactions occurred.
Click OK.
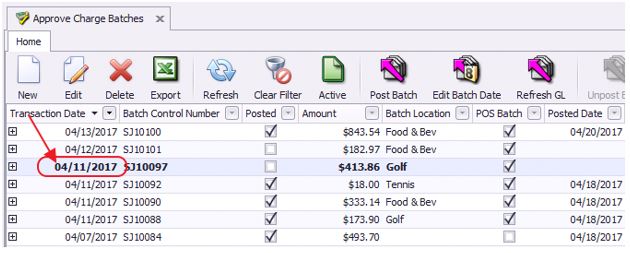
The Transaction Date is automatically changed.
Important: Please note that this feature will change the Transaction Date of all transactions within the Batch. Please also note that this feature can only be utilized with Unposted Batches. If a Posted Batch’s Date needs to be changed, the user will have to Unpost the Batch. For more information on Unposting Batches, please see the Unpost POS Batch section of this document.
Best Practices
Ensure batches are posted promptly in the system to ensure your financial records, and your Member accounts are up to date.
FAQs
Q: Why can’t I un-post a POS Batch?
A. POS batches that have been reconciled in a bank reconciliation, or who’s period has been closed, cannot be unposted.
